Author Archives: مهندس محمدی

آموزش کار با MultiPHP Manager در cpanel
آموزش کار با MultiPHP Manager در cpanel

دوستان عزیز پیشگام وبی امیدوارم که حالتون خوب باشه ، امروز با آموزش کار با MultiPHP Manager در cpanel خدمتتون هستیم و امیدوارم توضیحاتی که در این مطلب و یا در انتها مطلب که بصورت فیلم قرارداده شده بتونه به شما کمک کنه و هر روز بیشتر پیشرفت کنید.

خوب اصلا این قسمت به چه دردی میخوره کجا بهش نیاز داریم و در کل کاربردش چی هست؟

این قسمت برای تغییر پسورد در سی پنل میباشد که با عنوان MultiPHP Manager در قسمت Software موجود میباشد.

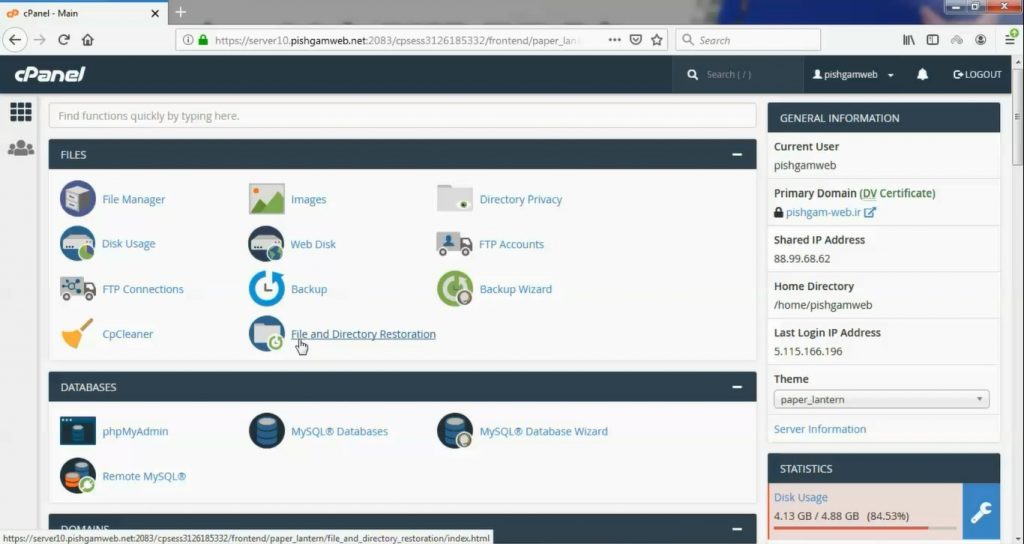
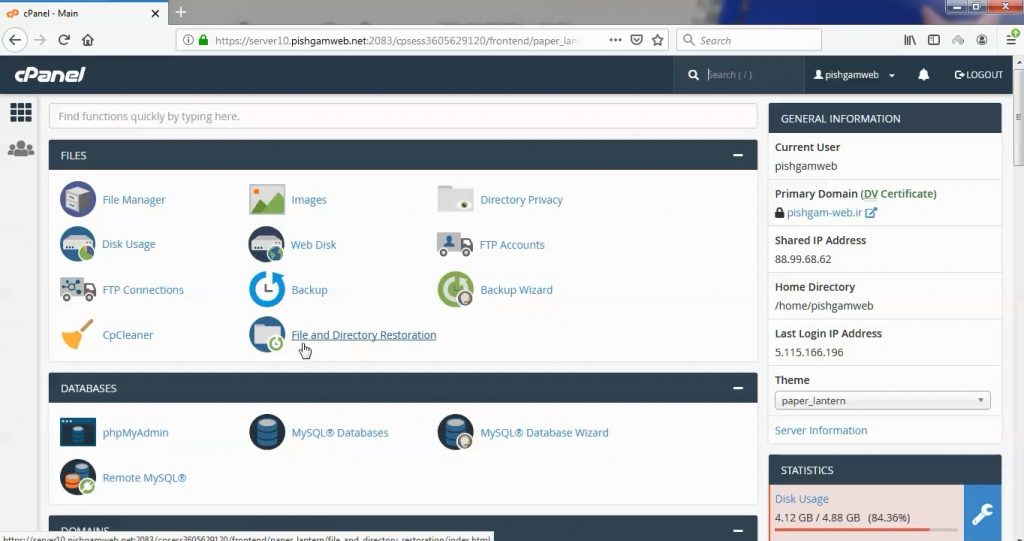
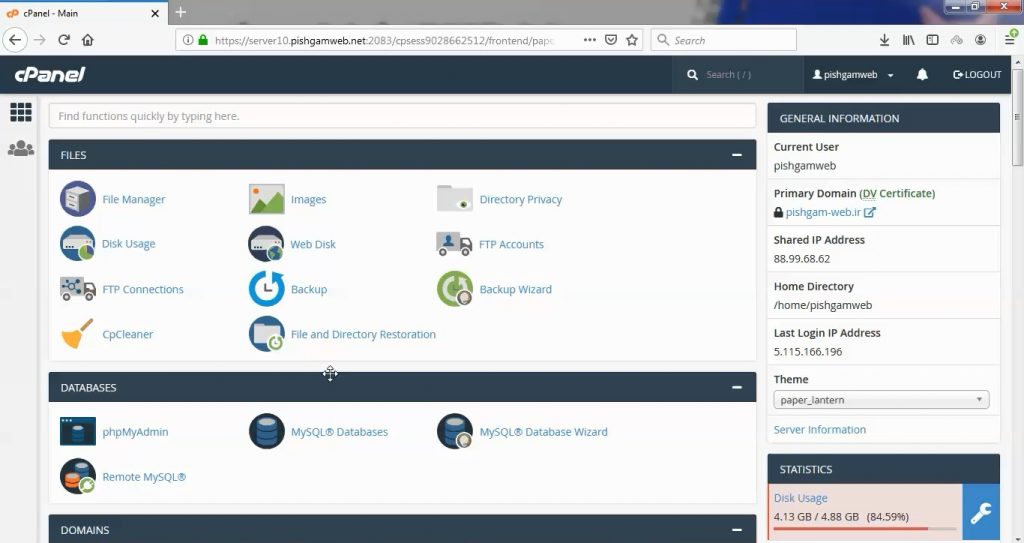
ابتدا وارد هاستمون داخل سایت پیشگام وب میشیم.

میتوانیم از سرویس های من ورود به سی پنل رو میزنید تا بصورت اتوماتیک وارد هاستمون بشیم.
MultiPHP Manager در cpanel

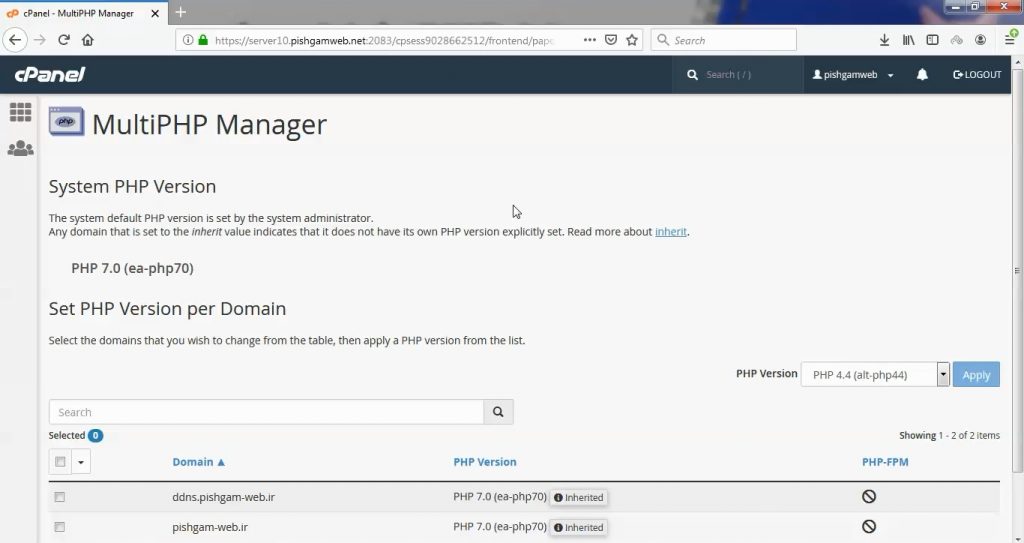
بعد از ورود به قسمت Software و کلیک روی گزینه MultiPHP Manager وارد صفحه زیر میشویم.

ما در این قسمت همانند سلکت پی اچ پی ورژن میتوانیم نسخه پی اچ پی هاست را مشخص کنیم ، فقط با این تفاوت که نسخه پی اچ پی بر اساس دامنه یا ساب دامنه قابل انتخاب میباشد در صورتی که در قسمت سلکت پی اچ پی ورژن بصورت کلی برای تمامی دامنه و ساب دامنه های روی هاست میباشد.

کاربرد این قسمت زمانی میباشد که شما یک اسکریپت دارید که حتما باید با نسخه 5.4 ست شود و یک اسکریپت هم در ساب دامنه یا دامنه دیگری دارید که باید نسخه پی اچ پی آن حداقل 7.0 باشد در غیر اینصورت سایت ناقص لود میگردد.

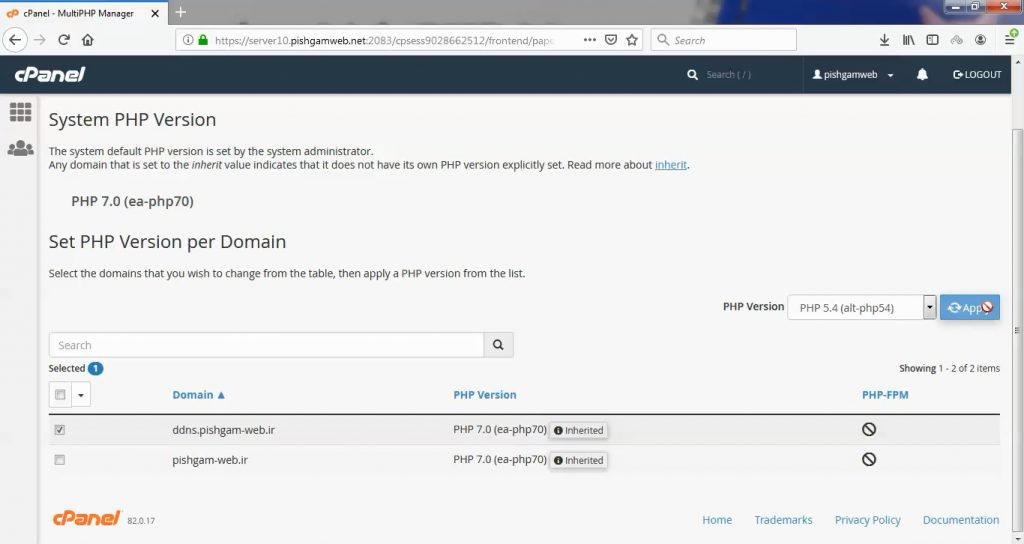
در کنار دامنه ، دامنه مد نظر را انتخاب کرده و در قسمت php version هم نسخه پی اچ پی مورد نظر را مشخص کرده و روی گزینه apply کلیک کنید تا ست شود.

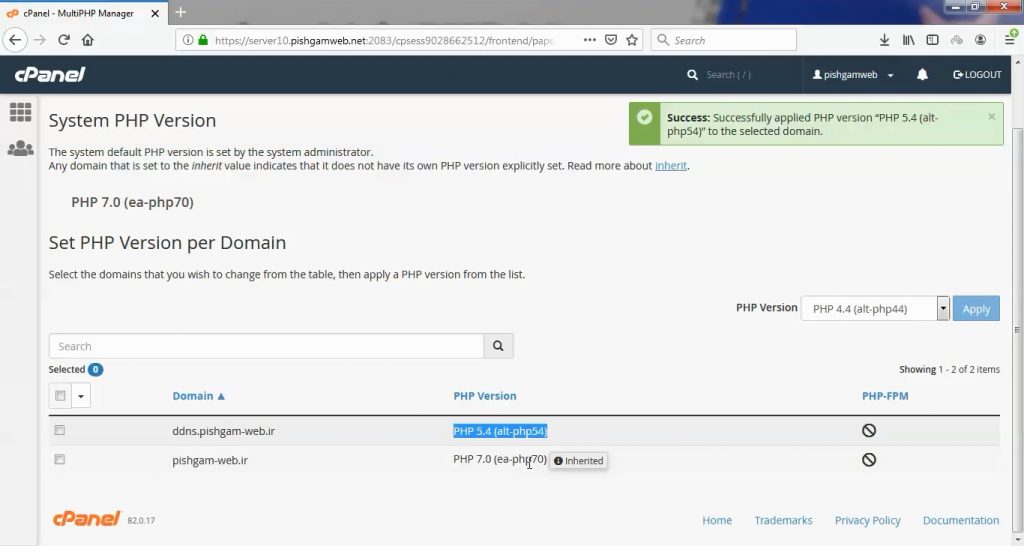
پس از apply در قسمت PHP Version که روبروی دامنه میباشد میتوانید نسخه پی اچ پی که به نسخه مورد نظر شما تغییر کرده است را مشاهده کنید.

مشاهده فیلم آموزشی از سایت آپارات


برای دانلود فیلم آموزش از قسمت تنظیمات روی گزینه دانلود کلیک کرده و کیفیت مد نظر خود را انتخاب کنید تا فیلم آموزش دانلود گردد.

نکته : هر چقدر که عدد این قسمت بیشتر باشد ، کیفیت فیلم دانلودی بالاتر خواهد بود.

آموزش های ابتدایی :

دوستان عزیز آموزش که خدمتتون ارائه کردیم از سری آموزش های ابتدایی پیشگام وب هست و این آموزش جزو پایه ای ترین آموزش های سایت هست امیدوارم که آموزشممون کامل باشه.

منتظر نظرات و پیشنهادات شما در قسمت دیدگاه های سایت هستیم.

learn in cpanel

Overview

cPanel’s MultiPHP Manager interface allows you to easily manage your account’s PHP configuration. In this interface, you can manage the PHP version or pool option of any virtual host.

  • The system PHP version refers to version of PHP that functions as the global default for all accounts. Only the system administrator can set the system PHP version. Any primary domain that is set to Inherit uses the system PHP version. For more information, read our PHP Inheritance documentation.

  • PHP FastCGI Process Manager (PHP-FPM) is an alternative PHP module that allows a website to handle strenuous loads on sites. PHP-FPM maintains pools (workers that respond to PHP requests) to accomplish this. These pools of workers allow the website to handle more requests than it normally could.

List of domains

The list of domains displays the following information:

  • The name of the domain.

  • The PHP version that the domain currently uses.

    Note:

    In EasyApache 4, each domain or virtual host can use any currently-installed PHP version or currently-installed PHP-FPM setting.


  • The Inherited label, if the domain inherits its PHP version from the system PHP version.

  • A PHP-FPM enabled () or disabled () indicator.

    Note:
    • Parked domains represent aliases for a primary domain. The system does not list parked domains.
    • System administrators can enable or disable PHP-FPM through WHM’s MultiPHP Manager interface (WHM >> Home >> Software >> MultiPHP Manager).


Use the Search text box to search domains by domain name or account name.

Set the PHP version for a domain

Note:

EasyApache 4 supports PHP versions 5.4 through 5.6, PHP versions 7.0 through 7.4, and PHP 8.0. The cPanel default profile includes PHP versions 7.2, 7.3, and 7.4.

To change a domain’s PHP version, perform the following steps:

  1. Select the checkbox for the domain that you wish to change.

  2. Select the desired version of PHP from the PHP Version menu. To always use the system default, select inherit.

    Note:
    • If the system administrator recommends any PHP versions, the menu will display the Recommended label next to them.

    • If you set your PHP version to inherit, the system will not allow you to set PHP-FPM. You must select a PHP version other than inherit to enable PHP-FPM on a domain.

    • If the PHP version that you want to use does not appear, that PHP version is either not installed on the server or is not available for your account.

    • If your system administrator limited your domain’s PHP version, then you cannot use this interface to restore the domain’s PHP version to its original version.


  3. Click Apply. The system will change the selected domain’s PHP version.

    Note:
    • When you change the PHP version for your domain and FPM is enabled, the system changes your FPM version to match the PHP version. If FPM is not enabled on your domain, the system changes the PHP and FPM versions separately.

    • If you enable FPM on your primary domain and then change that domain’s name, the system will disable FPM for the new domain. Your system administrator or hosting provider must reenable FPM on the new domain if you wish to use FPM for the new domain.


More:

For more information regarding PHP versions and installation, read our How to Locate and Install a PHP Version of Extension documentation.

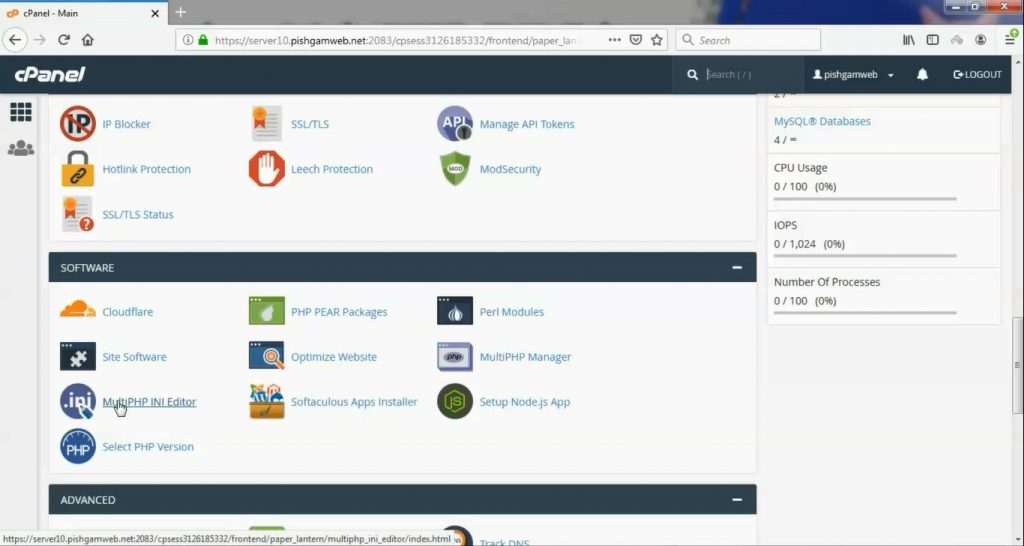
آموزش کار با MultiPHP INI Editor در cpanel

آموزش کار با MultiPHP INI Editor در cpanel

دوستان عزیز پیشگام وبی امیدوارم که حالتون خوب باشه ، امروز با آموزش کار با MultiPHP INI Editor در cpanel خدمتتون هستیم و امیدوارم توضیحاتی که در این مطلب و یا در انتها مطلب که بصورت فیلم قرارداده شده بتونه به شما کمک کنه و هر روز بیشتر پیشرفت کنید.

خوب اصلا این قسمت به چه دردی میخوره کجا بهش نیاز داریم و در کل کاربردش چی هست؟

این قسمت برای تغییر پسورد در سی پنل میباشد که با عنوان MultiPHP INI Editor در قسمت Software موجود میباشد.

ابتدا وارد هاستمون داخل سایت پیشگام وب میشیم.

میتوانیم از سرویس های من ورود به سی پنل رو میزنید تا بصورت اتوماتیک وارد هاستمون بشیم.
MultiPHP INI Editor در cpanel

این مورد دقیقا مشابه سلکت پی اچ پی ورژن در همین بخش میباشد ، البته با این تفاوت که دقت تنظیمات بیشتر میباشد و میتوانیم کدهای اختصاصی خود را هم اجرا کنیم.

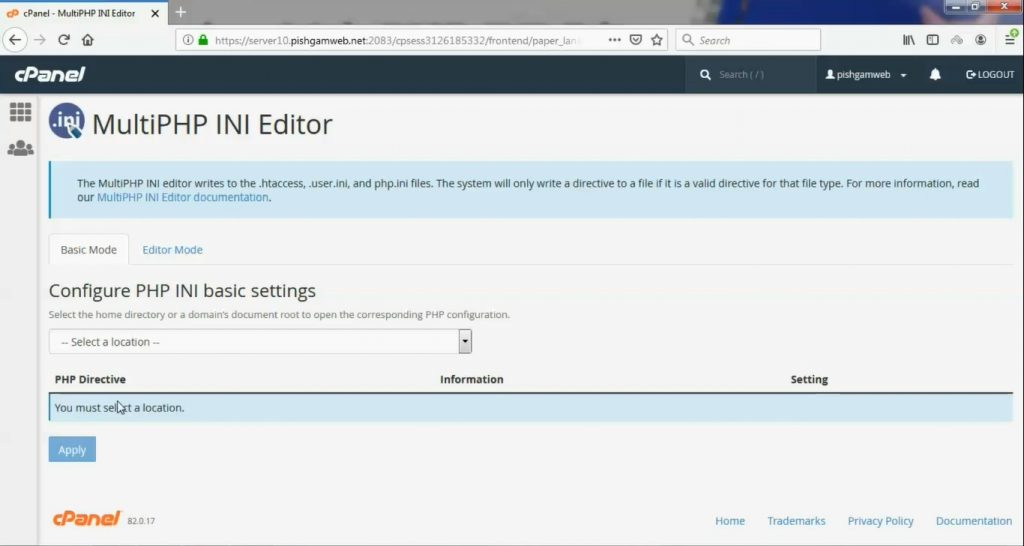
بعد از ورود به قسمت MultiPHP INI Editor در سی پنل با صفحه زیر روبرو میشود.

ابتدا قسمت Basic Mode توضیح داده میشود.

در قسمتSelect the home directory or a domain’s document root to open the corresponding PHP configuration. دامنه مورد نظر خود را انتخاب میکنیم.

موارد مهم در این قسمت توضیح داده میشود.

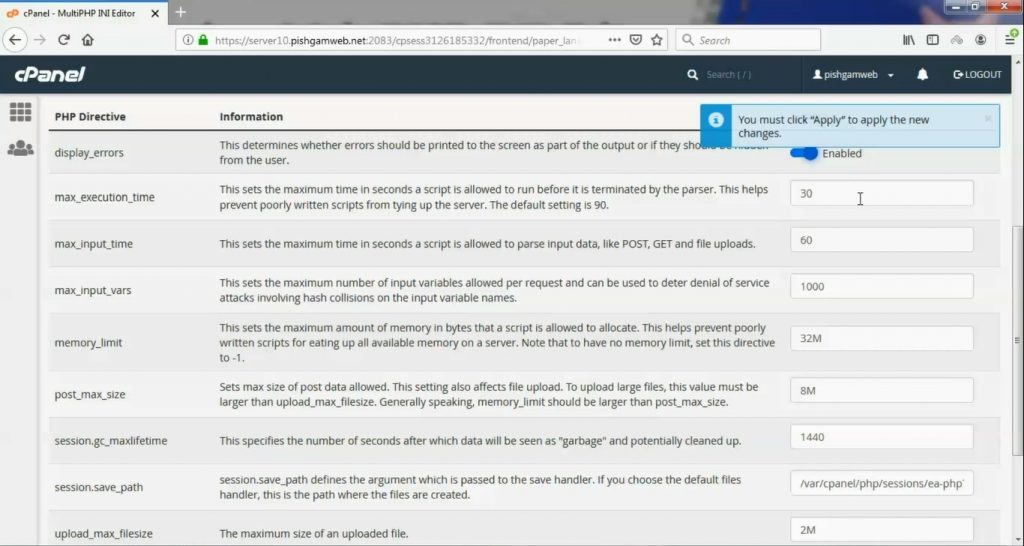
سپس تنظیمات برای شما باز میشود در قسمت display_errors روی دکمه کلیک کنید حالت Enabled گردد.

در سه مورد اول تایم اوت را میتوانید افزایش دهید ، اگر مشکلی ندارید پیشنهاد میشود این قسمت حالت دیفالت باقی بماند. max_execution_time – max_input_time – max_input_vars

در قسمت memory_limit میتوانید مموری هاست خود را به مقدار دلخواه افزایش دهید.

در قسمت post_max_size ماکزیمم حجم پست های وب سایت خود را مشخص میکنید.

در قسمت upload_max_filesize ماکزیمم حجم فایل های آپلودی از قبیل قالب ها ، افزونه ها و رسانه ها را مشخص میکنید.

در انتها حتما باید گزینه apply را بزنید تا تنظیمات ذخیره گردد.

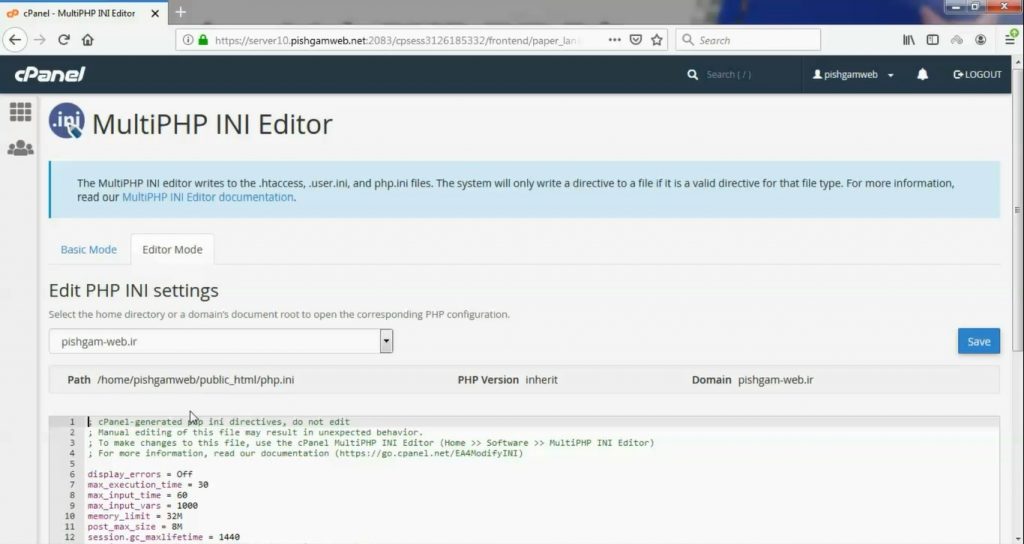
سپس به قسمت Editor Mode میریم.

بعد از انتخاب دامنه مطابق قسمت Basic Mode کد ها در کادر پایین مشخص شده و شما هم میتوانید کد مورد نظر خود را اضافه کنید.

در انتها حتما باید گزینه save را بزنید تا تنظیمات ذخیره گردد.

مشاهده سایت از سایت آپارات

برای دانلود فیلم آموزش از قسمت تنظیمات روی گزینه دانلود کلیک کرده و کیفیت مد نظر خود را انتخاب کنید تا فیلم آموزش دانلود گردد.

نکته : هر چقدر که عدد این قسمت بیشتر باشد ، کیفیت فیلم دانلودی بالاتر خواهد بود.

آموزش های ابتدایی :

دوستان عزیز آموزش که خدمتتون ارائه کردیم از سری آموزش های ابتدایی پیشگام وب هست و این آموزش جزو پایه ای ترین آموزش های سایت هست امیدوارم که آموزشممون کامل باشه.

منتظر نظرات و پیشنهادات شما در قسمت دیدگاه های سایت هستیم.

learn in cpanel

Overview

This interface allows you to configure your PHP settings.

Note:

WHM users can view information about the server’s PHP INI settings in WHM’s MultiPHP INI Editor interface (WHM >> Home >> Software >> MultiPHP INI Editor).

MultiPHP INI Editor

Select the location that you wish to configure from the menu. You can edit either the account’s home directory or the domain’s document root. The PHP directives will appear.

Basic Mode

The Basic Mode section of this interface loads directive values from the php.ini file for your selected domain or home directory. Make your changes to the desired directives and click Apply. The system saves changes to the php.ini file, the user.ini file, and your .htaccess file.

Important:

If you use the DSO PHP handler and you change your PHP version to a different major PHP version, the system will not read your configuration changes. cPanel & WHM does not support the DSO PHP handler with PHP 8.

For example, if you change your PHP version from PHP 5 to PHP 7, the system will not read your configuration changes. To correct this issue, you must edit and save your PHP configuration again in the interface. The system will then load the .htaccess directives correctly.

Note:
  • For security purposes, we strongly recommend that you use the cPanel-provided default values.
  • The availability of directives depends on your version of PHP. If a directive does not appear in your interface, your version of PHP does not support it.
  • The system only writes a directive to an .ini or .htaccess file if that file supports the directive. Your php.ini, .user.ini, and .htaccess files may not be identical. For more information about which files support which directives, read PHP’s documentation.
  • To ensure compatibility with the LSAPI module, the system also adds an LSAPI section to your .htaccess file. This section might resemble the following example:
    1
    2
    3
    4
    5
    
    <IfModule lsapi_module>
      php_value date.timezone "America/Chicago"
      php_value memory_limit 128M
      php_value upload_max_filesize 60M
    </IfModule>

Editor Mode

Select the location that you wish to configure from the menu. You can edit either the user account’s home directory or the domain’s document root. The PHP directives will appear.

Warning:
  • You must exercise extreme caution when you make changes in this interface. Errors could result in non-functional PHP scripts. Only advanced users should use this interface.
  • We restrict the following words and you cannot use them as directives: null, yes, no, true, false, on, off, and none. Directives also cannot contain any the following special characters: ?{}|&~![()^"
  • The following values set the directive value to "": null, off, no, and false.
  • The following values set the directive value to 1: on, yes, and true.

The Editor Mode section of this interface loads the contents of the php.ini file for your selected domain, if it exists. If the php.ini file does not exist, the interface loads a blank editor so that you can create your own file. Make your changes to the desired directives and click Save.

The system saves changes to both the php.ini file in the Path section of the interface and the .user.ini file. The system also saves these changes to your .htaccess file.

To ensure compatibility with the LSAPI module, the system also adds an LSAPI section to your .htaccess file. This section might resemble the following example:

1
2
3
4
5
<IfModule lsapi_module>
      php_value date.timezone "America/Chicago"
      php_value memory_limit 128M
      php_value upload_max_filesize 60M
</IfModule>

For example, the location of your file may be the /home/allthethings/public_html/php.ini file. The interface attempts a rudimentary validation of directive names. This does not guarantee that your PHP configuration will function. To reset your PHP settings to default values, delete the domain’s or home directory’s php.ini file.

Important:

If you use the DSO PHP handler, the system will not read your configuration changes if you change your PHP version to a different major PHP version. cPanel & WHM does not support the DSO PHP handler with PHP 8.

For example, if you change your PHP version from PHP 5 to PHP 7, the system will not read your configuration changes. To correct this issue, you must edit and save your PHP configuration again in the interface. The system will then load the .htaccess directives correctly.

Note:

The system only writes a directive to an .ini or .htaccess file if that file supports the directive. Your php.ini, .user.ini, and .htaccess files may not be identical. For more information about which files support which directives, read the PHP documentation.

For more information about a directive, search the php.net documentation.

آموزش کار با Softaculous Apps Installer در cpanel

آموزش کار با Softaculous Apps Installer در cpanel

دوستان عزیز پیشگام وبی امیدوارم که حالتون خوب باشه ، امروز با آموزش کار با Softaculous Apps Installer در cpanel خدمتتون هستیم و امیدوارم توضیحاتی که در این مطلب و یا در انتها مطلب که بصورت فیلم قرارداده شده بتونه به شما کمک کنه و هر روز بیشتر پیشرفت کنید.

خوب اصلا این قسمت به چه دردی میخوره کجا بهش نیاز داریم و در کل کاربردش چی هست؟

این قسمت برای تغییر پسورد در سی پنل میباشد که با عنوان Softaculous Apps Installer در قسمت Software موجود میباشد.

ابتدا وارد هاستمون داخل سایت پیشگام وب میشیم.

میتوانیم از سرویس های من ورود به سی پنل رو میزنید تا بصورت اتوماتیک وارد هاستمون بشیم.

Softaculous Apps Installer در cpanel

بعد از رفتن به قسمت Software و ورود به Softaculous Apps Installer با صفحه زیر روبرو خواهید شد.

حدود 1 عدد اسکریپت در این قسمت برای نصب وجود دارد و همچنین میتوانید دمو برخی از همین اسکریپت ها را قبل از نصب مشاهده کنید هم خود وبسایت و هم پنل مدیریت سایت.

اگر سایت معمولی و فروشگاهی نیاز دارید پشنهاد ما به شما وردپرس میباشد.

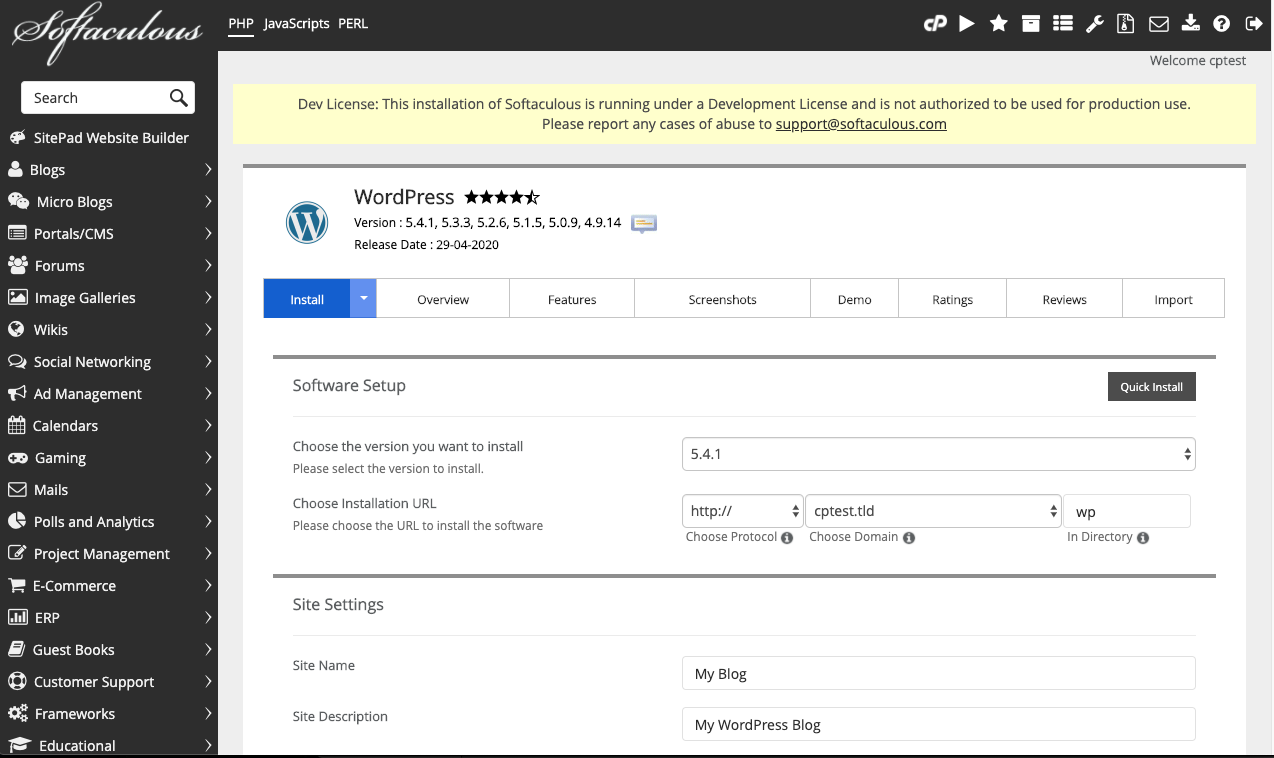
بعد از کلیک بر روی install که بطور مثال وردپرس کلیک شده صفحه ای بصورت زیر باز میشود که پس از وارد کردن اطلاعات و کلیک روی گزینه install نصب تکمیل میشود.

در قسمت اول ورژن وردپرس را انتخاب میکنیم که بهترین گزینه بالاترین نسخه میباشد.

در پایین تر آدرس جایی که میخواهید نصب انجام بشه رو قرار میدیم ، در کادر سمت راست که نوشته wp اون رو حذف نکنید در اون پوشه نصب میشه بهتر هست حذف کنید البته اگر روی صفحه اصلی سایت ، فایلی ندارید.

در قسمت site name اسم سایتتون رو نوشته و در مورد پایین تر توضیحات سایت در قسمت user باید یوزر ورود به مدیریت را مشخص کنید که بهتر هست admin نباشد و در قسمت پسورد ، پسورد دلخواهد خود را وارد کرده و در قسمت ایمیل هم ایمیل خود را وارد کرده و روی گزینه install کلیک کنید.

مشاهده فیلم آموزشی از وب سایت آپارات


برای دانلود فیلم آموزش از قسمت تنظیمات روی گزینه دانلود کلیک کرده و کیفیت مد نظر خود را انتخاب کنید تا فیلم آموزش دانلود گردد.

نکته : هر چقدر که عدد این قسمت بیشتر باشد ، کیفیت فیلم دانلودی بالاتر خواهد بود.

آموزش های ابتدایی :

دوستان عزیز آموزش که خدمتتون ارائه کردیم از سری آموزش های ابتدایی پیشگام وب هست و این آموزش جزو پایه ای ترین آموزش های سایت هست امیدوارم که آموزشممون کامل باشه.

منتظر نظرات و پیشنهادات شما در قسمت دیدگاه های سایت هستیم.

learn in cpanel

What is Softaculous?

Softaculous is an auto-installer that makes installing web apps easier. Softaculous provides hundreds of scripts to install some of the most popular hosting software in the industry on your cPanel server.  They also provide automatic updates through their service, to help keep sites secure, and add new software to their library of scripts fairly regularly.

Why Use Softaculous With cPanel?

For some users, installing software on a server with the command line can seem intimidating.  Softaculous provides a graphical interface with trusted scripts to make installation easier.  As a web host, with just a few clicks, you can empower your web hosting customers to manage their own software and trust that it will be kept up to date. 

Including Softaculous as part of your hosting packages can enhance your services without adding significant cost. Their free plan includes 59 popular scripts, and their paid plans include over 200, making it easy for your users to install the software packages they desire most on their own cPanel & WHM servers. 

If you have your own server that doesn’t include Softaculous, you can also install it yourself to provide quality-of-life improvements for your own server administration. Softaculous provides step-by-step documentation for installing Softaculous on the command line.

How to Install Softaculous on Your cPanel

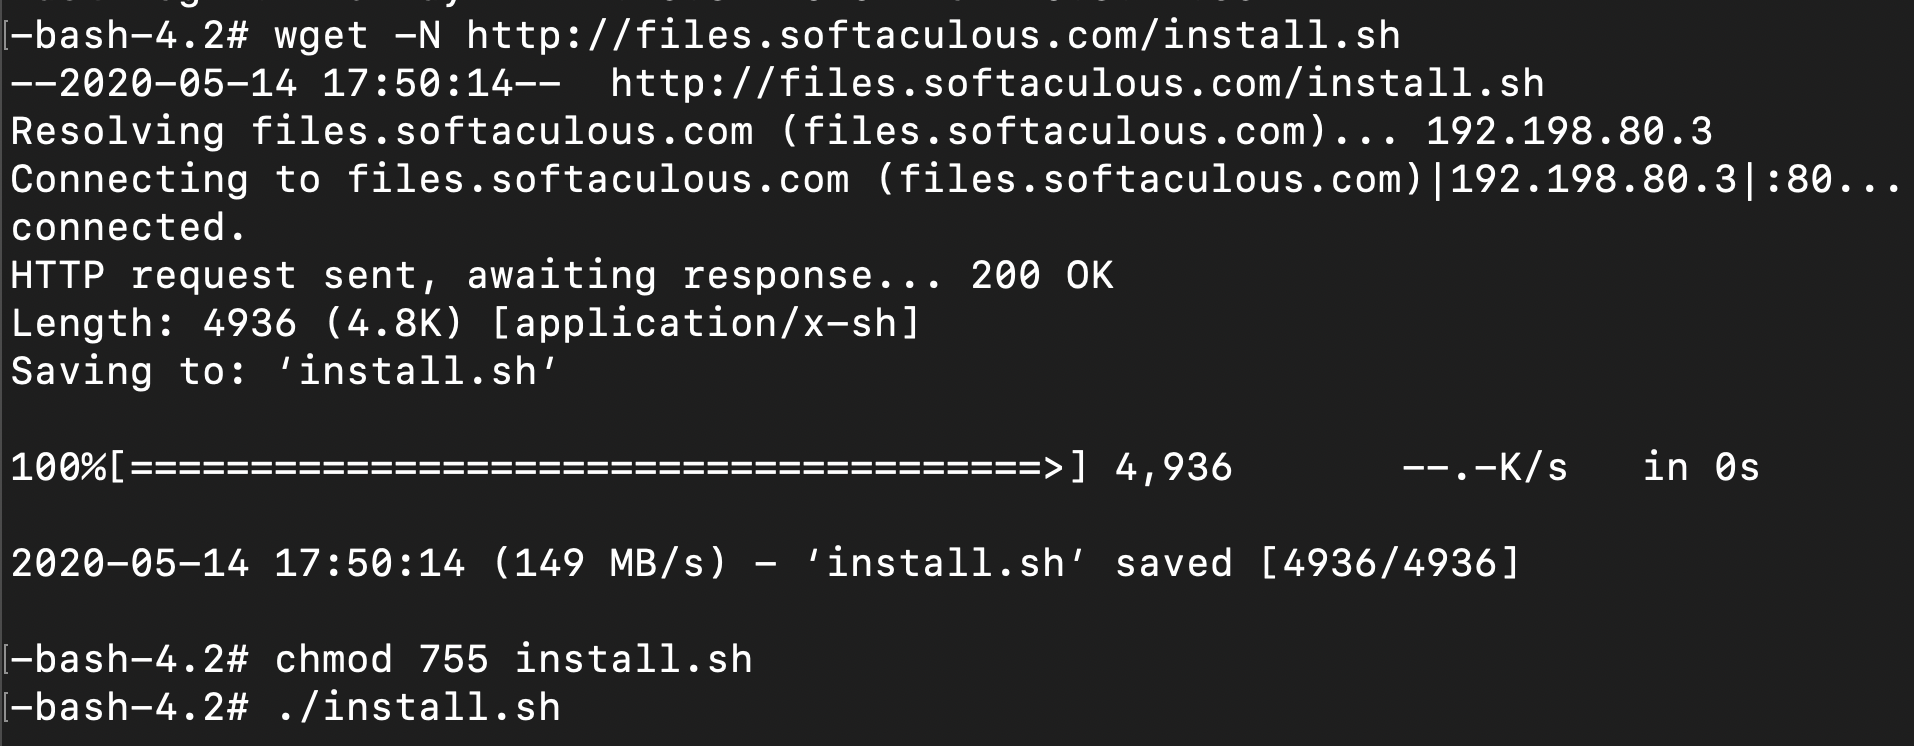
Installing Softaculous from scratch requires root access via SSH to your server, if it isn’t preinstalled by your hosting provider. Softaculous provides an installation guide with specific instructions. Once you have connected via SSH, execute the following commands:

  1. wget -N http://files.softaculous.com/install.sh
  2. chmod 755 install.sh
  3. ./install.sh

It will look something like this when it installs: 

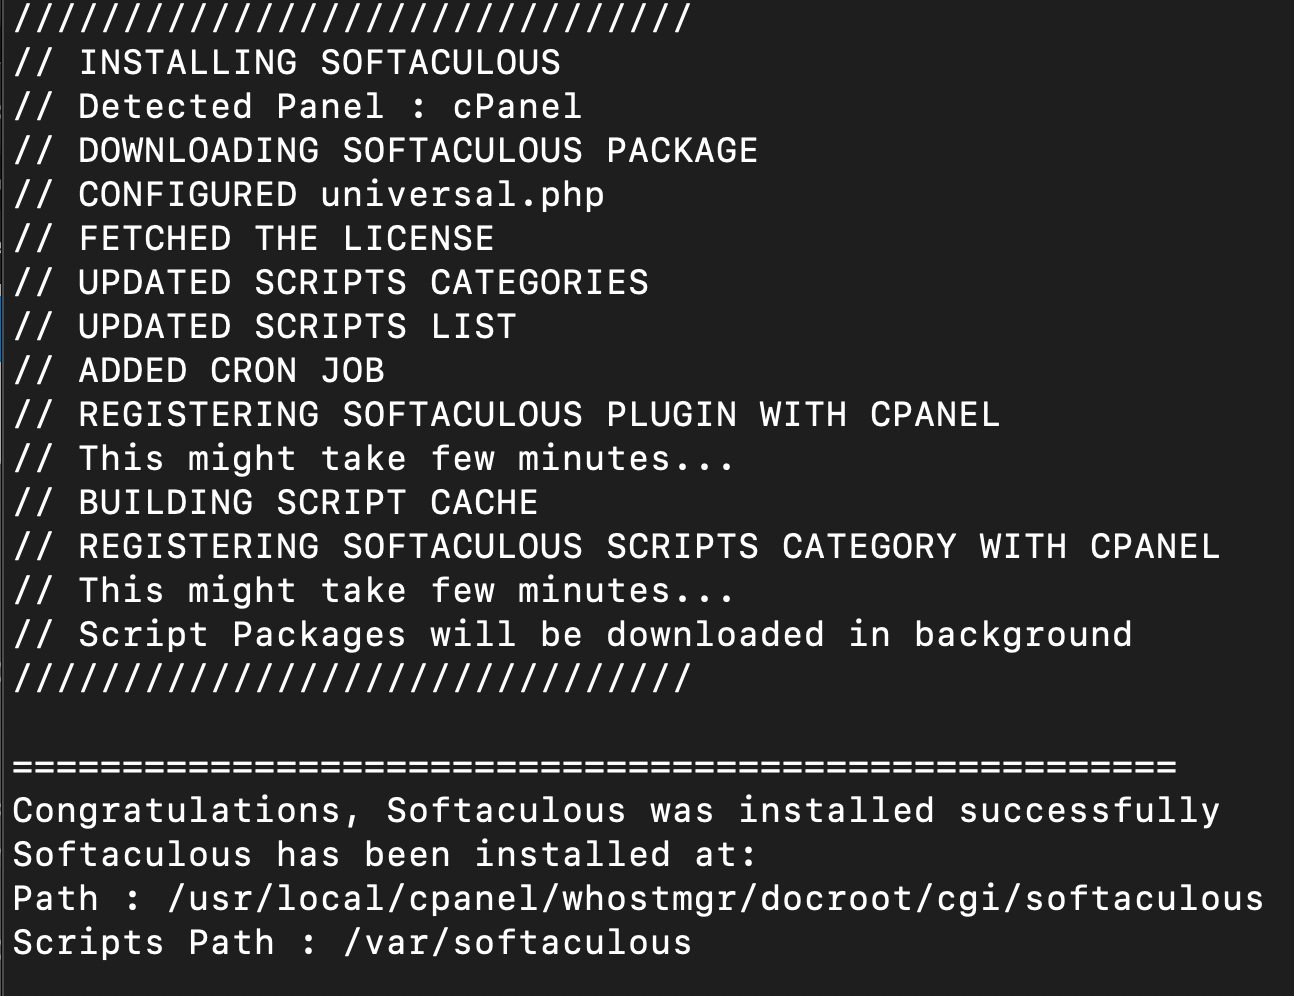
Important note: You must have ionCube Loaders enabled via WHM in the Tweak Settings interface. Find the ionCube Loader in the backend copy of PHP to enable it. 

Once the installation file has successfully downloaded and executed, you will see the installation screen, which looks something like this: 

You should now be able to access the Softaculous interface on your server.

Using Softaculous to Install WordPress

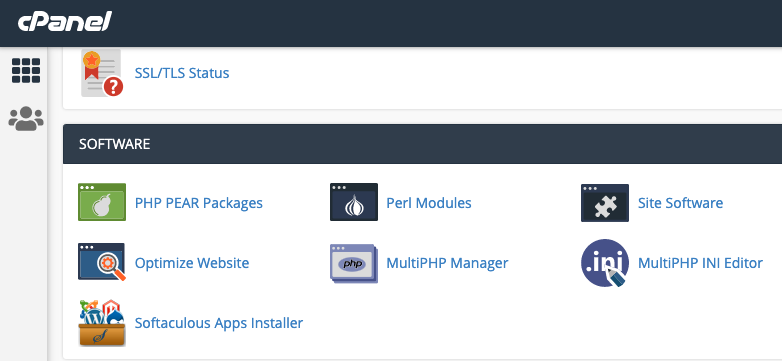
If you log in to WHM, you can specify which scripts are available to your users, but you cannot install any software. You will need to log in to cPanel (not WHM) to install WordPress using Softaculous. In cPanel, Softaculous Apps Installer can be found under “software” or by searching for Softaculous. 

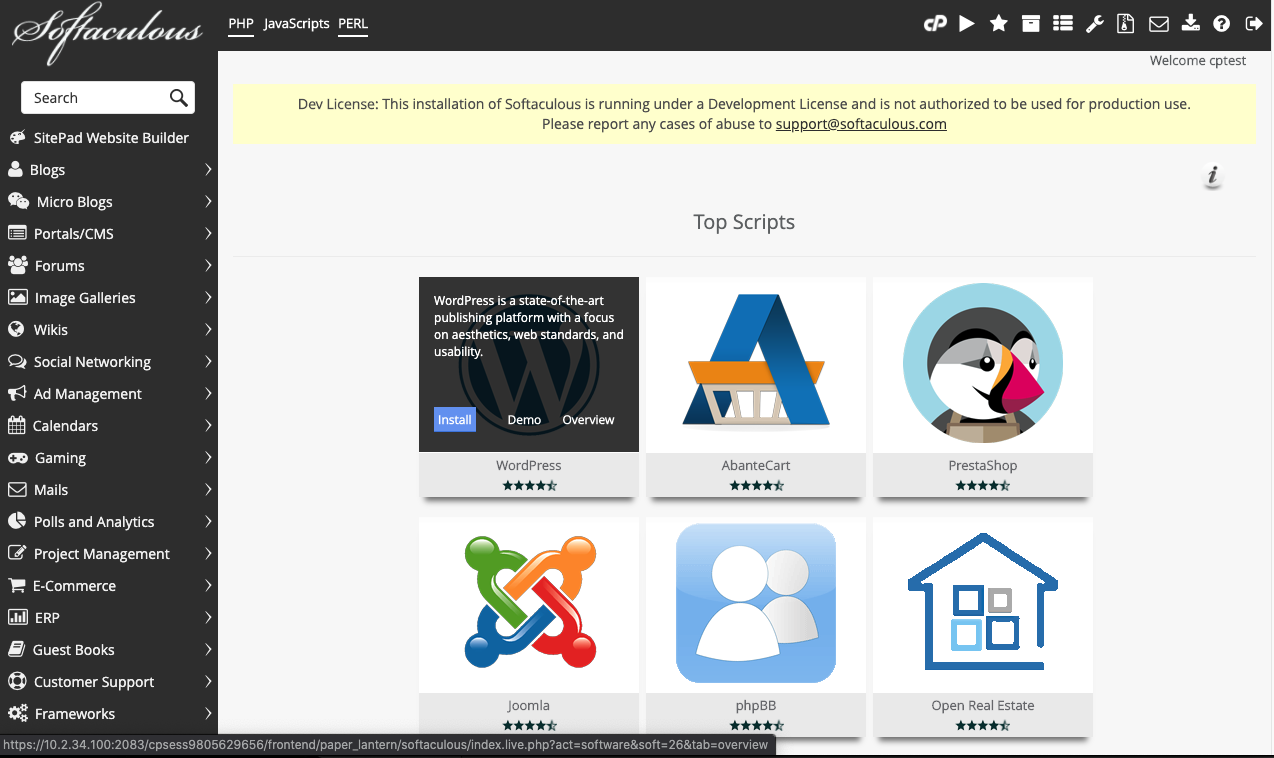
Softaculous is very easy to use.  It has multiple layers of settings you can customize to suit your needs, and it allows you to install hundreds of software titles with just a click and a few simple steps. If you hover over the software you wish to install, in this case WordPress, it will display information about the application and an install button.  Click the install button. 

Once you’ve clicked Install, it will walk you though the options for your WordPress site.  You can choose to hit the “quick install” button to use some generic presets that can be changed later, or you can specify the options on the screen, including site name and base theme, before clicking Install at the bottom. 

With a few easy clicks, you will have your site up and running. 

Softaculous is a Powerful Addition for your cPanel

Throughout this process, we’ve shown that using Softaculous can be advantageous for both independent server owners and web hosting providers alike. They are known to provide quality, timely support, and keep their products up-to-date. It’s a robust tool that offers excellent improvements to make server management easier with automatic updates and one-click installations.  If you’d like to join the discussion about this blog or any others, we can be reached on Discord, Reddit, and our cPanel Forums, as well as on Twitter, Facebook, Instagram and LinkedIn.   

آموزش کار با Setup Node.js App در cpanel

آموزش کار با Setup Node.js App در cpanel

دوستان عزیز پیشگام وبی امیدوارم که حالتون خوب باشه ، امروز با آموزش کار با Setup Node.js App در cpanel خدمتتون هستیم و امیدوارم توضیحاتی که در این مطلب و یا در انتها مطلب که بصورت فیلم قرارداده شده بتونه به شما کمک کنه و هر روز بیشتر پیشرفت کنید.

خوب اصلا این قسمت به چه دردی میخوره کجا بهش نیاز داریم و در کل کاربردش چی هست؟

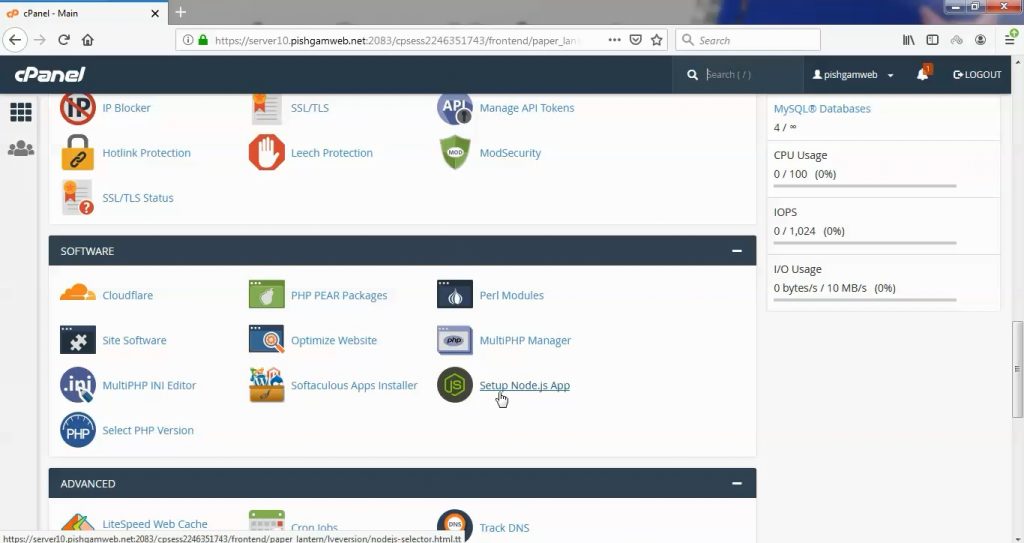
این قسمت برای تغییر پسورد در سی پنل میباشد که با عنوان Setup Node.js App در قسمت Software موجود میباشد.

ابتدا وارد هاستمون داخل سایت پیشگام وب میشیم.

میتوانیم از سرویس های من ورود به سی پنل رو میزنید تا بصورت اتوماتیک وارد هاستمون بشیم.

Setup Node.js App در cpanel

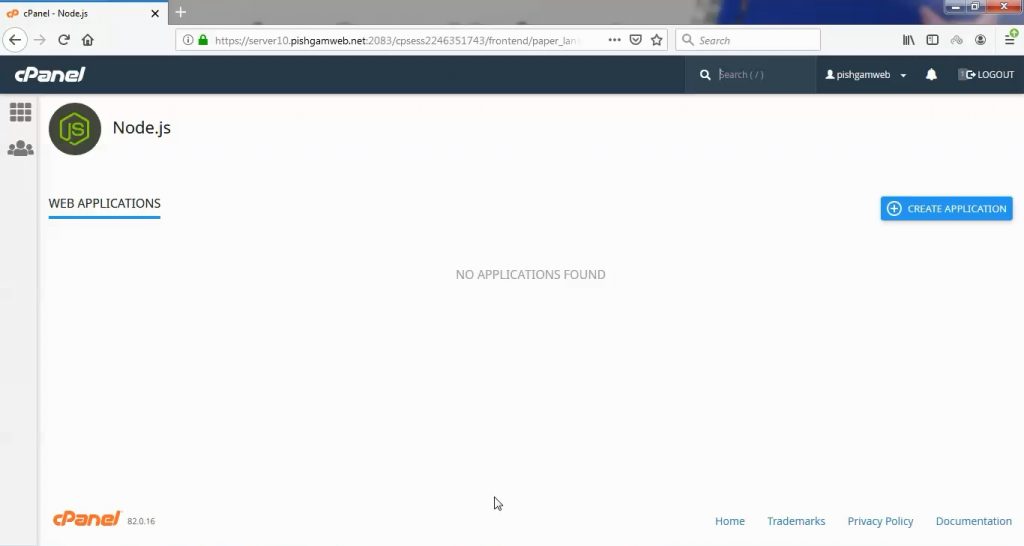
بعد از ورد به هاست به قسمت Software بروید و روی Setup Node.js App گزینه کلیک کنید.

سپس در صفحه باز شده روی گزینه Create application کلیک کنید تا پروژه جدید معرفی کنیم.

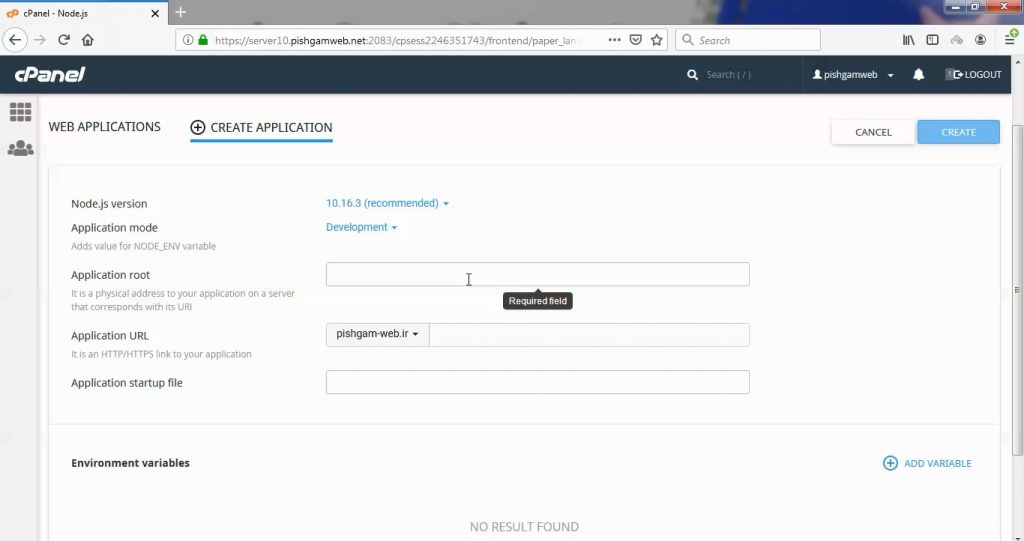
در صفحه باز شده اطلاعات را بصورت زیر وارد کنید.

Node.js version : ورژن پوژه را مشخص کنید.

Application mode : نوع پروژه را مشخص کنید.

Application root : محل ذخیره کردن پروژه در هاست را مشخص کنید.

Application URL : لینک سایت رو وارد کنید.

Application startup file : اسم فایل اجرایی پروژه را در این قسمت مشخص کنید.

فایل های پروژه را از قسمت فایل منیجر در پوشه مد نظر آپلود کنید.

مشاهده فیلم آموزش از سایت آپارات


برای دانلود فیلم آموزش از قسمت تنظیمات روی گزینه دانلود کلیک کرده و کیفیت مد نظر خود را انتخاب کنید تا فیلم آموزش دانلود گردد.

نکته : هر چقدر که عدد این قسمت بیشتر باشد ، کیفیت فیلم دانلودی بالاتر خواهد بود.

آموزش های متوسطه :

دوستان عزیز آموزش که خدمتتون ارائه کردیم از سری آموزش های ابتدایی پیشگام وب هست و این آموزش جزو آموزش های متوسطه هست که باعث میشه شما بتونید سایتتون رو بهتر از قبل مدیریت کنید.

این آموزش ها به شما کمک میکنه تا به مرور زمان به یک طراح سایت تبدیل بشید و اون رو به عنوان شغل خودتون انتخاب کنید و اگر هم قصد ندارید به عنوان شغل بهش نگاه کنید میتوانید پشتیبانی سایت خودتان را در دست بگیرید.

learn in cpanel

How to Host a Node.JS Application With cPanel

Node.js hosting was once a complicated business, especially on multi-user web hosting servers. However, with cPanel & WHM’s Application Manager, installing JavaScript applications and configuring Node.js environments is a breeze, empowering web hosts to offer intuitive Node.js hosting services with an easy-to-use graphical interface. 

In this article, we explain how to activate cPanel’s Application Manager and how to install, register, and manage Node.js applications. 

Getting Started With the cPanel Application Manager

cPanel users can register Node.js applications and associate them with a domain in Application Manager.  To offer this feature to hosting users, server administrators should first install a handful of support packages and ensure that Application Manager is activated.

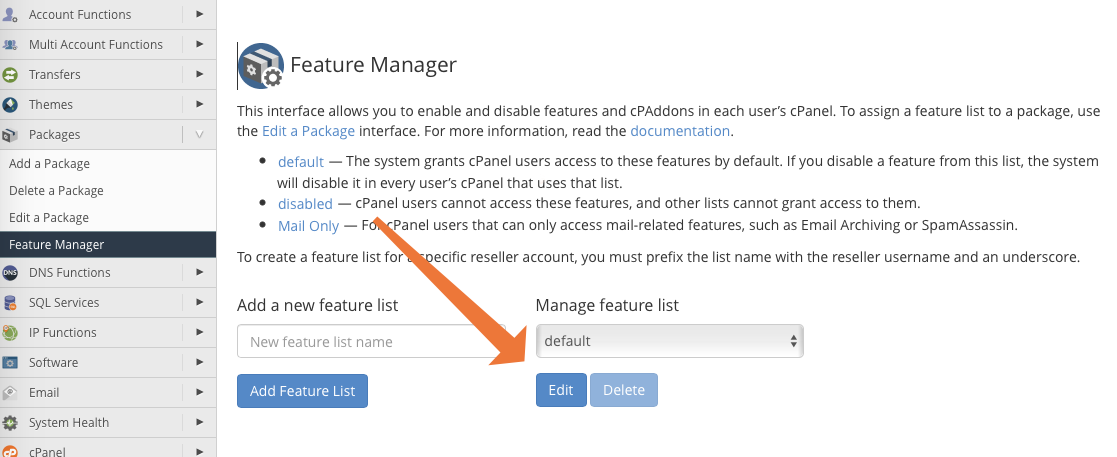
We’ll use WHM’s Feature Manager to turn on Application Manager.  Open Feature Manager, which is under Packages in the WHM sidebar menu. 

Click the Edit button under Manage Feature List with the Default list selected in the dropdown menu. 

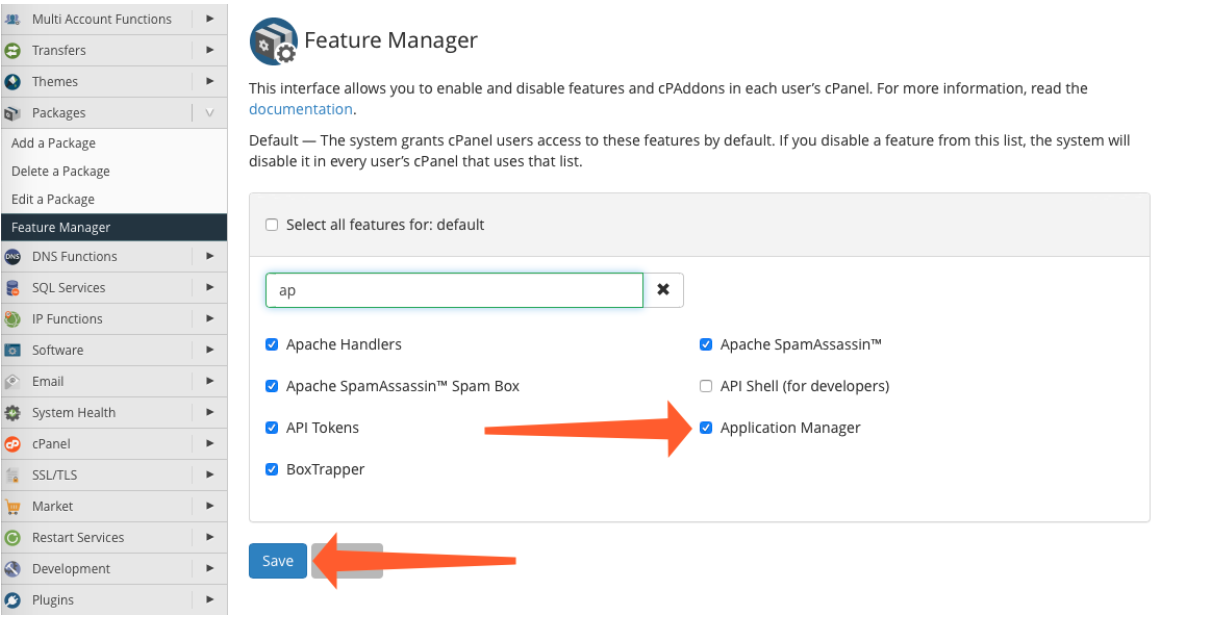
Enter Application Manager in the search field, and verify that its entry in the feature list is checked. If it isn’t, click the adjacent box and then Save at the bottom of the page. 

Next, we’ll install the software that allows cPanel to run and manage Node.js applications, including the mod_passenger app server and EasyApache4’s Node environment. You will need to log in as root with SSH to install the software:

yum install ea-ruby24-mod_passenger ea-apache24-mod_env ea-nodejs10

Application Manager is now available in user cPanel accounts and ready to host Node.js applications. 

Creating an Application in the cPanel Application Manager

Hosting applications with cPanel is a two-step process:

  1. Install the app on the server. 
  2. Register it with Application Manager.

We’ll look at registering an application in the next section, but first we need to install it on the server. Users of the Git™ version control system could clone a repository with its command-line client or cPanel’s Git Version Control interface. However, to illustrate the process, we’ll create a simple single-file application.

Log in with SSH as a cPanel user and create a new directory in their home directory. 

mkdir nodejsapp

You can call the directory anything you want. This is where your app’s code files will live. Create a file called app.js in this directory with your preferred text editor. cPanel expects the application’s entry point to be called app.js, so it’s best to stick with the standard naming convention unless you have a good reason to change it

Paste the following code and save the new file. 

const http = require('http')
const hostname = '127.0.0.1';
const port = 3000;

const server = http.createServer((req, res) => {
  res.statusCode = 200;
  res.setHeader('Content-Type', 'text/plain');
  res.end('Hello World! I am your new NodeJS app! \n');
});

server.listen(port, hostname, () => {
  console.log(`Server running at http://${hostname}:${port}/`);
});

The code sets up an HTTP server on port 3000. It responds to web requests with the message: “Hello World! I am your new NodeJS app!”  

We could go straight to the registration step, but let’s make sure the app works first. Run the following command, which executes our mini-app with EasyApache’s Node.js installation. 

/opt/cpanel/ea-nodejs10/bin/node app.js

All being well, you will see a message that says:

Server running at http://127.0.0.1:3000

Finally, open a new terminal window and log in to your server as the same cPanel user. We’ll use the curl HTTP client to send the app a request. 

curl http://127.0.0.1:3000

If it responds with “’Hello World! I am a NodeJS app on cPanel,” you can move on to the next stage: registering your Node.js app with cPanel. 

Registering Your Node.JS Application in the cPanel Application Manager

Registering tells the Passenger app manager and cPanel where to find your application and which domain you would like to use. 

In cPanel, open the Application Manager, which you’ll find under Software on the main page. 

Click the Register Application button.

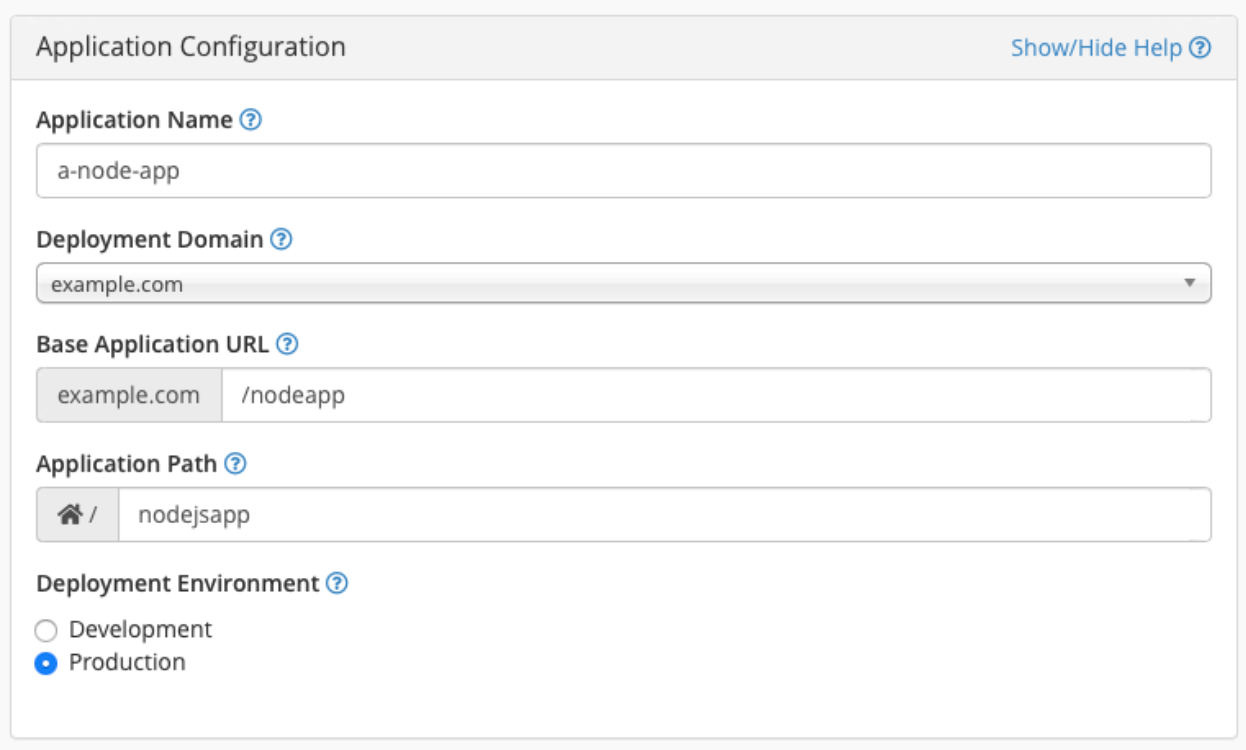
In the Application Configuration table, we need to provide four pieces of information:

  • Application Name: A display name for the application. You can choose any name, but it must start with a number or letter, and it can’t contain periods.
  • Deployment Domain: The app’s domain name. The domain must already be associated with the cPanel account. 
  • Base Application URL: The app’s home page will be available at the deployment domain + the base URL. For example, if the Deployment Domain is “example.com” and you enter “nodeapp” in this field, the app will be served from “example.com/nodeapp.” The URL extension does not have to be the same as the directory that stores the app’s files. 
  • Application Path: The location of the app’s files relative to the user’s home. In our example, we created a directory in home called “nodejsapp,” so we’d enter “nodejsapp” here.

The Deployment Environment selector indicates whether the app is under development or ready for deployment in a production environment. 

Underneath the Application Configuration table is an interface for configuring environment variables. We’ll look at them in greater depth in the next section. 

For now, we’ll click the Deploy button at the bottom of the page, and cPanel will configure the app’s environment and domain. Once it’s finished, you can open your new app in a web browser at the URL you just configured: “example.com/nodeapp” in our examples. 

Unlike a real app, our one-pager has no external dependencies. If it did, cPanel Application Manager would display the Ensure Dependencies button for one-click installation. The button is only available for apps with a package.json file that lists dependencies. 

 If you’re following our examples and would like to see Ensure Dependencies in action, add a file called package,json to the app’s directory with the following contents:

{
  "name": "nodejsapp",
  "version": "1.0.0",
  "description": "A Node App",
  "main": "app.js",
  "author": "",
  "license": "ISC",
  "dependencies": {
    "express": "^4.17.1"
  }
}

As you can see, we have listed the Express web framework as a dependency.  The Ensure Dependencies button should now be available in Application Manager. When you click it, cPanel installs Express and any applications and libraries it depends on. 

Adding Environment Variables to Your Node.JS App’s Environment

Environment variables are name-value pairs that store a chunk of information. They work much like variables in programming, except that they are not internal to the program but part of its external environment.  Servers use environment variables to hold useful configuration data. 

For example, CentOS uses the PATH environment variable to store a list of directories that contain command-line programs. When you enter a command like “ls,” the shell looks through those directories for an executable file with that name.  If there was no PATH variable, you’d have to enter the full path of every command:  “/usr/bin/ls” instead of just “ls.” 

The server administrator can change the PATH environment variable, controlling the directories the shell looks in without modifying its internal code.  With cPanel’s Application Manager, you can add environment variables to your Node.js app’s environment to configure its behavior in the same way. 

In our simple app.js file, this line of JavaScript tells the app the port it should listen for connections on. 

const port = 3000;

In reality, a developer is unlikely to know the correct port when they write the code.  To give users more flexibility, they could tell the app to look in its environment for a variable called PORT and to use its value when setting up the app. 

In Node.js, the JavaScript code looks something like this:

const PORT = process.env.PORT || 3000;

This sets the app’s internal PORT variable to the value of the environment variable called PORT or to a default of 3000 if an environment variable isn’t set. 

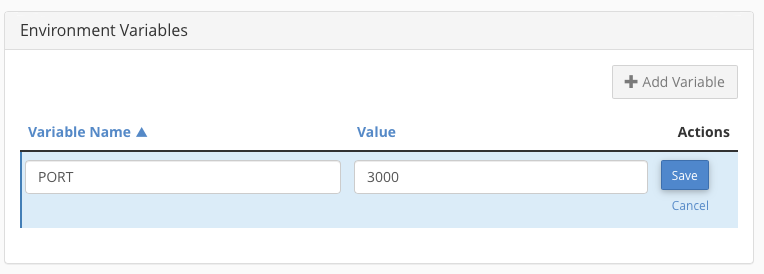
Now the user can tell the app which port to bind to by setting a PORT variable in the app’s environment. To do this in cPanel’s Application Manager, find the Environment Variables interface beneath Application Configuration and click Add Variable.

Enter a variable name and value, and click Save. 

Editing Your Node.JS Application

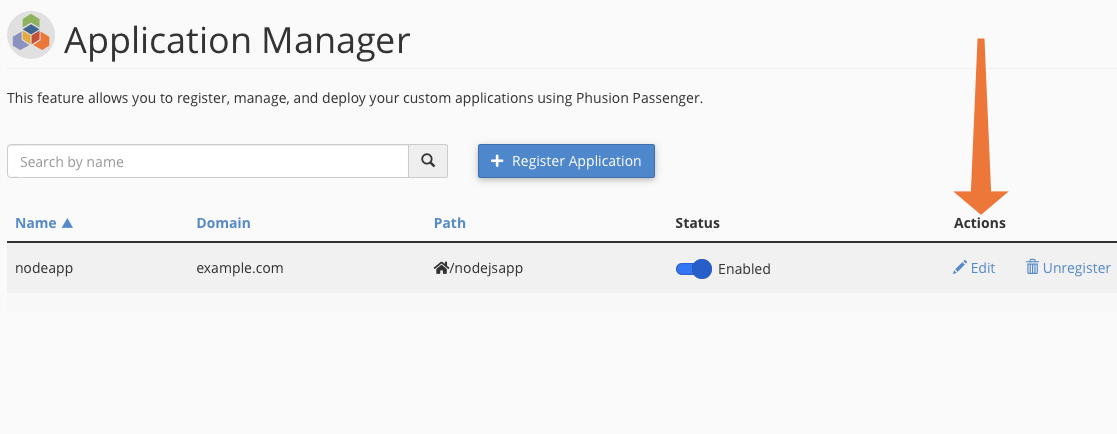
You can edit a Node application’s registration configuration in the Application Manager.

Click the Edit link in the Actions column. In this interface, you can edit all the values you set when first registering your application, including the environment variables. 

Uninstalling Your Node.JS Application

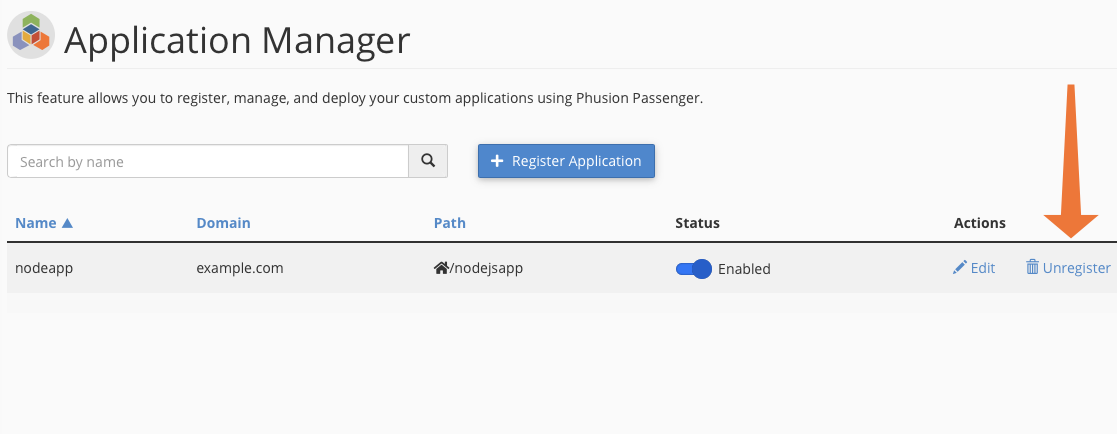
To uninstall or “unregister ”a Node.js application from cPanel, click the unregister link at the right of the Application Manager table. 

When you unregister an application, cPanel removes it from the list, deletes its configuration file, and dissociates it from the domain. cPanel does not delete the application’s files, but you are free to delete them yourself in File Manager or on the command line. 

Bring Node.JS Hosting to Your cPanel Server

PHP remains the most widely used server language by a large margin, but Node.js, JavaScript, and web frameworks like Express, Meteor, and Nest are increasingly popular with web developers and tech-savvy users. cPanel and WHM’s Application Manager makes it easy for web hosts to support Node apps and JavaScript-focused users on their platform.

آموزش کار با Select PHP Version در cpanel

آموزش کار با Select PHP Version در cpanel

دوستان عزیز پیشگام وبی امیدوارم که حالتون خوب باشه ، امروز با آموزش کار با Select PHP Version در cpanel خدمتتون هستیم و امیدوارم توضیحاتی که در این مطلب و یا در انتها مطلب که بصورت فیلم قرارداده شده بتونه به شما کمک کنه و هر روز بیشتر پیشرفت کنید.

خوب اصلا این قسمت به چه دردی میخوره کجا بهش نیاز داریم و در کل کاربردش چی هست؟

این قسمت برای تغییر پسورد در سی پنل میباشد که با عنوان Select PHP Version در قسمت Software موجود میباشد.

ابتدا وارد هاستمون داخل سایت پیشگام وب میشیم.

میتوانیم از سرویس های من ورود به سی پنل رو میزنید تا بصورت اتوماتیک وارد هاستمون بشیم.

Select PHP Version در cpanel

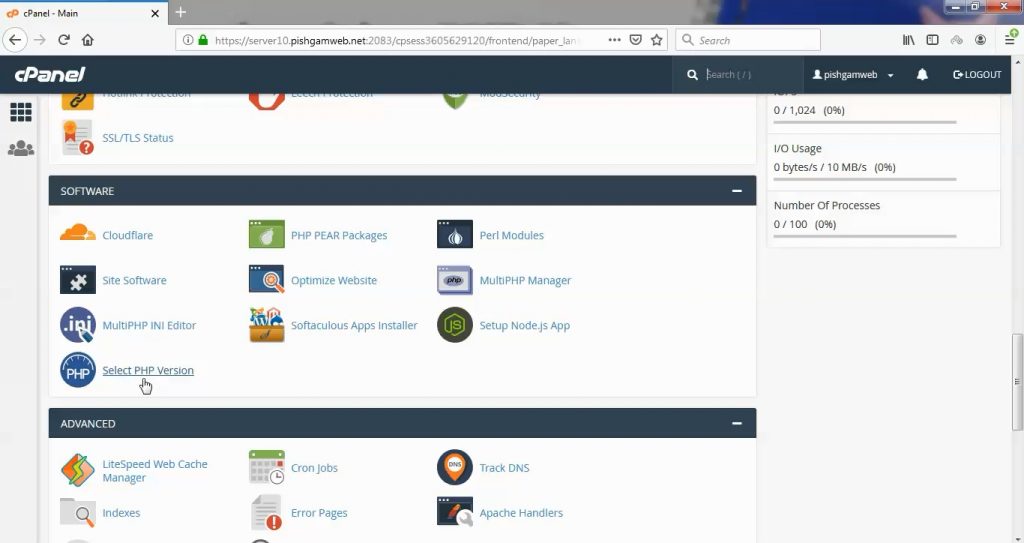
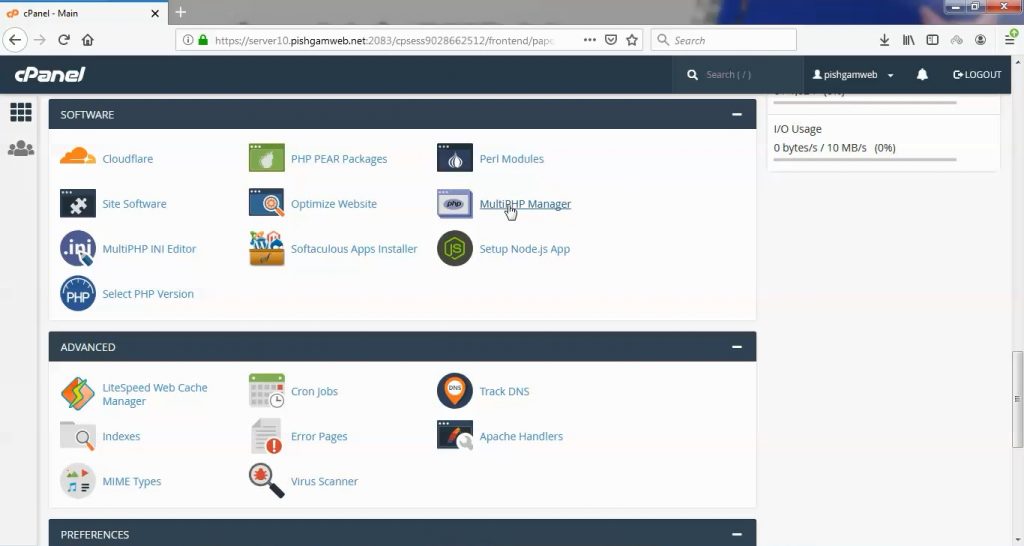
بعد از ورود به قسمت به قسمت Software رفته و روی گزینه Select PHP Version کلیک میکنیم.

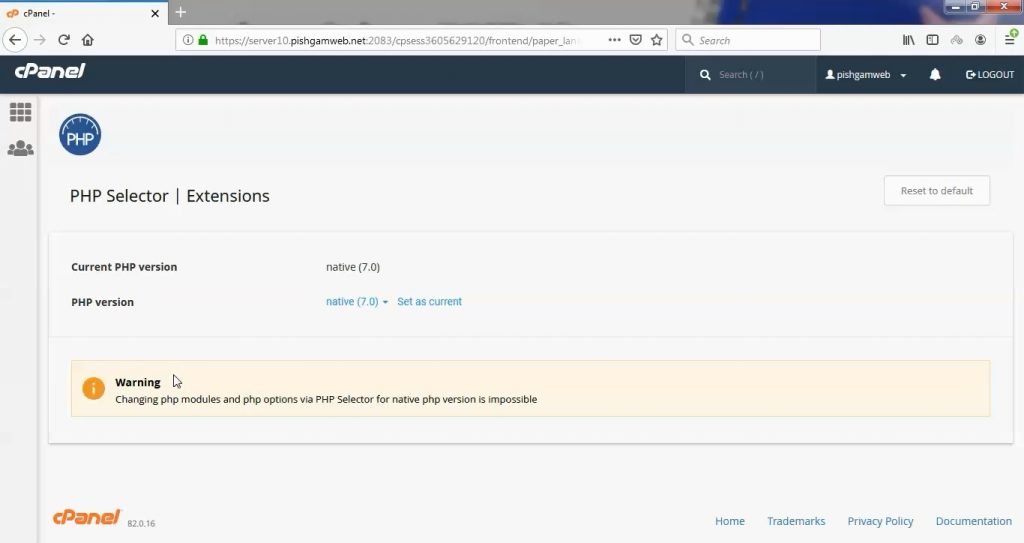
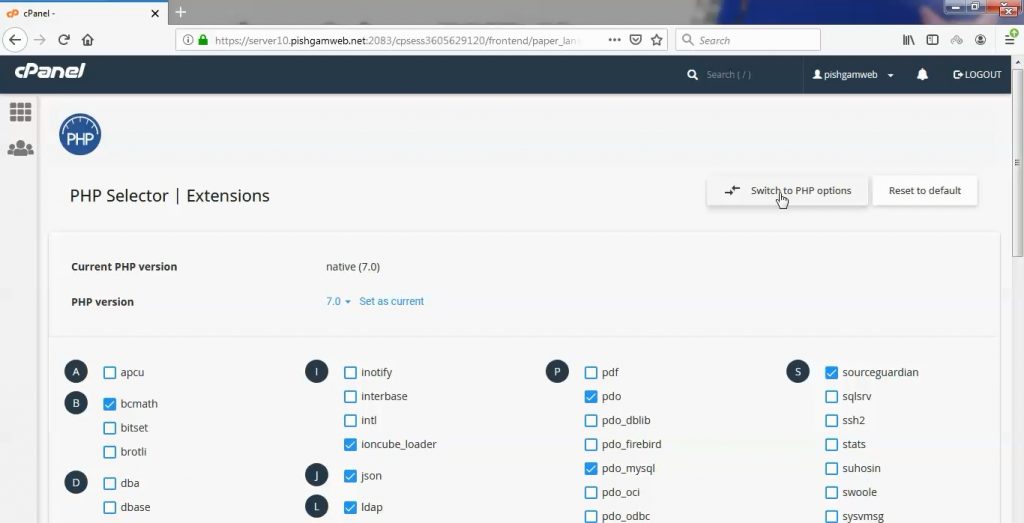
در صفحه باز شده معمولا نسخه پی اچ پی دیفالت ست میباشد که بصورت زیر نمایش داده میشود.

Current PHP version native (7.0)

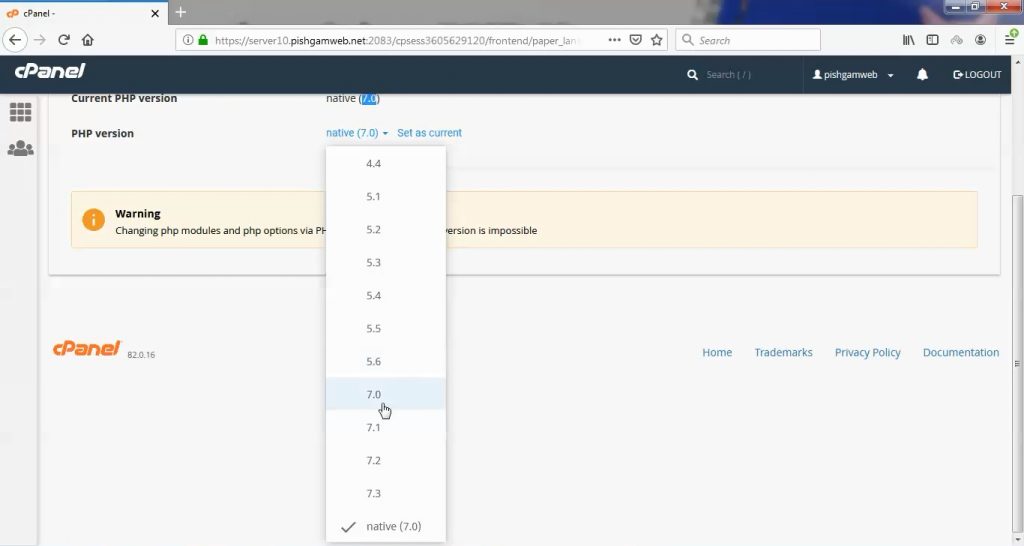
حال برای تغییر نسخه پی اچ پی از روبروی گزینه PHP version کلیک کنید تا منو کشویی باز شود و نسخه پی اچ پی مورد نظر را انتخاب کنید و روی گزینه Set as current کلیک کنید. سپس در قسمت Current PHP version نسخه پی اچ پی انتخابی قرار میگیرد که به معنی ست شدن نسخه مورد نظر میباشد.

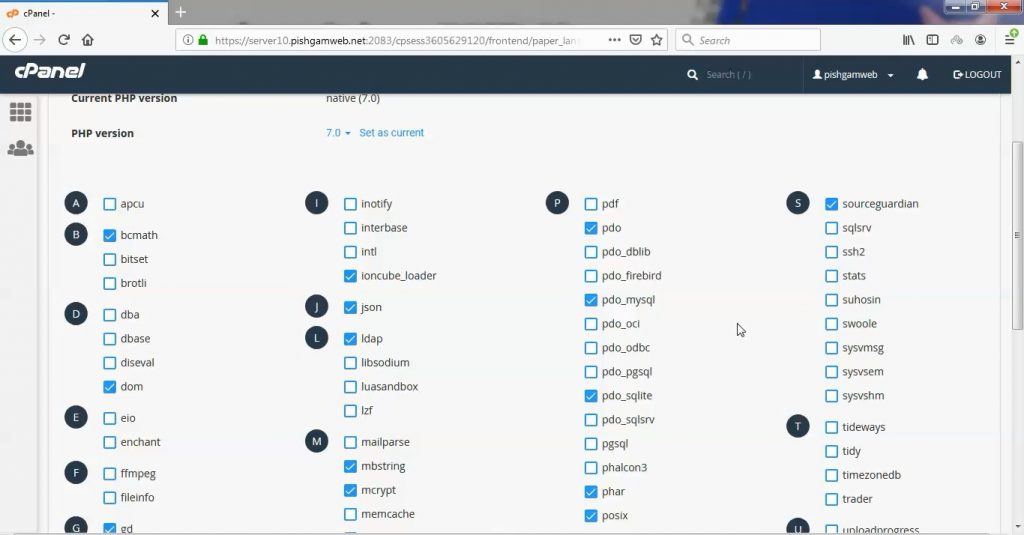
بعد از تغییر نسخه پی اچ پی از حالت دیفالت توابع و ماژول هایی را میتوانید فعال و غیر فعال کنید که در همان صفحه مشاهده خواهد شد که با زدن تیک در سمت چپ تابع مورد نظر فعال و با برداشتن تیک غیر فعال میشود.

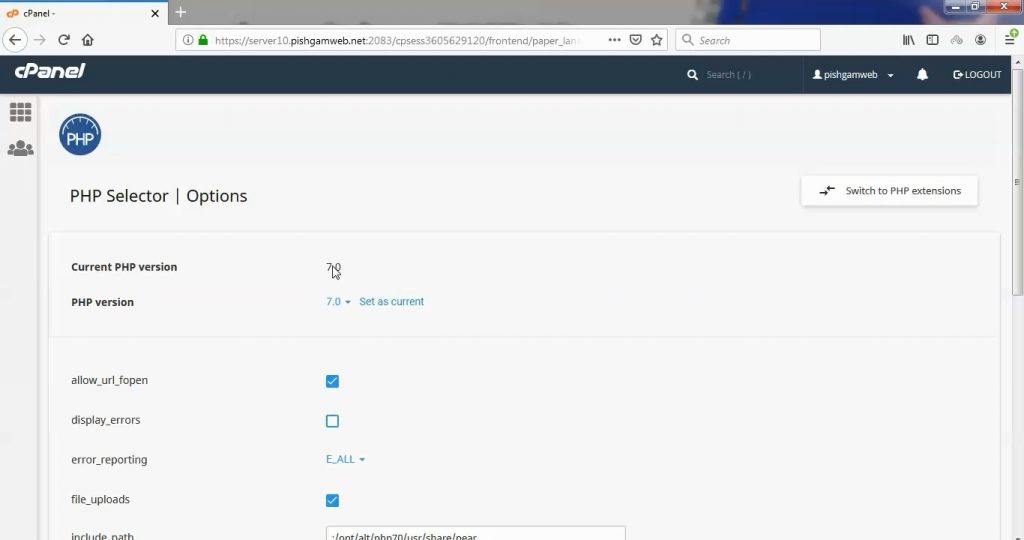
برای تغییرات در میزان آپلود فایل روی گزینه Switch to PHP options کلیک کنید.

در صفحه باز شده موارد مهم و کاربردی در زیر توضیح داده شده و از تغییر در سایر موارد خوداری کنید مگر اینکه اطلاعات کافی در مورد گزینه مورد نظر داشته باشید.

max_execution_time : این مورد تایم اوت رای درخواست های شما میباشد که میتوانید تا 300 تنظیم کنید.

memory_limit : در این قسمت مموری هاست خود را میتوانید معمولا تا 512 مگابایت افزایش دهید.

post_max_size : در این قسمت شما ماکزیمم حجم هر پست را مشاهده میکنید.

upload_max_filesize : در این قیمت شما حداکثر حجم فایل آپلودی را مشاهده میکنید.

مشاهده فیلم آموزشی از سایت آپارات

برای دانلود فیلم آموزش از قسمت تنظیمات روی گزینه دانلود کلیک کرده و کیفیت مد نظر خود را انتخاب کنید تا فیلم آموزش دانلود گردد.

نکته : هر چقدر که عدد این قسمت بیشتر باشد ، کیفیت فیلم دانلودی بالاتر خواهد بود.

آموزش های ابتدایی :

دوستان عزیز آموزش که خدمتتون ارائه کردیم از سری آموزش های ابتدایی پیشگام وب هست و این آموزش جزو پایه ای ترین آموزش های سایت هست امیدوارم که آموزشممون کامل باشه.

منتظر نظرات و پیشنهادات شما در قسمت دیدگاه های سایت هستیم.

learn in cpanel

Changing the PHP version

A2 Hosting servers support multiple versions of PHP. To change the PHP version used for your account, follow these steps:

  1. Log in to cPanel.
    If you do not know how to log in to your cPanel account, please see this article.
  2. In the SOFTWARE section of the cPanel home screen, click Select PHP Version:

    cPanel - Select PHPVersion icon

    If you do not see Select PHP Version in the SOFTWARE section, your server does not support this feature. 
  3. cPanel displays the current PHP version. To change the PHP version, in the Current PHP Version list box, select the version that you want to use. The new PHP version takes effect immediately.

Changing PHP settings

In addition to changing the PHP version from cPanel, you can change various PHP settings. You can enable and disable PHP extensions, as well as configuration directives such as allow_url_fopen, error_log, and many more.

This feature removes the need to configure and maintain custom php.ini files. Instead, you control all PHP settings directly from cPanel.

To change your PHP settings, follow these steps:

  1. Log in to cPanel.
    If you do not know how to log in to your cPanel account, please see this article.
  2. In the SOFTWARE section of the cPanel home screen, click Select PHP Version:

    cPanel - Select PHPVersion icon

    If you do not see Select PHP Version in the SOFTWARE section, your server does not support this feature.
  3. Select which extensions you want to enable for the current PHP version:

    • To enable an extension, select the check box next to the extension name.
    • To disable an extension, clear the check box next to the extension name.

    • Selections are saved automatically.
    To reset the extension list to the default configuration, click Reset to default in the top right corner.
  4. To change settings for the current PHP version:

    • Near the top of the page, click the Options tab.
    • Click the value next to the setting that you want to modify.
    • Depending on the type of setting, a list box may appear with predefined settings that you can choose. Or, a text box may appear so you can type the value:

    • Changes are saved automatically, and take effect immediately.
    When you modify a setting, a Reset to default link appears beneath the setting label. Click the link to change the setting back to the default value.

آموزش کار با LiteSpeed Web Cache Manager در cpanel

آموزش کار با LiteSpeed Web Cache Manager در cpanel

دوستان عزیز پیشگام وبی امیدوارم که حالتون خوب باشه ، امروز با آموزش کار با LiteSpeed Web Cache Manager در cpanel خدمتتون هستیم و امیدوارم توضیحاتی که در این مطلب و یا در انتها مطلب که بصورت فیلم قرارداده شده بتونه به شما کمک کنه و هر روز بیشتر پیشرفت کنید.

خوب اصلا این قسمت به چه دردی میخوره کجا بهش نیاز داریم و در کل کاربردش چی هست؟

این قسمت برای تغییر پسورد در سی پنل میباشد که با عنوان LiteSpeed Web Cache Manager در قسمت Advanced موجود میباشد.

ابتدا وارد هاستمون داخل سایت پیشگام وب میشیم.

میتوانیم از سرویس های من ورود به سی پنل رو میزنید تا بصورت اتوماتیک وارد هاستمون بشیم.

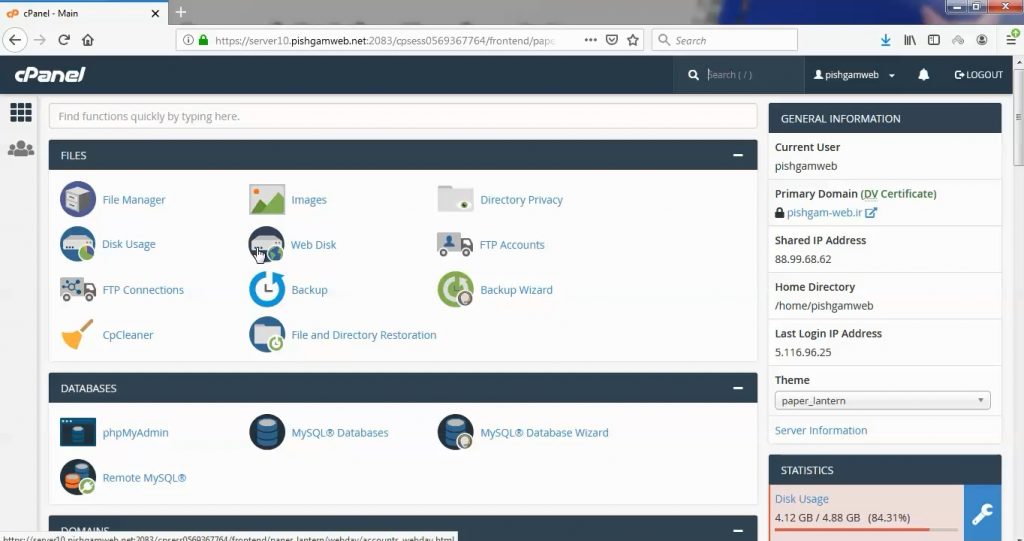
LiteSpeed Web Cache Manager در cpanel

توضیحاتی در مورد LiteSpeed :

شرکت LiteSpeed که در New Jersey امریکا میباشد. از شرکت های پیشرو در خدمات وب سرور و امنیت سرور های میزبانی وب میباشد . این شرکت اوایل سال ۲۰۰۲ توسط یک تیم از مهندسین به رهبری George Wang تاسیس شده است.
شعار این شرکت به این صورت میباشد که خرید سخت افزار قوی تر برای حل مشکلات کار ساز نیست و مقرون به صرفه نمیباشد . آنها بر این باور هستند که در صورت استفاده از این وب سرور مناسب شما تا حد بسیار بالای نیاز به خرید سرور با منابع بیشتر جهت رفع کمبود های خود نخواهید داشت .
وب سرور لایت اسپید در چند سال اخیر بسیار گشترش یافته است .

لایت اسپید وب سروری است بر پایه عملکرد و سرعت بالا طرحی شده است. به دلیل سرعت بالای این وب سرور و استفاده و نصب بسیار ساده میتوانید وب سایت خود را به این سیستم مجهز کنید. لایت اسپید عملکرد و مقیاس پذیری فوق العاده بالایی دارد و تقریبا سرعتش شش برابر سریع تر از آپاچی است.برای محتوا های ایستا یا استاتیک لایت اسپید از thttpd , boa و TUX استفاده میکند و برای محتوای پویا یا دینامیک لایت اسپید تا ۵۰% سریع تر در سرویس های نوشته شده در php است نسبت به آپاچی و این به دلیل استفاده از mod_php است که در این وب سرور استفاده شده.از ورژن ۳ لایت اسپید به بعد این سرویس همواره کنار وب هاستینگ ها بوده و از کنترل پنل های سی پنل دایرکت ادمین و … پشتیبانی میکند.همچنین لایت اسپید بهترین انتخاب برای هاستینگ اشتراکی میباشد زیرا هم از سرعت بسیار بالا و هم از امنیت خوبی برخوردار است.

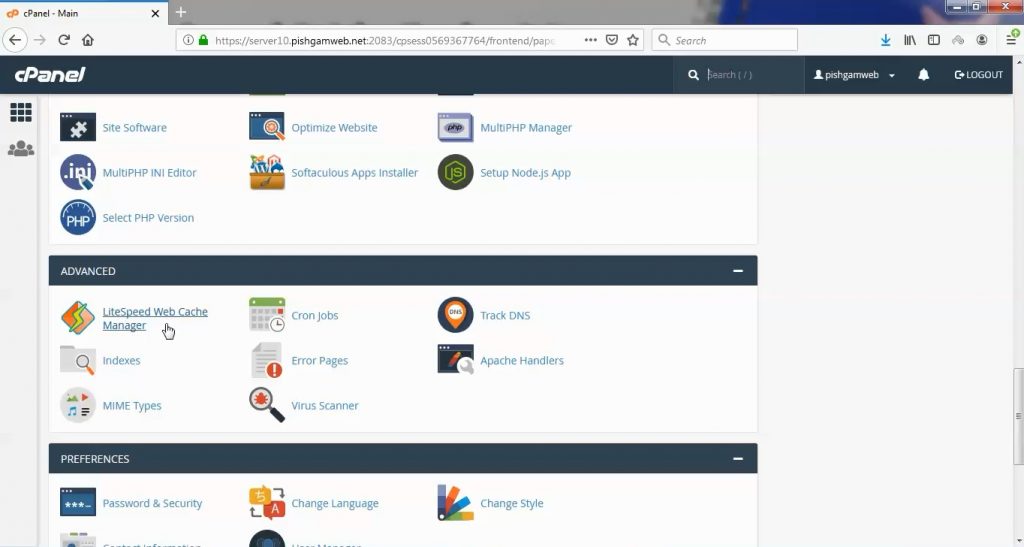
از قسمت Advanced روی گزینه LiteSpeed Web Cache Manager کلیک کلید میکنیم.

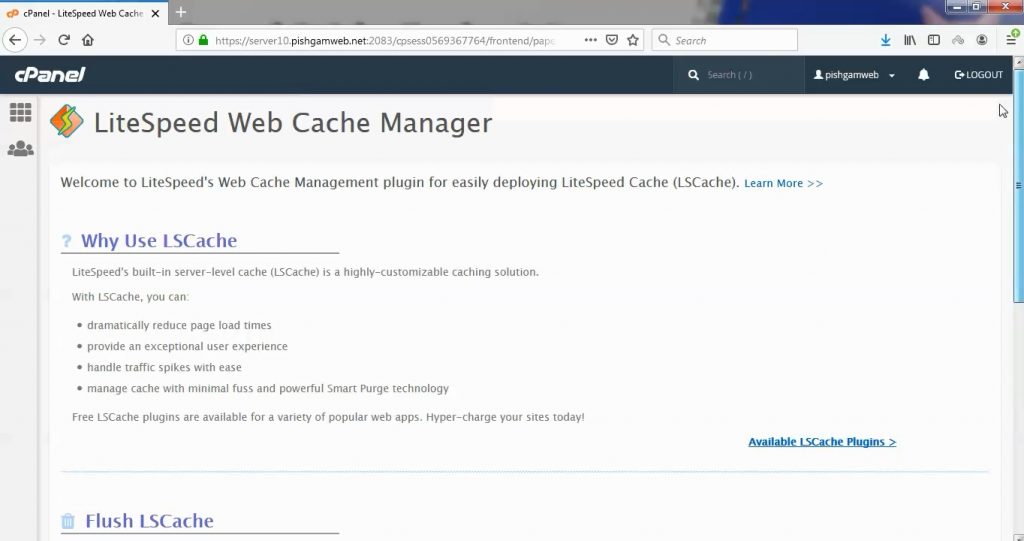
توضیحات هر چهار مورد

1- در بخش ابتدایی صفحه توضیحاتی برای اینکه چرا از پلاگین لایت اسپید استفاده کنید و چه مزایایی را در اختیار شما قرار می‌ دهد وجود دارد.

Why Use LSCache


LiteSpeed’s built-in server-level cache (LSCache) is a highly-customizable caching solution.

With LSCache, you can:

  • dramatically reduce page load times
  • provide an exceptional user experience
  • handle traffic spikes with ease
  • manage cache with minimal fuss and powerful Smart Purge technology

Free LSCache plugins are available for a variety of popular web apps. Hyper-charge your sites today!

2- گزینه با نام Flush All در بخش Flush LSCache مشاهده می‌نمایید که با کلیک بر روی آن تمامی کش‌های مربوط به سایت شما حذف خواهد شد. این گزینه دقیقاً مشابه گزینه Purge All Cache در پلاگین لایت اسپید در وردپرس و جوملا می‌باشد.

3- در بخش LiteSpeed Cache management گزینه‌ای با نام WordPress Cache مشاهده می‌کنید که در صورت وجود پلاگین وردپرسی این وب سرور ، تنظیمات در اختیار شما قرار خواهد گرفت.

4- در پایان دو گزینه Setting و Advanced در اختیار شما قرار داده شده که با استفاده از آنها می‌توانید به تنظیم محل ذخیره‌سازی لاگ‌های کش وب سایت خود و همچنین در بخش Advanced تمامی پروسس‌های PHP مربوط به سایت خود را حذف کرده و مجدداً راه‌اندازی کنید.

مشاهده فیلم آموزش از سایت آپارات


برای دانلود فیلم آموزش از قسمت تنظیمات روی گزینه دانلود کلیک کرده و کیفیت مد نظر خود را انتخاب کنید تا فیلم آموزش دانلود گردد.

نکته : هر چقدر که عدد این قسمت بیشتر باشد ، کیفیت فیلم دانلودی بالاتر خواهد بود.

آموزش های متوسطه :

دوستان عزیز آموزش که خدمتتون ارائه کردیم از سری آموزش های ابتدایی پیشگام وب هست و این آموزش جزو آموزش های متوسطه هست که باعث میشه شما بتونید سایتتون رو بهتر از قبل مدیریت کنید.

این آموزش ها به شما کمک میکنه تا به مرور زمان به یک طراح سایت تبدیل بشید و اون رو به عنوان شغل خودتون انتخاب کنید و اگر هم قصد ندارید به عنوان شغل بهش نگاه کنید میتوانید پشتیبانی سایت خودتان را در دست بگیرید.

learn in cpanel

This article describes how to use the LiteSpeed Web Cache Manager to manage LiteSpeed caching for your account. LiteSpeed is a built-in caching engine on Turbo Boost and Turbo Max Web Hosting accounts that can significantly increase a site’s performance.

This article only applies to Turbo Boost and Turbo Max Web Hosting accounts.
Table of Contents

Managing the cache

To manage the LiteSpeed Cache, follow these steps:

  1. Log in to cPanel.
    If you do not know how to log in to your cPanel account, please see this article.
  2. In the ADVANCED section of the cPanel home screen, click LiteSpeed Web Cache Manager:

    cPanel  - Advanced - LiteSpeed Web Cache Manager

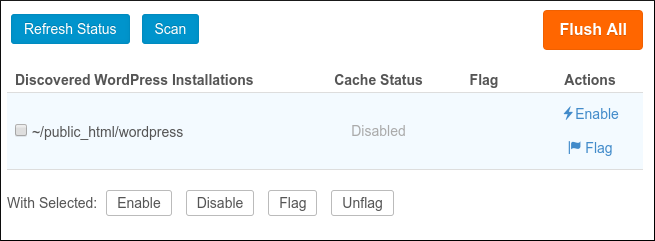
  3. Under LiteSpeed Cache Management, click the application you want to manage. For example, click WordPress Cache.
  4. Click Scan to locate all installations of the selected application. LiteSpeed Web Cache Manager lists the discovered applications:

    LiteSpeed Web Cache Manager - Application list

  5. Select one of the following options:

    • To enable LiteSpeed Cache for the application, under Actions, click Enable.
    • To disable LiteSpeed Cache for the application, under Actions, click Disable.
    • To flush the LiteSpeed Cache for all of your applications at the same time, click Flush All.
      For an alternate method of flushing the entire cache, see the following section.
    • To flag an installation, under Actions, click Flag.
      When you flag an application, it is unaffected by all future mass enable or disable operations.
    • To unflag an installation, under Actions, click Unflag.
    • To do a mass operation on multiple applications at once, select the check boxes for the applications, and then next to With Selected: click the operation you want to do.

Flushing the cache

To flush the LiteSpeed Cache for all of your applications at the same time, follow these steps:

  1. Log in to cPanel.
    If you do not know how to log in to your cPanel account, please see this article.
  2. In the ADVANCED section of the cPanel home screen, click LiteSpeed Web Cache Manager:

    cPanel  - Advanced - LiteSpeed Web Cache Manager

  3. Under Flush LSCache, click Flush All.
  4. Click OK to confirm. LiteSpeed Web Cache Manager flushes the cache.

Setting the log level

You can change the log level for LiteSpeed Web Cache Manager. To do this, follow these steps:

  1. Log in to cPanel.
    If you do not know how to log in to your cPanel account, please see this article.
  2. In the ADVANCED section of the cPanel home screen, click LiteSpeed Web Cache Manager:

    cPanel  - Advanced - LiteSpeed Web Cache Manager

  3. Scroll to the bottom of the page, and then click Settings.
  4. In the Log File Level list box, select the logging level that you want.
  5. Click Save.

    LiteSpeed Web Cache Manager stores log data in the /home/username/lscmData/ls_webcachemgr.log file, where username represents your account username.

آموزش کار با Cron Jobs در cpanel

آموزش کار با Cron Jobs در cpanel

دوستان عزیز پیشگام وبی امیدوارم که حالتون خوب باشه ، امروز با آموزش کار با Cron Jobs در cpanel خدمتتون هستیم و امیدوارم توضیحاتی که در این مطلب و یا در انتها مطلب که بصورت فیلم قرارداده شده بتونه به شما کمک کنه و هر روز بیشتر پیشرفت کنید.

خوب اصلا این قسمت به چه دردی میخوره کجا بهش نیاز داریم و در کل کاربردش چی هست؟

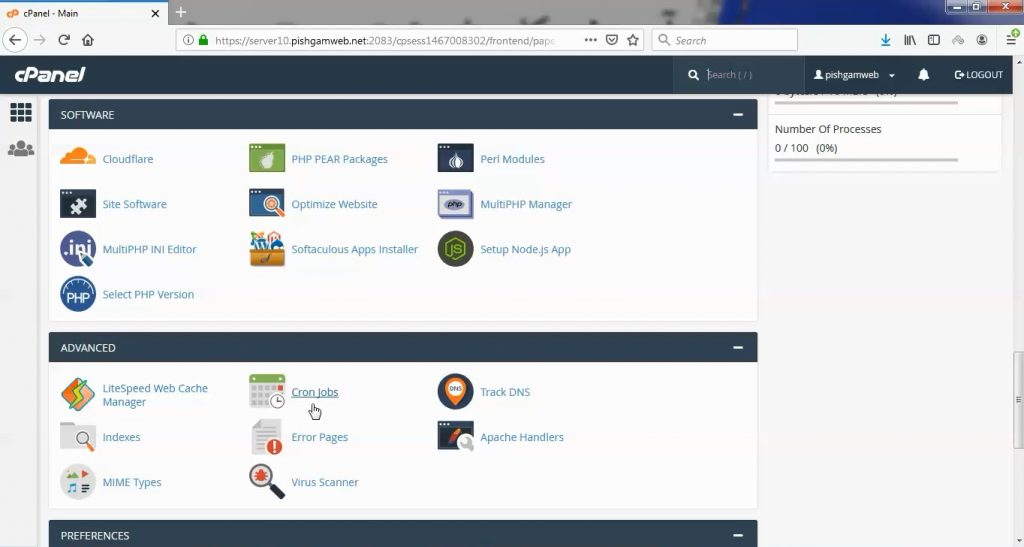
این قسمت برای تغییر پسورد در سی پنل میباشد که با عنوان Cron Jobs در قسمت Advanced موجود میباشد.

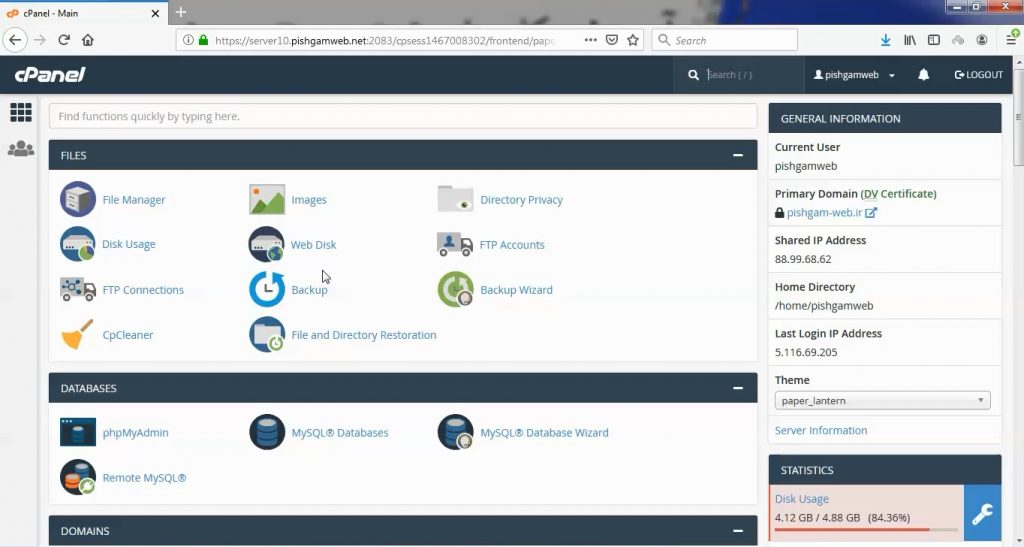
ابتدا وارد هاستمون داخل سایت پیشگام وب میشیم.

میتوانیم از سرویس های من ورود به سی پنل رو میزنید تا بصورت اتوماتیک وارد هاستمون بشیم.

Cron Jobs در cpanel

کرون جابز یکی از امکانات نرم افزاری کنترل پنل‌ ها است که در سی‌ پنل نیز وجود دارد و برای اجرای دستور در زمان خاصی استفاده می گردد.

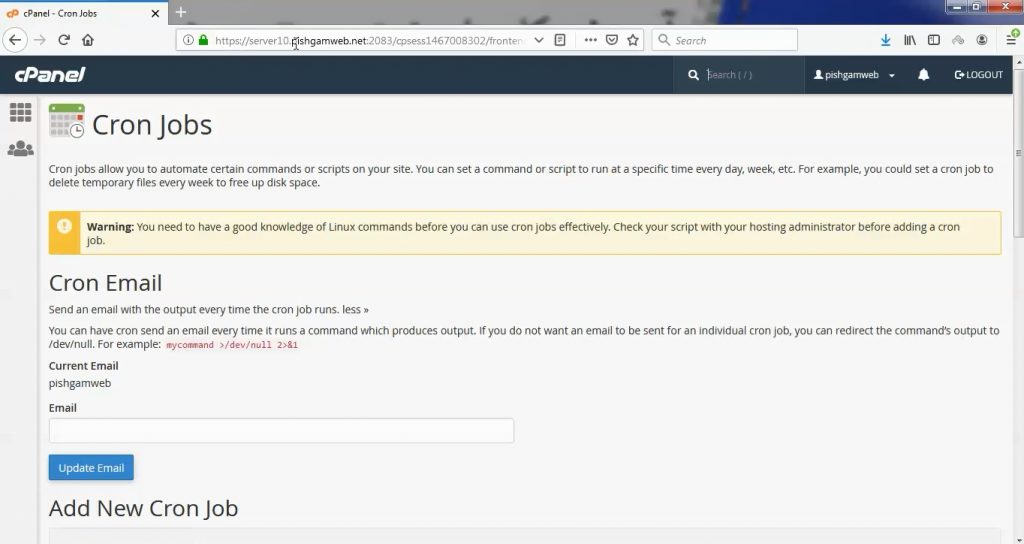
وارد قسمت کرون جبز هاست میشویم.

در تصویر زیر در قسمت email ایمیل خودتون یا مدیر سایت را وارد کنید تا اطلاعیه و اخطار هایی که در زمان اجرای کرون جابز رخ میدهد برای این ایمیل ارسال گردد.

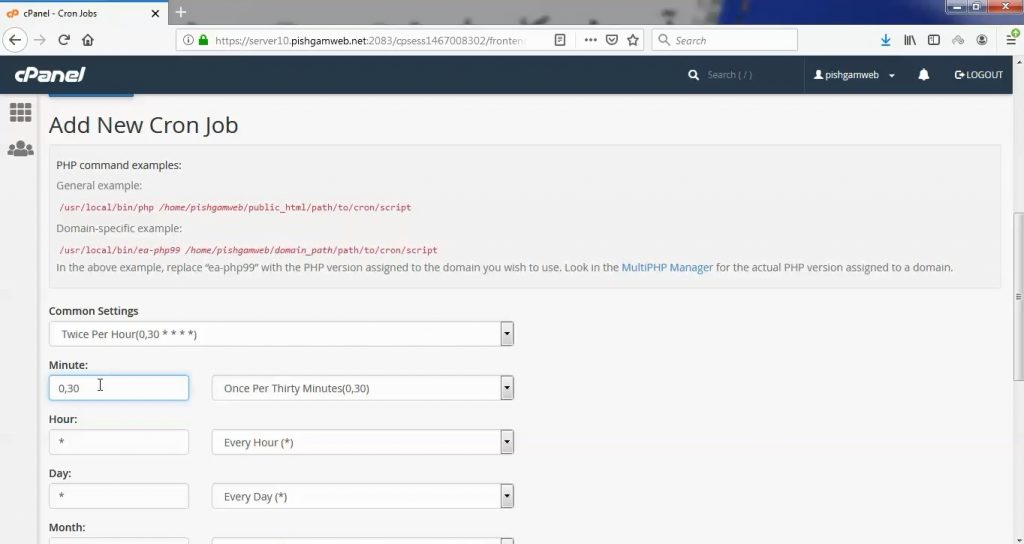
در قسمت PHP command examples توضیحاتی در مورد نوع دستورات در قسمت Command مشخص شده است.

General example: /usr/local/bin/php /home/analysi1/public_html/path/to/cron/script

Domain-specific example: /usr/local/bin/ea-php99 /home/analysi1/domain_path/path/to/cron/script In the above example, replace “ea-php99” with the PHP version assigned to the domain you wish to use. Look in the MultiPHP Manager for the actual PHP version assigned to a domain.

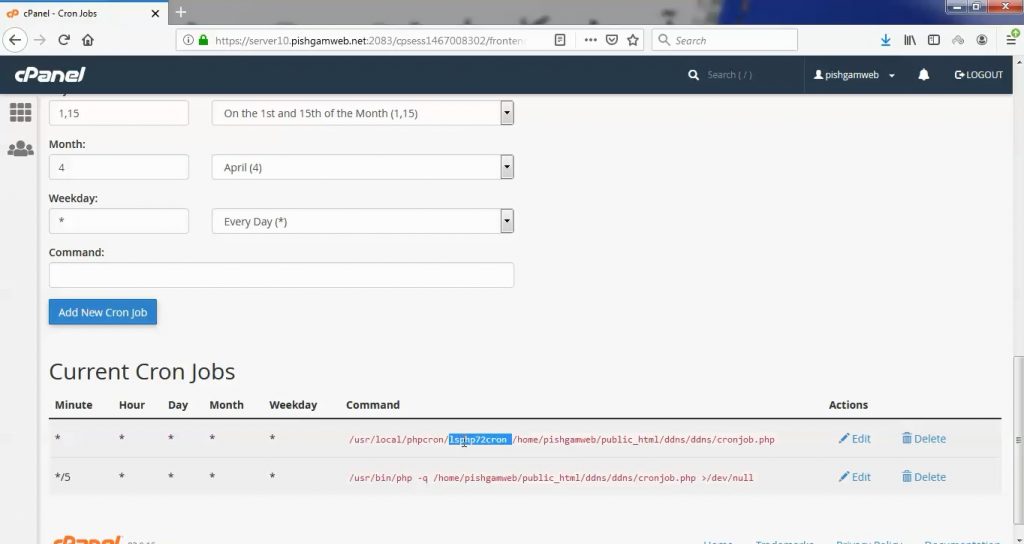
یکسری موارد صورت پیفرض میباشد ، مثالی که در تصویر بالا مشاهده میکنید برای اجرای دستور مورد نظر در هر 30 دقیقه میباشد.

البته در فیلم موجود در انتهای مطلب بصورت کامل ای مورد توضیح داده شده است.

در این قسمت دو دستوری که قبلا ایجاد شده را مشاهده میکنیم و هر زمان نیاز باشد میتوانیم دستور مورد نظر را ویرایش و یا حذف کنیم.

مشاهده فیلم آموزشی از سایت آپارات


برای دانلود فیلم آموزش از قسمت تنظیمات روی گزینه دانلود کلیک کرده و کیفیت مد نظر خود را انتخاب کنید تا فیلم آموزش دانلود گردد.

نکته : هر چقدر که عدد این قسمت بیشتر باشد ، کیفیت فیلم دانلودی بالاتر خواهد بود.

آموزش های حرفه ای :

دوستان عزیز به انتهای این آموزش رسیدیم و این آموزش که خدمتتون هست از سری آموزش های حرفه ای پیشگام وب هست و یواش یواش اگر آموزش ها رو کامل فرا گرفته باشید میتوانید خودتون رو یک طراح سایت بدونید و ما از این بابت خیلی خوشحال هستیم و امیدواریم همیشه شاد و سر زنده باشید.

learn in cpanel

Overview

Cron jobs are scheduled tasks that the system runs at predefined times or intervals. Typically, a cron job contains a series of simple tasks that the system runs from a script file.

Important:
  • Exercise caution when you schedule cron jobs. We recommend that you allow enough time between cron jobs for the previous cron job to complete. If you schedule them to run too often, the server could start another cron job before the last cron job ends. This duplication may degrade performance.

  • For more information about cron jobs, read Red Hat’s Scheduling a Cron Job documentation.

Add a cron email

The Cron Email section of the interface allows you to enter an email address for the system to send notifications when your cron jobs run. To set an email address, perform the following steps:

  1. In the Email text box, enter the email address at which you wish to receive the notifications.

  2. Click Update Email.

Disable email notifications

To disable email notifications for all cron jobs, remove the email address.

To disable email notifications for a single cron job, perform the following steps:

  1. Locate the cron job for which to disable email notifications in the Current Cron Jobs table and click Edit.

  2. In the Command text box, add the/dev/null 2>&1 line to the end of the command. For example:

    /usr/local/cpanel/bin/is_script_stuck /dev/null 2>&1


  3. Save your changes.

Add a cron job

To create a cron job, perform the following steps:

  1. Select the interval at which you wish to run the cron job from the appropriate menus, or enter the values in the text boxes.

    • Common Settings — Select a commonly-used interval. The system will configure the appropriate settings in the Minute, Hour, Day, Month, and Weekday text boxes for you.

    • Minute — The number of minutes between each time the cron job runs, or the minute of each hour on which you wish to run the cron job.

    • Hour — The number of hours between each time the cron job runs, or the hour of each day on which you wish to run the cron job.

    • Day — The number of days between each time the cron job runs, or the day of the month on which you wish to run the cron job.

    • Month — The number of months between each time the cron job runs, or the month of the year in which you wish to run the cron job.

    • Weekday — The days of the week on which you wish to run the cron job.

  2. In the Command text box, enter the command that you wish the system to run.

    Important:
    • You must specify settings for the Minute, Hour, Day, Month, Weekday, and Command text boxes.

    • Exercise extreme caution when you use the rm command in a cron job. If you do not declare the correct options, you may delete your home directory’s data.

    • If your cron job runs a custom script, the script requires the execute permission. For more information, read Red Hat’s Linux Permissions documentation.

    Note:

    Specify the absolute path to the command that you wish to run. For example, if you wish to run the public_html/index.php file in your home directory, enter the following command:

    /home/user/public_html/index.php


  3. Click Add New Cron Job.

Cron job example

To run a script that resides in your home directory once an hour, perform the following steps:

  1. In the Common Settings menu, select the Once Per Hour(0 * * * *) option.

  2. In the Command text box, enter the script’s name. For example:

    ./my-script.sh
    Remember:

    You must set the correct file permissions to allow a script to execute.


  3. Click Add New Cron Job. The interface will display a success message.

View existing cron jobs

The Current Cron Jobs table displays your existing cron jobs.

Edit a cron job

To edit a cron job, perform the following steps:

  1. Locate the cron job that you wish to edit and click Edit.
  2. Edit the settings that you wish to change and click Edit Line.

Delete a cron job

To delete a cron job, perform the following steps:

  1. Click Delete next to the cron job that you wish to delete.
  2. Click Delete.

آموزش کار با Track DNS در cpanel

آموزش کار با Track DNS در cpanel

دوستان عزیز پیشگام وبی امیدوارم که حالتون خوب باشه ، امروز با آموزش کار با Track DNS در cpanel خدمتتون هستیم و امیدوارم توضیحاتی که در این مطلب و یا در انتها مطلب که بصورت فیلم قرارداده شده بتونه به شما کمک کنه و هر روز بیشتر پیشرفت کنید.

خوب اصلا این قسمت به چه دردی میخوره کجا بهش نیاز داریم و در کل کاربردش چی هست؟

این قسمت برای تغییر پسورد در سی پنل میباشد که با عنوان Track DNS در قسمت Advanced موجود میباشد.

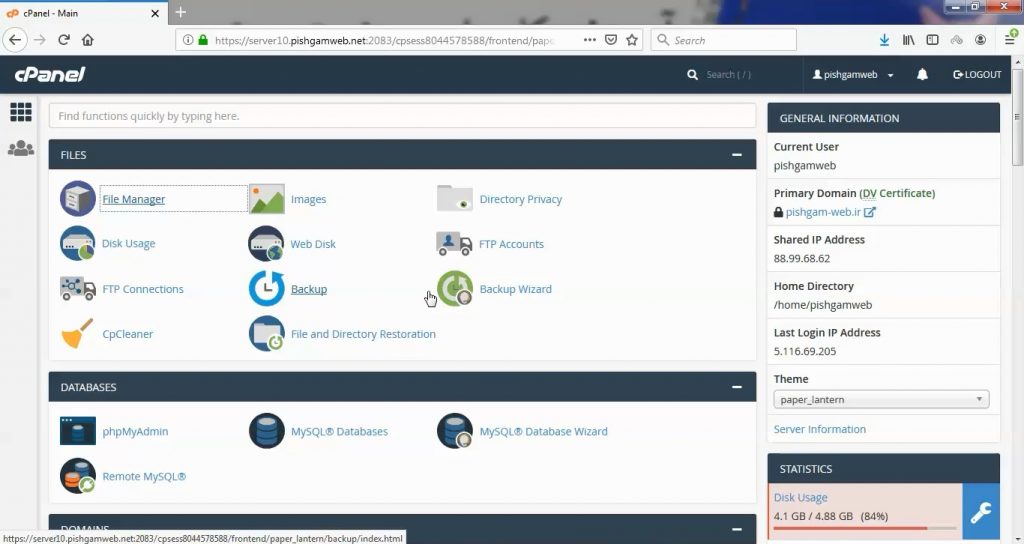
ابتدا وارد هاستمون داخل سایت پیشگام وب میشیم.

میتوانیم از سرویس های من ورود به سی پنل رو میزنید تا بصورت اتوماتیک وارد هاستمون بشیم.

Track DNS در cpanel

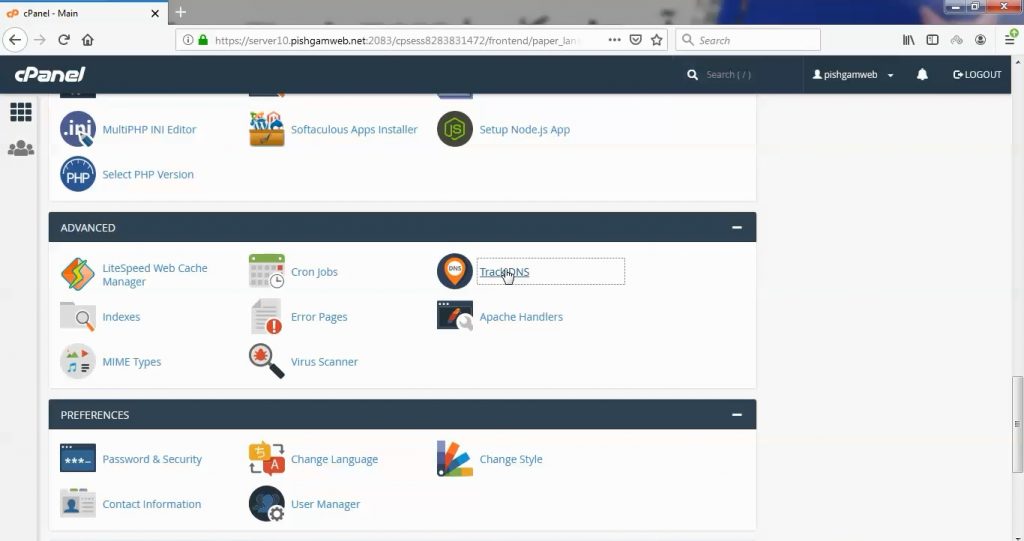
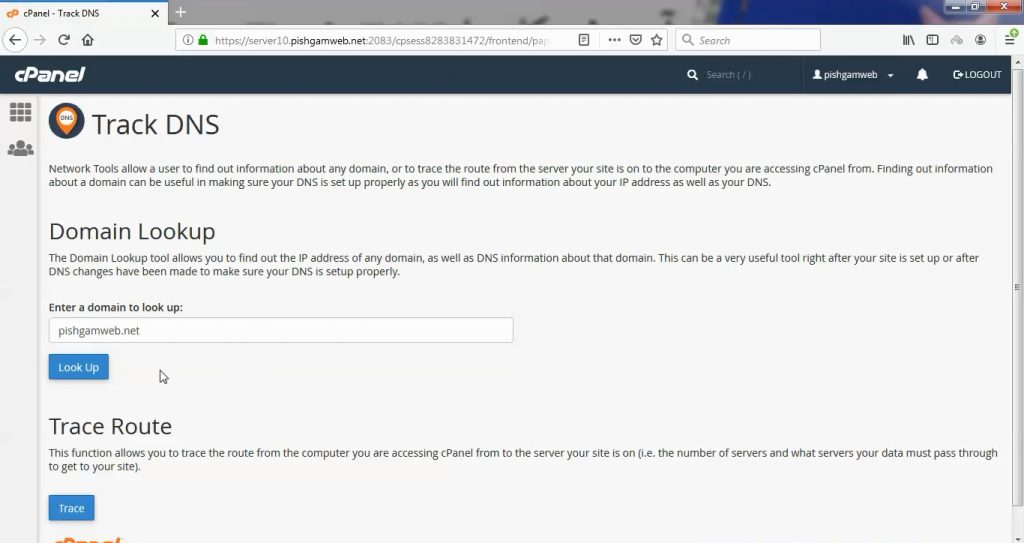
از قسمت Advanced روی گزینه Track DNS کلیک کنید.

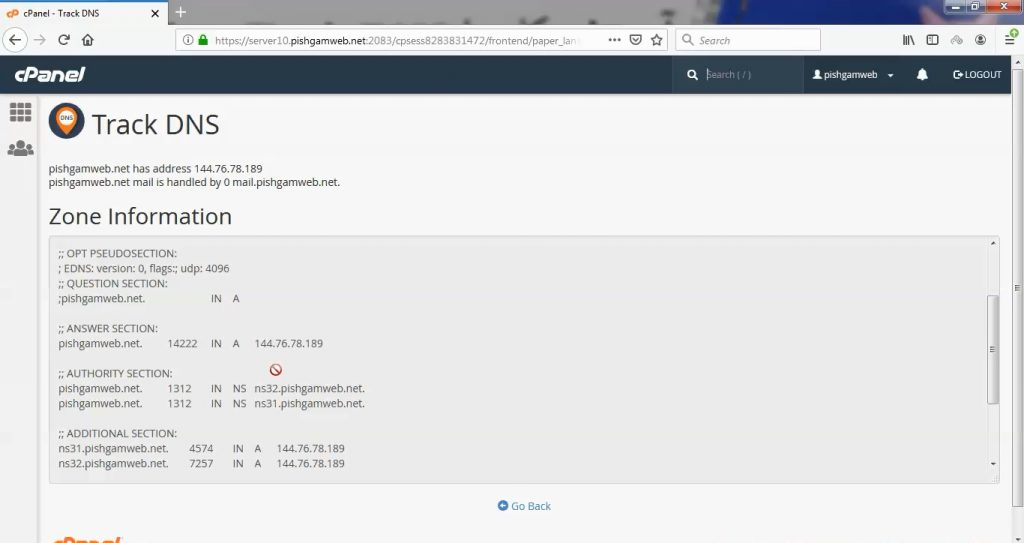
در قسمت Domain Lookup میتوانید هویز دامنه که شامل دی ان اس ها و ای پی و یا ای پی های سرور را مشاهده کنید.

در این قسمت پاسخ سی پنل به درخواست Domain Lookup را مشاهده میکنید.

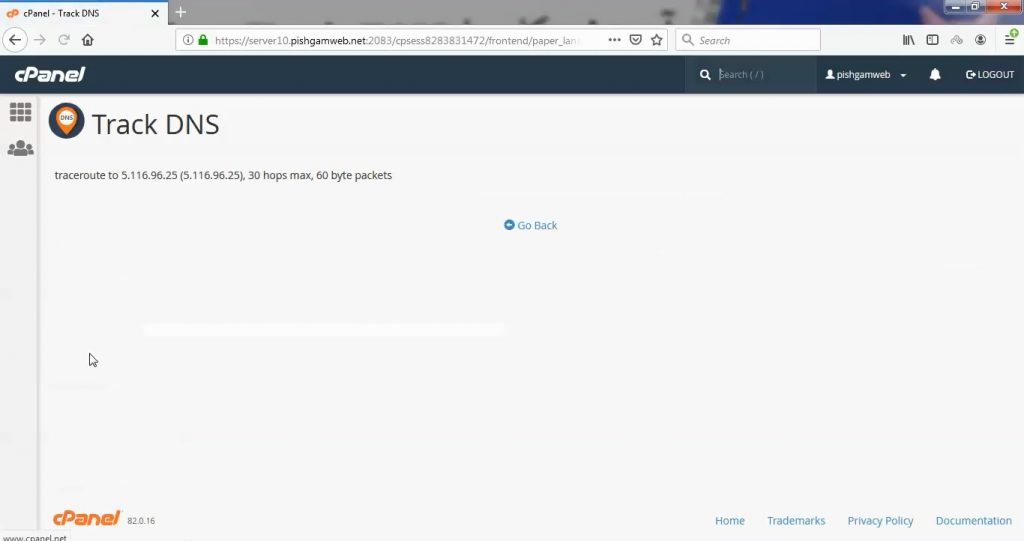
در قسمت Trace Route میتوانید تریس روت از سایت مورد نظر دریافت کنید.

در این قسمت پاسخ سی پنل به درخواست Trace Route را مشاهده میکنید.

مشاهده فیلم از سایت آپارات


برای دانلود فیلم آموزش از قسمت تنظیمات روی گزینه دانلود کلیک کرده و کیفیت مد نظر خود را انتخاب کنید تا فیلم آموزش دانلود گردد.

نکته : هر چقدر که عدد این قسمت بیشتر باشد ، کیفیت فیلم دانلودی بالاتر خواهد بود.

آموزش های متوسطه :

دوستان عزیز آموزش که خدمتتون ارائه کردیم از سری آموزش های ابتدایی پیشگام وب هست و این آموزش جزو آموزش های متوسطه هست که باعث میشه شما بتونید سایتتون رو بهتر از قبل مدیریت کنید.

این آموزش ها به شما کمک میکنه تا به مرور زمان به یک طراح سایت تبدیل بشید و اون رو به عنوان شغل خودتون انتخاب کنید و اگر هم قصد ندارید به عنوان شغل بهش نگاه کنید میتوانید پشتیبانی سایت خودتان را در دست بگیرید.

learn in cpanel

Overview

This interface contains tools to help you retrieve network information. For example, you can look up an IP address or trace the route from your computer to the computer that hosts your website.

Domain Lookup

The Domain Lookup tool executes the host domain command, where domain represents a specific domain. This command resolves an IP address from a specified domain name, and returns general DNS information about the server.

To look up a domain, perform the following steps:

  1. Enter the domain to look up in the Enter a domain to look up text box.
  2. Click Look Up.

The domain’s mail servers and IP address will display. You can also view the domain’s DNS information under the Zone Information heading.

Trace Route

The Trace Route function traces the route that your computer takes to access your website. This function displays how many servers through which your data passes before it reaches your website. This information also includes the amount of time that your computer requires to reach the server.

To trace the route to your server, click Trace. The interface will display the pathways that your computer follows to reach your server.

Note:

You may not possess access to this function. Contact your system administrator for more information about how to use the Trace Route function.

آموزش کار با Indexes در cpanel

آموزش کار با Indexes در cpanel

دوستان عزیز پیشگام وبی امیدوارم که حالتون خوب باشه ، امروز با آموزش کار با Indexes در cpanel خدمتتون هستیم و امیدوارم توضیحاتی که در این مطلب و یا در انتها مطلب که بصورت فیلم قرارداده شده بتونه به شما کمک کنه و هر روز بیشتر پیشرفت کنید.

خوب اصلا این قسمت به چه دردی میخوره کجا بهش نیاز داریم و در کل کاربردش چی هست؟

این قسمت برای تغییر پسورد در سی پنل میباشد که با عنوان Indexes در قسمت Advanced موجود میباشد.

ابتدا وارد هاستمون داخل سایت پیشگام وب میشیم.

میتوانیم از سرویس های من ورود به سی پنل رو میزنید تا بصورت اتوماتیک وارد هاستمون بشیم.

Indexes در cpanel

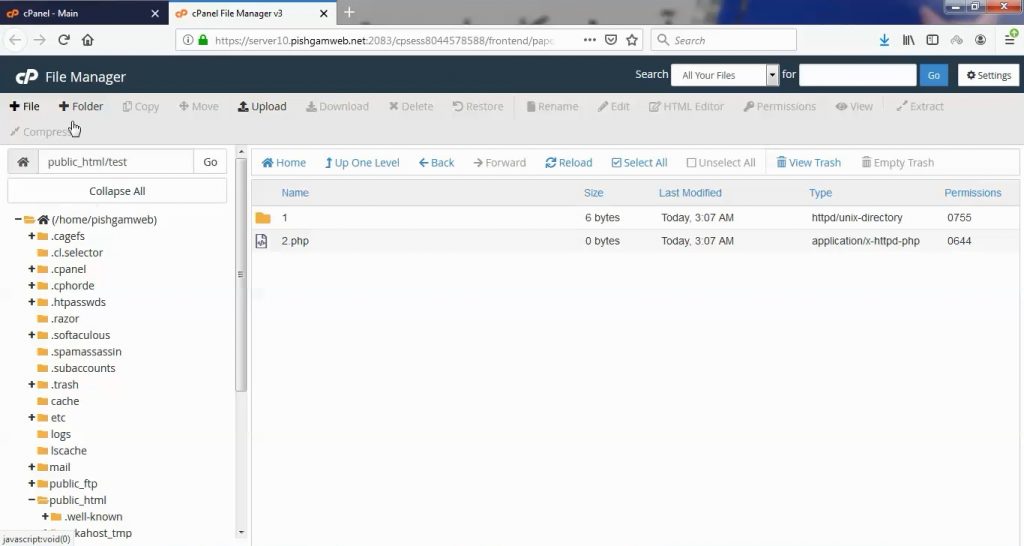
وارد فایل منیجر هاست میشیم تا فایل نمونه برای تست ایجاد کنیم.

یک پوشه بنام test در پابلیک اچ تی ام ال میسازیم و در داخل اون برای نمونه یک پوشه بنام 1 و یک فایل بنام 2.php میسازیم.

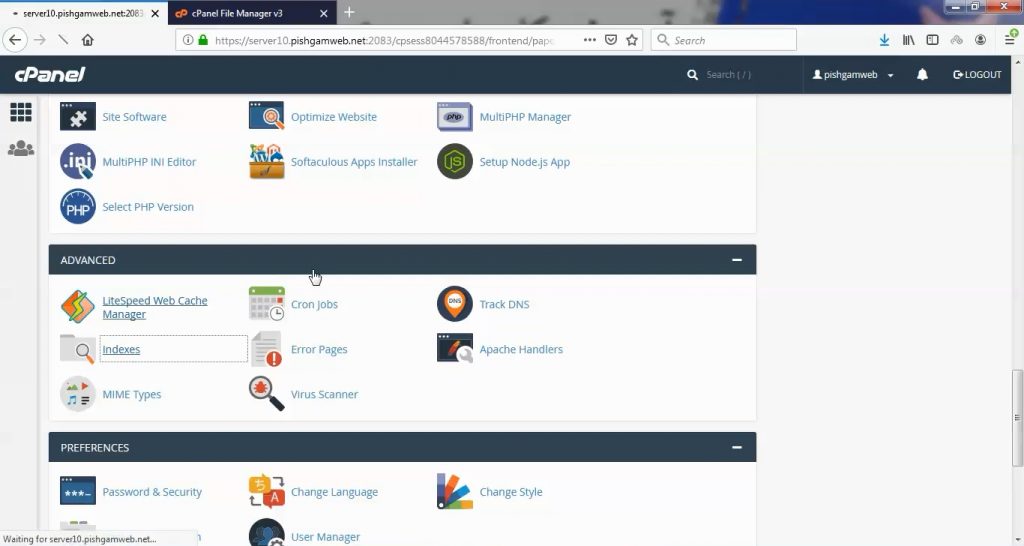
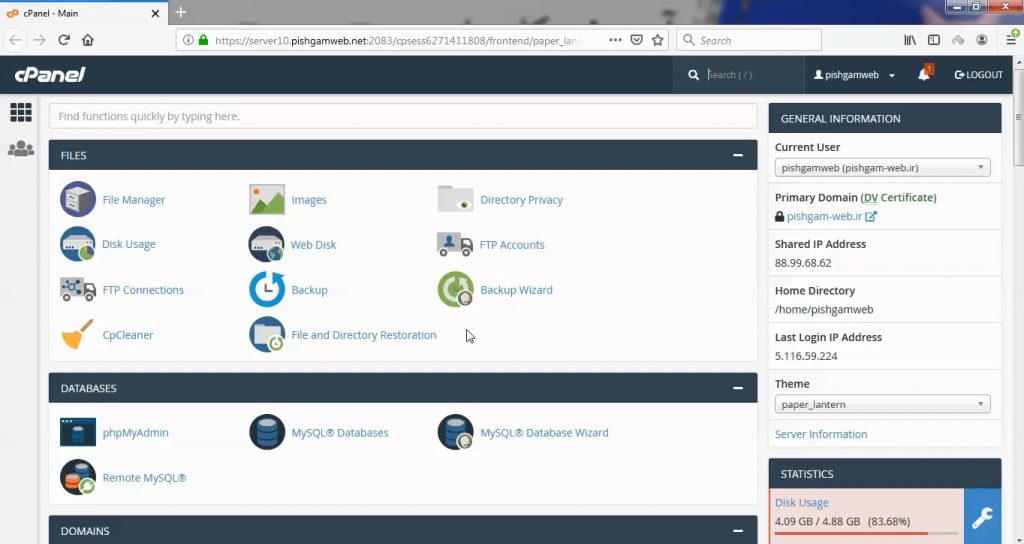
از صفحه اصلی سی پنل به قسمت Indexes میرویم.

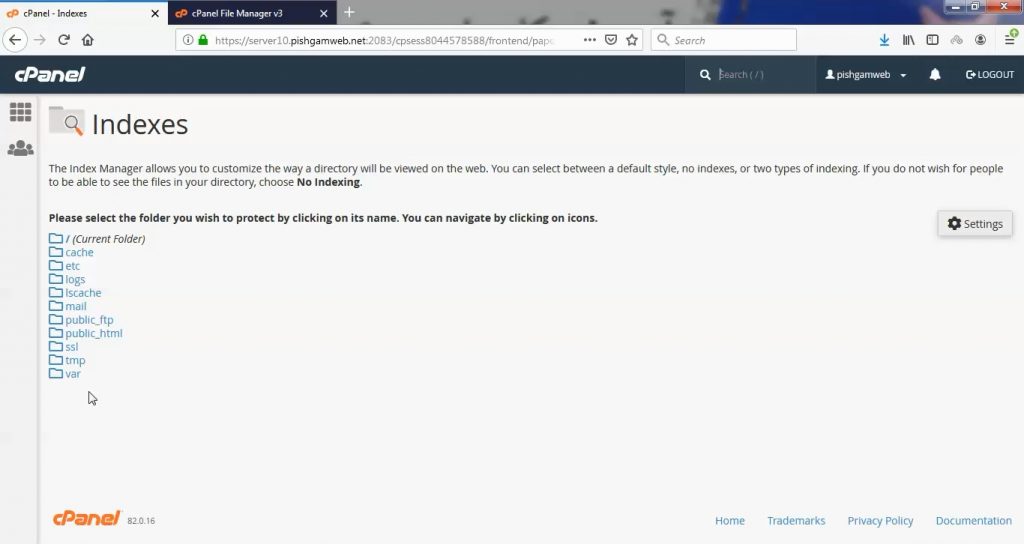
در صفحه باز شده باید پوشه مد نظر که میخواهید محدودیت مورد نظر رو ایجاد کنید انتخاب کنیم.

ما public_html رو انتخاب میکنیم.

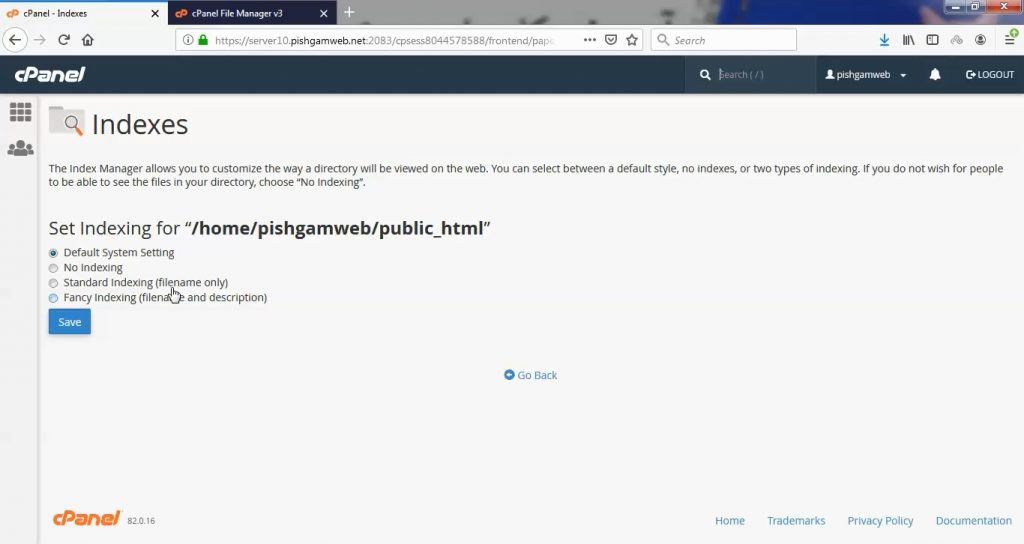
خوب چهار گزینه موجود هست.

Default System Setting : حالت دیفالت سیستم هست که توسط مدیر سرور مشخص شده است.
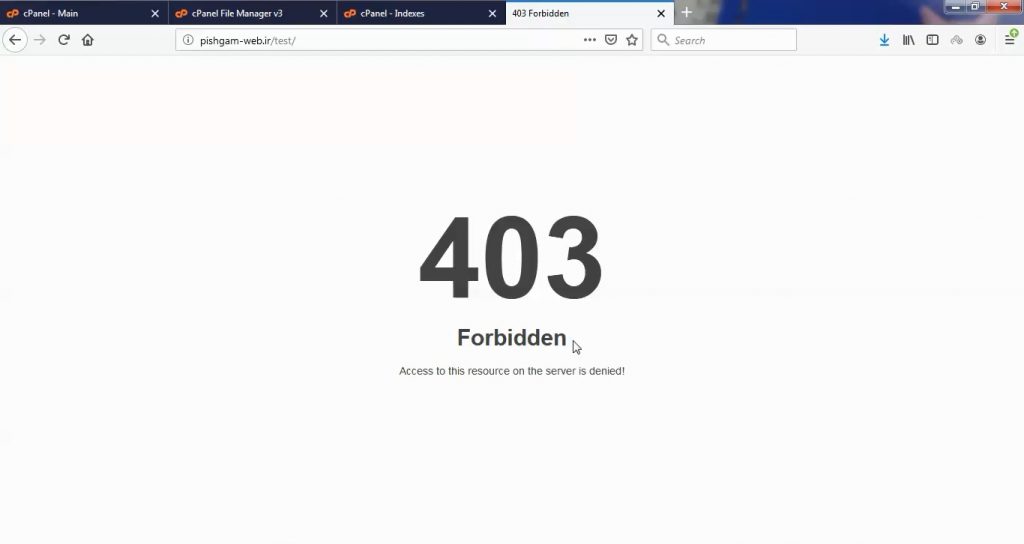
No Indexing : هیچ یک از فایل ها ایندکس نمیشود.
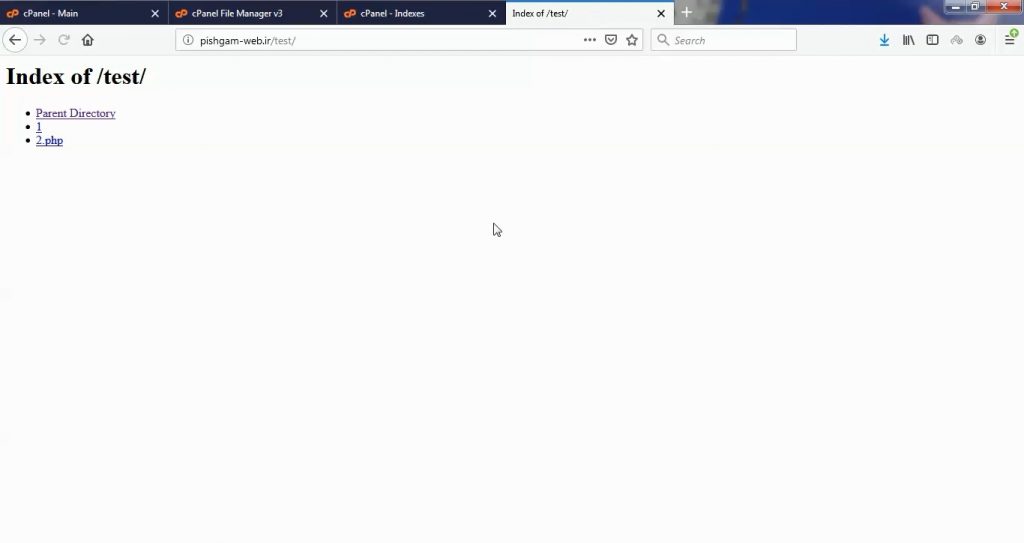
Standard Indexing (filename only) : فقط نام ها را نمایش میدهد.
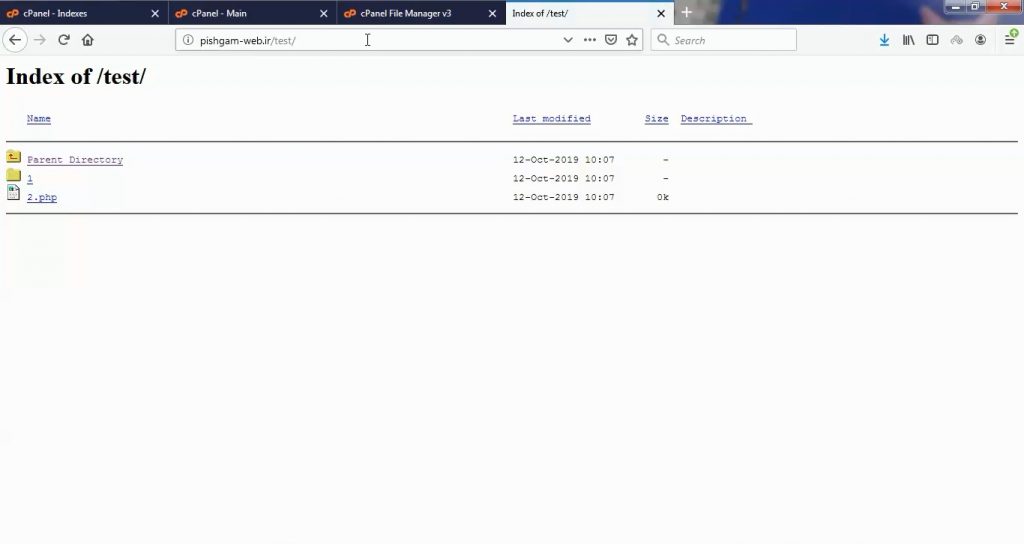
Fancy Indexing (filename and description) : هم نام فایل ها و هم توضیحات مربوطه را نمایش میدهد.

عکس بالا مربوط به نوع Fancy Indexing (filename and description) هست.

عکس بالا مربوط به نوع No Indexing هست.

عکس بالا مربوط به نوع Standard Indexing (filename only) هست.

مشاهده فیلم آموزشی از سایت آپارات


برای دانلود فیلم آموزش از قسمت تنظیمات روی گزینه دانلود کلیک کرده و کیفیت مد نظر خود را انتخاب کنید تا فیلم آموزش دانلود گردد.

نکته : هر چقدر که عدد این قسمت بیشتر باشد ، کیفیت فیلم دانلودی بالاتر خواهد بود.

آموزش های ابتدایی :

دوستان عزیز آموزش که خدمتتون ارائه کردیم از سری آموزش های ابتدایی پیشگام وب هست و این آموزش جزو پایه ای ترین آموزش های سایت هست امیدوارم که آموزشممون کامل باشه.

منتظر نظرات و پیشنهادات شما در قسمت دیدگاه های سایت هستیم.

learn in cpanel

Overview

When a visitor accesses a directory (rather than a page) on your web site, the browser typically displays the directory’s index page. If no index page exists, the browser displays a list of the files in that directory. Use the Indexes interface to define how the server displays a specific directory’s index to a visitor, or to disable index display for a directory.

Manage the directory index

To configure your directory settings

  1. Click Settings, and then select one of the following locations in which to begin navigation:

    • Web Root — Begin navigation in the document root for the account’s primary domain.

    • Document Root for — Select the domain that corresponds to the document root in which you wish to begin navigation.

  2. To configure the interface to always open your selection from Step 1, select the Always open this directory in the future checkbox.

  3. Click Save Changes.

  4. Navigate to the desired folder with the following:

    • To navigate into a folder, click the folder icon ().

    • To navigate up one level of the directory tree, click Up One Level at the top of the list of directory contents.

    • To select a directory, click that directory’s name.

  5. Select one of the following options:

    • Default System Setting — cPanel uses the default that your hosting provider defines.

    • No Indexing — The server does not list the contents of the directory. Browsers display a message that states that the contents are forbidden.

    • Standard Indexing — The server lists the directory’s contents as filenames only.

    • Fancy Indexing — The server lists file names and additional information, such as file size and time last modified.

  6. Click Save.

آموزش کار با Error Pages در cpanel

آموزش کار با Error Pages در cpanel

دوستان عزیز پیشگام وبی امیدوارم که حالتون خوب باشه ، امروز با آموزش کار با Indexes در cpanel خدمتتون هستیم و امیدوارم توضیحاتی که در این مطلب و یا در انتها مطلب که بصورت فیلم قرارداده شده بتونه به شما کمک کنه و هر روز بیشتر پیشرفت کنید.

خوب اصلا این قسمت به چه دردی میخوره کجا بهش نیاز داریم و در کل کاربردش چی هست؟

این قسمت برای تغییر پسورد در سی پنل میباشد که با عنوان Indexes در قسمت Advanced موجود میباشد.

ابتدا وارد هاستمون داخل سایت پیشگام وب میشیم.

میتوانیم از سرویس های من ورود به سی پنل رو میزنید تا بصورت اتوماتیک وارد هاستمون بشیم.

Error Pages در cpanel

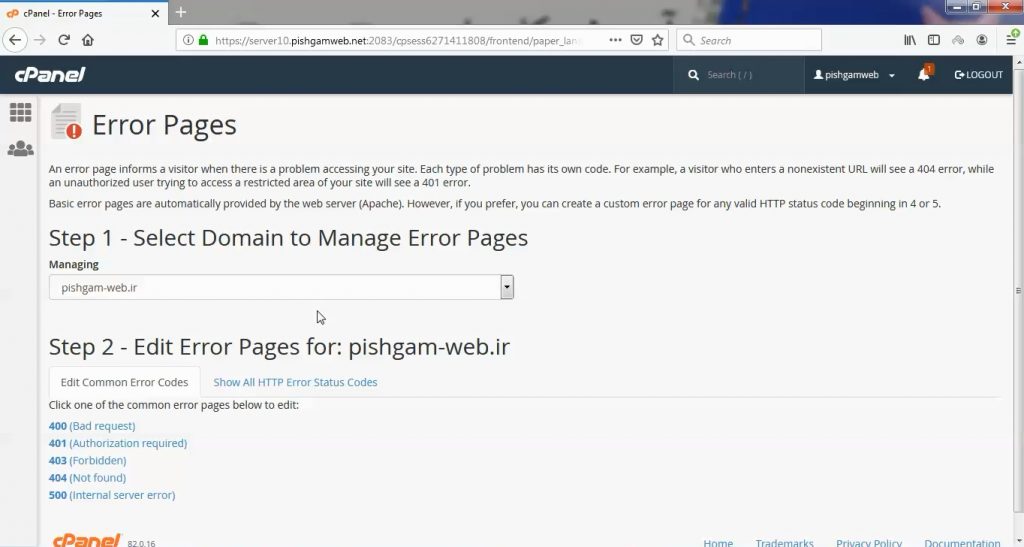
برای ورود طبق عکس روی گزینه مورد نظر کلیک میکنیم.

پس از ورود با صفحه زیر مواجه میشویم.

در قسمت Step 1 – Select Domain to Manage Error Pages دامنه و یا زیر دامنه ( ساب دامنه ) مورد نظر را انتخاب میکنید.
در قسمت Step 2 – Edit Error Pages for: pishgam-web.ir ارور مورد نظر را انتخاب میکنید ، در این قسمت دامنه انتخابی هم مشاهده میشود.

یکسری ارور ها که پرکاربرد هستند درقسمت Edit Common Error Codes وبرای مشاهده تمام ارور ها روی گزینه Show All HTTP Error Status Codes کلیک کنید.

لیست ارور ها در قسمت Edit Common Error Codes :

400 (Bad request)
401 (Authorization required)
403 (Forbidden)
404 (Not found)
500 (Internal server error)

لیست تمام ارور ها در قسمت Show All HTTP Error Status Codes :

400 (Bad request)
401 (Authorization required)
402 (Payment required)
403 (Forbidden)
404 (Not found)
405 (Method not allowed)
406 (Not acceptable)
407 (Proxy authentication required)
408 (Request timeout)
409 (Conflict)
410 (Gone)
411 (Length required)
412 (Precondition failed)
413 (Request entity too large)
414 (Request URI too large)
415 (Unsupported media type)
416 (Request range not satisfiable)
417 (Expectation failed)
422 (Unprocessable entity)
423 (Locked)
424 (Failed dependency)
500 (Internal server error)
501 (Not Implemented)
502 (Bad gateway)
503 (Service unavailable)
504 (Gateway timeout)
505 (HTTP version not supported)
506 (Variant also negotiates)
507 (Insufficient storage)
510 (Not extended)

اگر توجه کنید متوجه میشوید اطلاعات مربوط به اررو هم مقابل عدد ارور مشخص شده است.

مشاهده فیلم از سایت آپارات

برای دانلود فیلم آموزش از قسمت تنظیمات روی گزینه دانلود کلیک کرده و کیفیت مد نظر خود را انتخاب کنید تا فیلم آموزش دانلود گردد.

نکته : هر چقدر که عدد این قسمت بیشتر باشد ، کیفیت فیلم دانلودی بالاتر خواهد بود.

آموزش های ابتدایی :

دوستان عزیز آموزش که خدمتتون ارائه کردیم از سری آموزش های ابتدایی پیشگام وب هست و این آموزش جزو پایه ای ترین آموزش های سایت هست امیدوارم که آموزشممون کامل باشه.

منتظر نظرات و پیشنهادات شما در قسمت دیدگاه های سایت هستیم.

learn in cpanel

Overview

Error pages inform visitors about problems when they attempt to access your site. Each problem has its own status code (for example, 404) and error page.

The web server automatically provides basic error pages, but the Error Pages interface allows you to define custom error pages for any HTTP status code.

Edit an error page

To customize an error page, perform the following steps:

  1. If this account manages more than one domain, select the domain for which you wish to edit an error page from the Managing: menu.
  2. Click the error status code for which you wish to edit its error page.
    • If you do not see the desired error status code in that list, click the Show All HTTP Error Status Codes tab. Then, click on the desired error status code.
  3. Enter a message in the text box.
    • To display information on the error page about the visitor who accessed your site, click the appropriate buttons for the information that you wish to display.
    • Enter additional HTML code to further customize your error pages.
  4. Click Save.