آموزش کار با Email Accounts در cpanel
دوستان عزیز پیشگام وبی امیدوارم که حالتون خوب باشه ، امروز با آموزش کار با Email Accounts در cpanel خدمتتون هستیم و امیدوارم توضیحاتی که در این مطلب و یا در انتها مطلب که بصورت فیلم قرارداده شده بتونه به شما کمک کنه و هر روز بیشتر پیشرفت کنید.
خوب اصلا این قسمت به چه دردی میخوره کجا بهش نیاز داریم و در کل کاربردش چی هست؟
جهت ساختن و مدیریت آدرس های ایمیل.
مثلا ساختن آدرسی مانند : [email protected]
برای ورود به ایمیل برای چک میل (ارسال ایمیل، خواندن ایمیل های دریافت شده و …)، در صفحه ی Email Accounts، پایین صفحه، روی گزینه ی Access Webmail کلیک کنید یا برای ورود مستقیم به یک ایمیل (بدون ورود به سی پنل)، به آدرس webmail.yoursite.com بروید و آدرس ایمیل و رمز آن را وارد کنید .
این قسمت برای تغییر پسورد در سی پنل میباشد که با عنوان Email Accounts در قسمت Email موجود میباشد.
ابتدا وارد هاستمون داخل سایت پیشگام وب میشویم.
میتوانید از سایت پیشگام وب قسمت سرویس های من ، سرویس مورد نظر را انتخاب کرده و ورود به سی پنل را بزنید تا بصورت اتوماتیک وارد هاستتون بشید و همچنین میتوانید از لینک سایت خودتون ، البته اگر که دی ان اس های ( DNS ) پیشگام وب را درست ست کرده باشید و 24 ساعت گذشته باشد از طریق پورت 2082 و یا 2083 وارد بشید.
فقط نکته ای که هست و باید بهش توجه کنید ، اگر سایت را با http باز میکنید از پورت 2082 و اگر با https باز میکنید از 2083 استفاده کنید ، نمونه لینک در زیر مشخص شده است.
البته به این نکته توجه داشته باشید که باید جای آدرس سایت ما آدرس سایت خودتان را وارد کنید.
راه آخر جهت لاگین هم در صورتی که دی ان اس ها ( DNS ) را ست نکرده اید یا 24 ساعت از تنظیم آنها نگذشته است و دوست ندارید بطور مثال اطلاعات ناحیه کاربری رو به طراح بدید استفاده از لینک پیشفرض پیشگام وب هست که در زمان خرید هاست برای شما ارسال شده و اگر هم نتونستید پیدا کنید میتوانید تیکت بدهید تا به شما داده شود ، پایین هم میتوانید نمونه لینک رو مشاهده کنید.
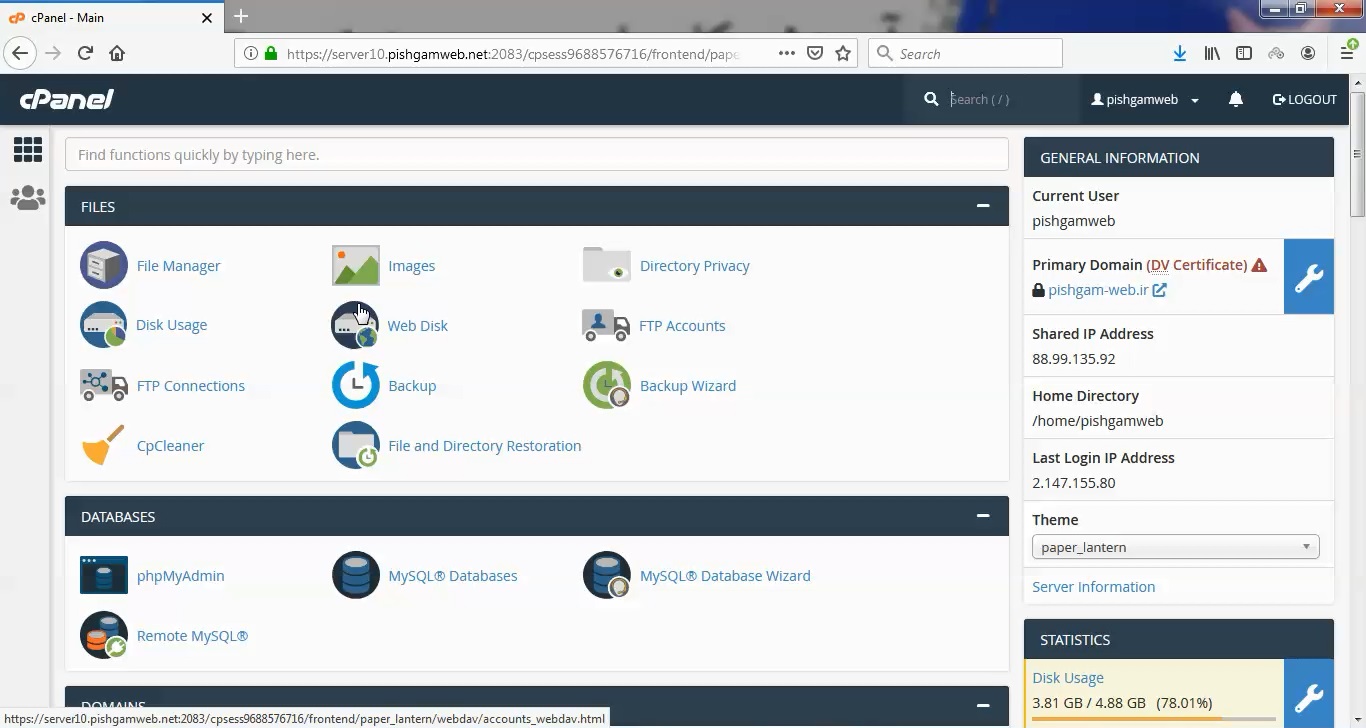
از قسمت ایمیل روی گزینه Email Accounts کلیک میکنیم.
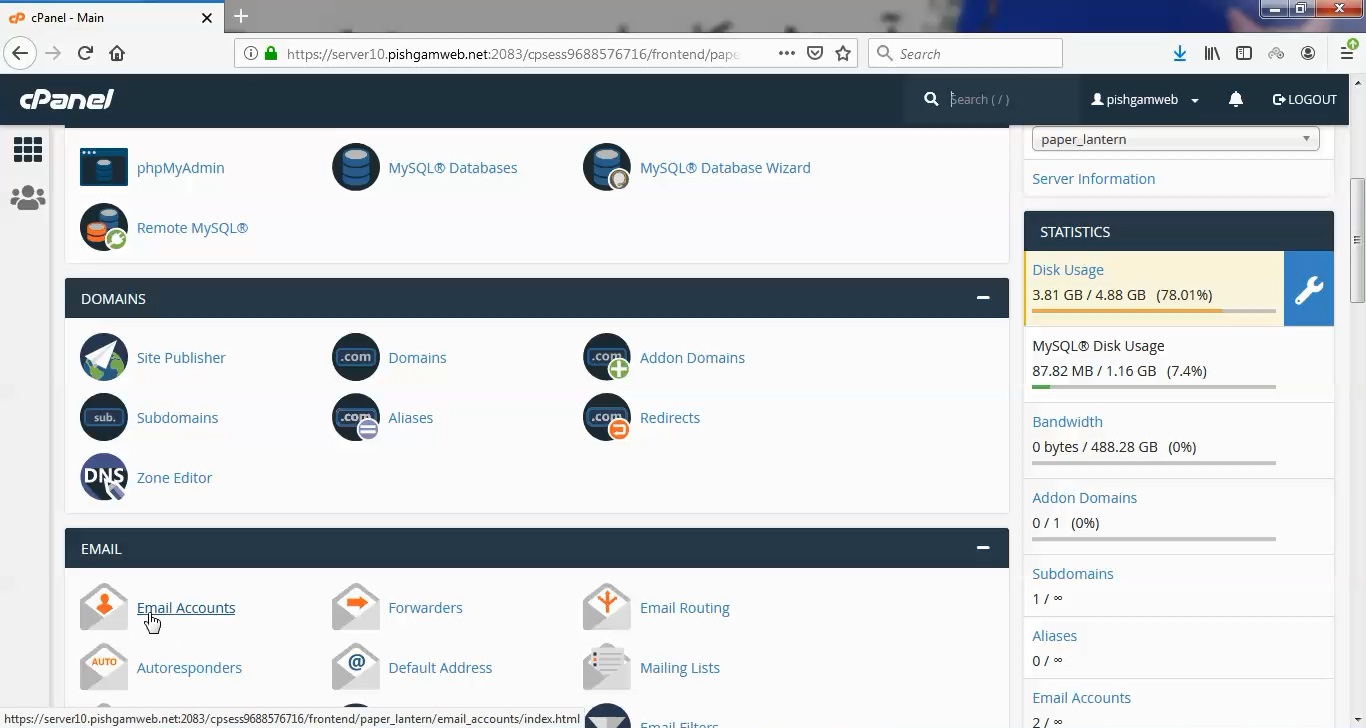
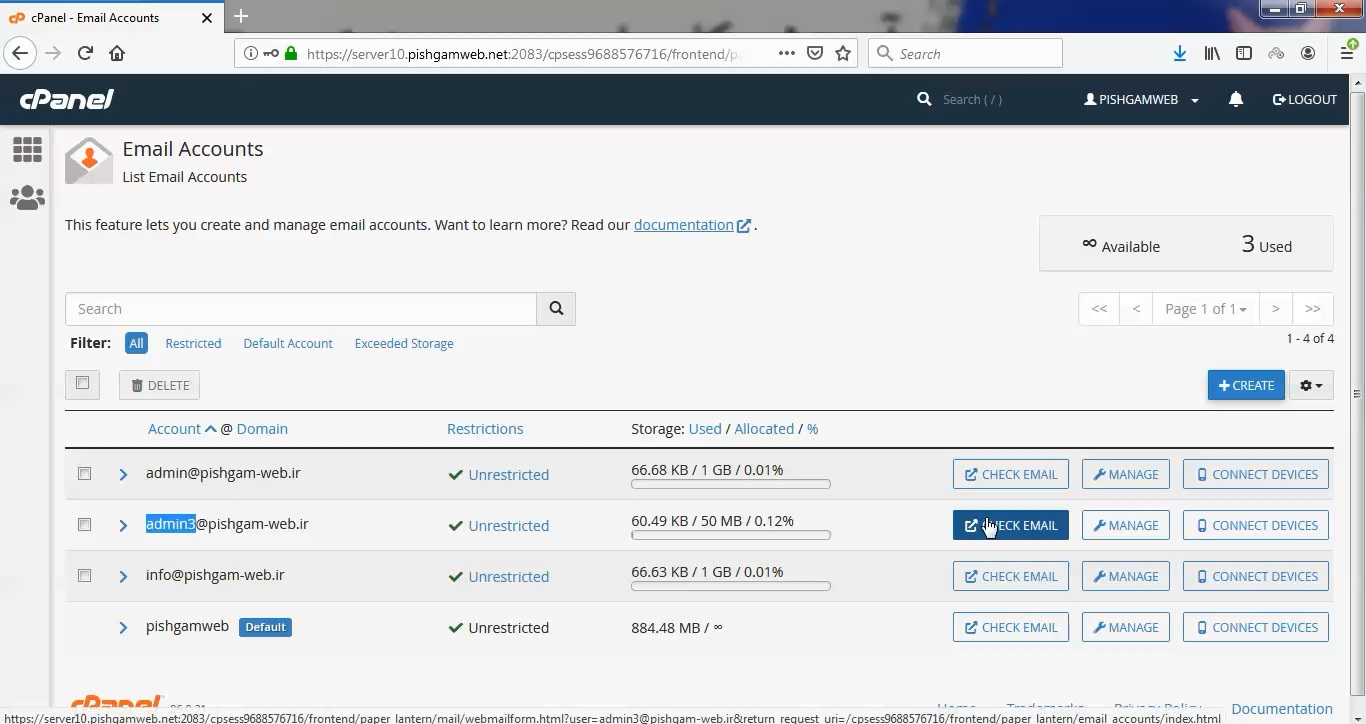
در صفحه باز شده تمامی ایمیل های ساخته شده را مشاهده میکنید که ایمیل pishgam توسط خود سی پنل ساخته شده که بصورت ابی رنگ با نام دیفالت مشخص شده است.
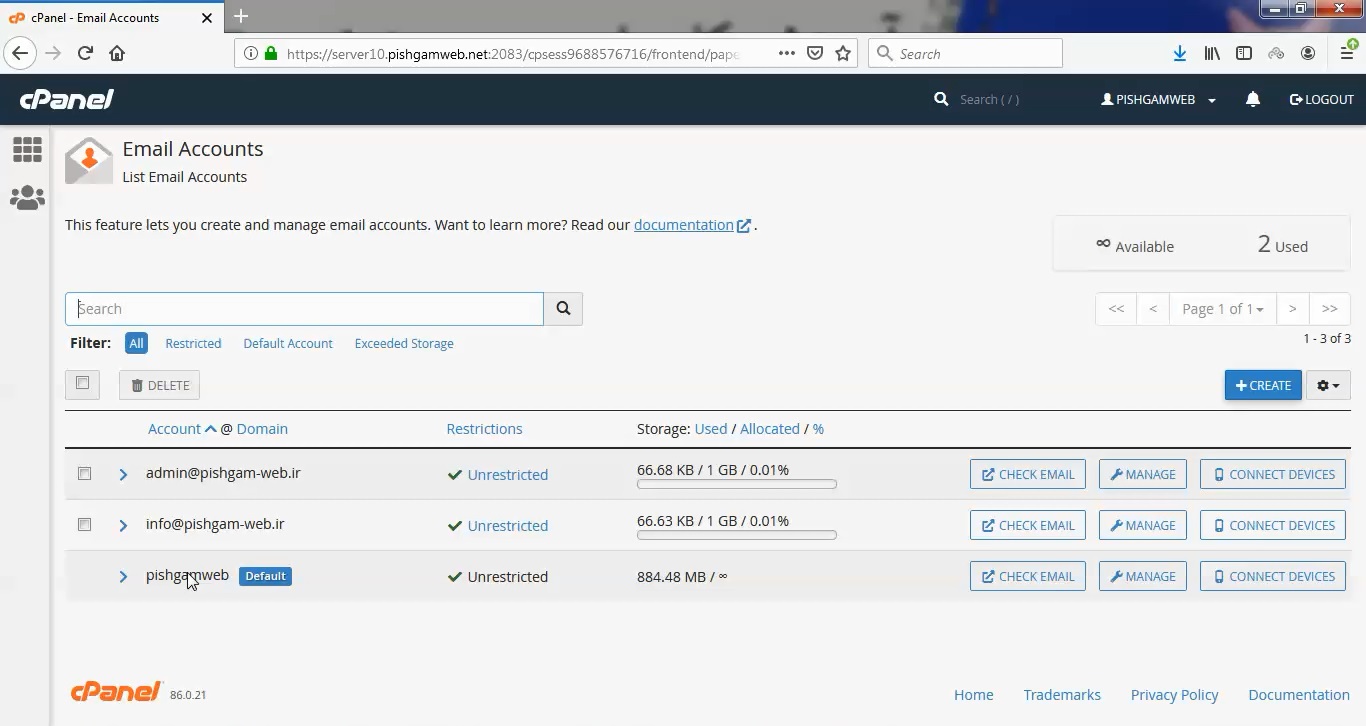
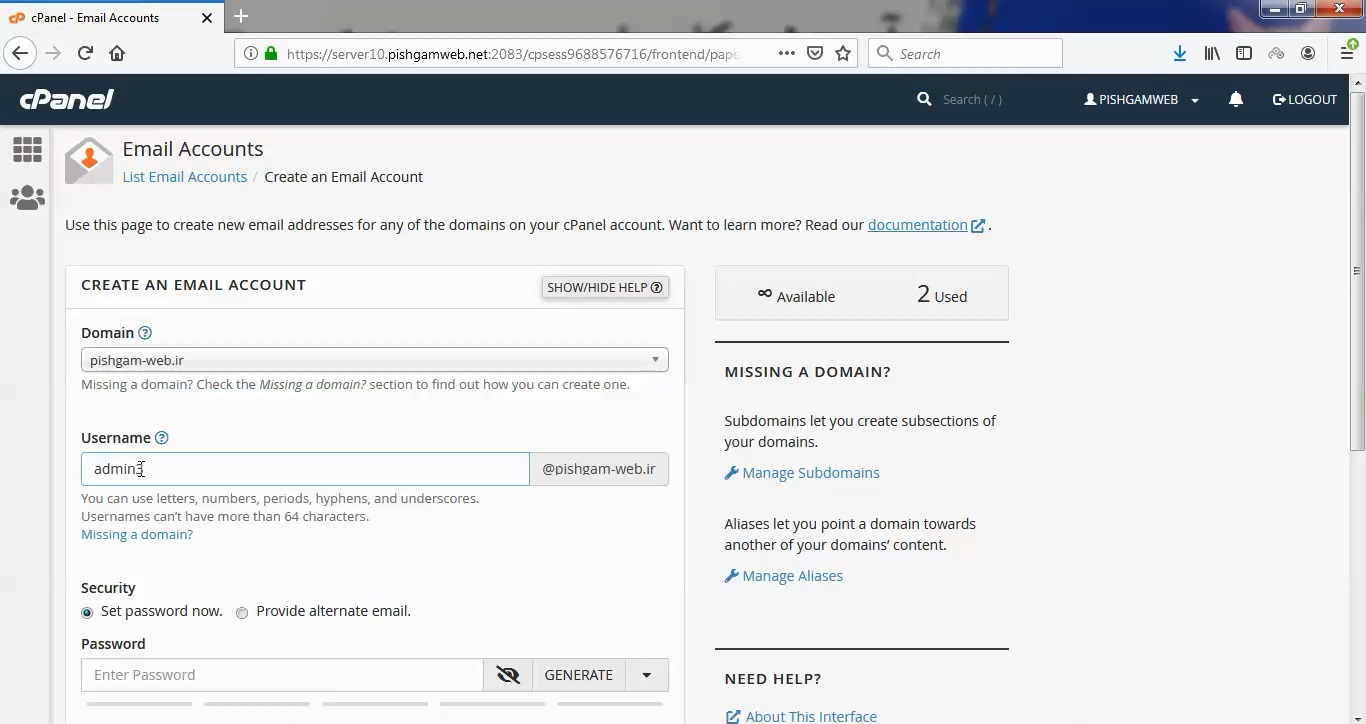
برای ساخت ایمیل جدید روی گزینه Create کلیک میکنیم.
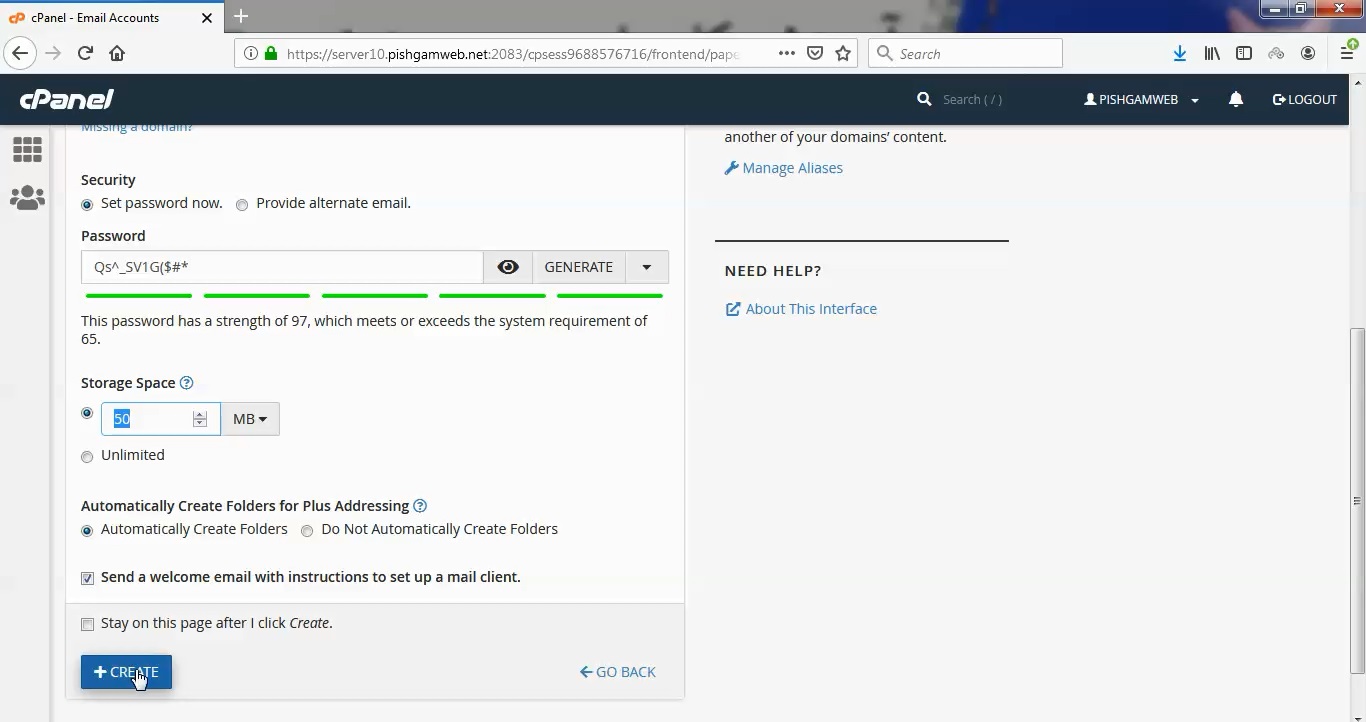
در قسمت یوزر نیم طور مثال admin3 را وارد کرده و پسورد مورد نظر را وارد میکنیم و در قسمت Storage Space فضای مد نظر برای ایمیل را مشخص میکنیم.
در انتها هم روی گزینهCreate کلیک میکنیم.
برای مشاهده وب میل همانند تصویر بالا روی گزینه روبروی وب میل با نام chack email کلیک میکنیم.
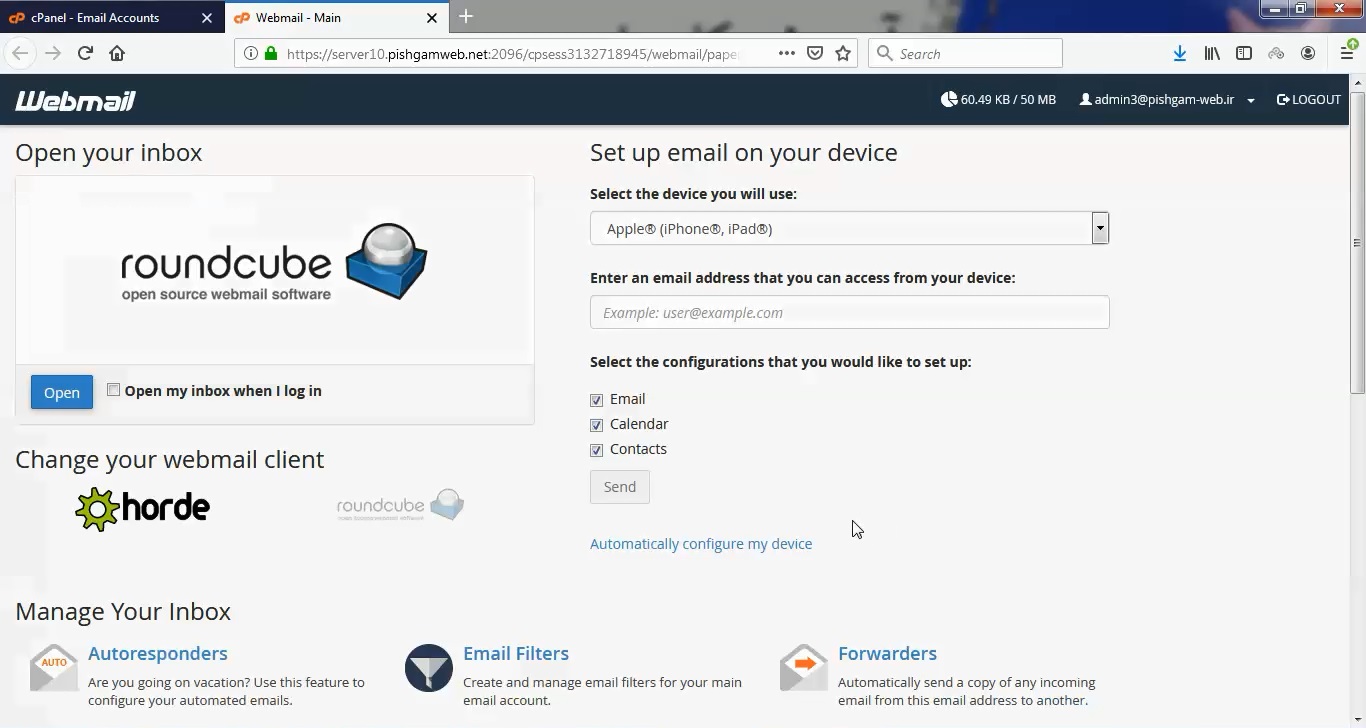
در صفحه باز شده روی گزینه roundcube کلیک میکنیم.
در قسمت inbox ایمیل های دریافتی قابل مشاهده میباشد.
در قسمت drafts ایمیل های پیشفرض قابل مشاهده میباشد.
در قسمت send ایمیل های ارسالی قابل مشاهده میباشد.
در قسمت junk ایمیل های اسپم قابل مشاهده میباشد.
در قسمت trash ایمیل هایی که قبلا حذف کرده ایم قابل مشاهده میباشد.
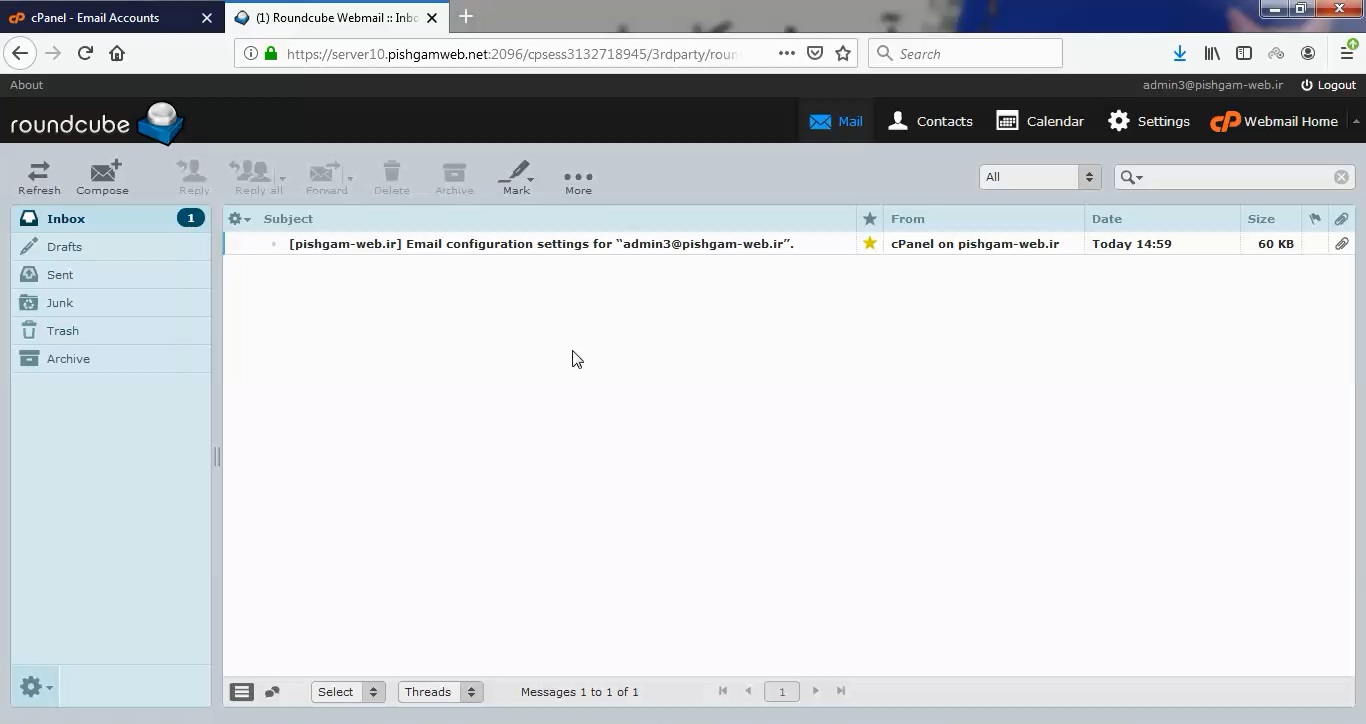
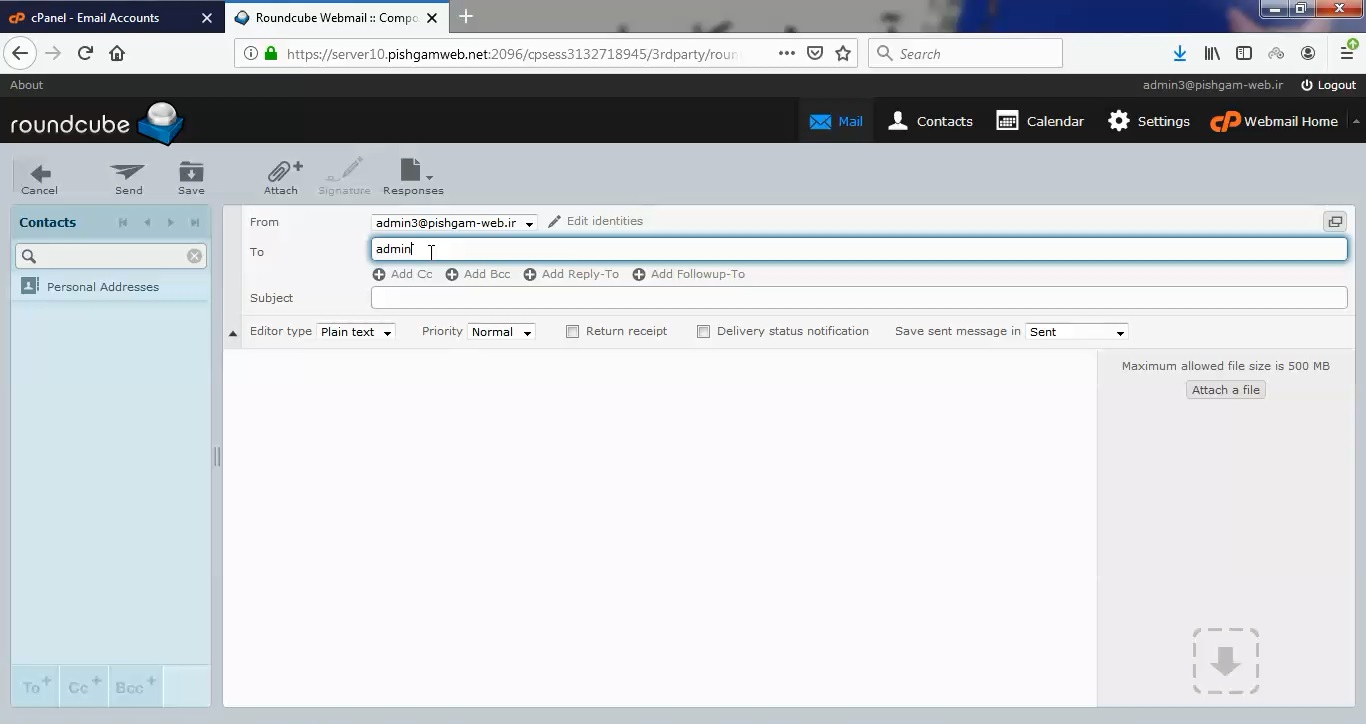
برای ارسال ایمیل روی گزینه compose کلیک میکنیم.
در قسمت to ایمیل مقصد را وارد میکنیم و در قسمت Subject موضوع پیام را مشخص میکنم و در کادر پایین تر متن و یا فایل مورد نظر را پیوست کرده و روی گزینه send کلیک میکنیم.
برای ویرایش ایمیل هایی که از قبل ساخته شده از صفحه اصلی ایمیل اکانت روی گزینه منیج کلیک کرده و مطاق تصویر بالا میتوانید موارد زیر را تغییر دهید.
تغییر پسورد
کاهش یا افزایش مقدار حافظه ایمیل مورد نظر
مسدود کردن دریافت ارسال و یا لاگین
مشاهده فیلم آموزشی از سایت آپارات
برای دانلود فیلم آموزش از قسمت تنظیمات روی گزینه دانلود کلیک کرده و کیفیت مد نظر خود را انتخاب کنید تا فیلم آموزش دانلود گردد.
نکته : هر چقدر که عدد این قسمت بیشتر باشد ، کیفیت فیلم دانلودی بالاتر خواهد بود.
آموزش های ابتدایی :
دوستان عزیز آموزش که خدمتتون ارائه کردیم از سری آموزش های ابتدایی پیشگام وب هست و این آموزش جزو پایه ای ترین آموزش های سایت هست امیدوارم که آموزشممون کامل باشه.
منتظر نظرات و پیشنهادات شما در قسمت دیدگاه های سایت هستیم.
Email Accounts from cpanel
Overview
Use this interface to add, manage, and delete email accounts.
Email Accounts statistics
In the upper-right corner of the interface, the Email Accounts statistics box displays the current number of email accounts on this cPanel account. It also displays how many accounts remain in the account’s quota.
Notes:
- The system does not include the default email account in the cPanel account’s total number of email accounts.
- If your system administrator allows customers to purchase quota increases, the interface will display a purchase link in the Email Accounts statistics box.
Create Email Account
To create a new email account, perform the following steps:
- Click Create. A new interface will appear.
- From the Domain menu, select the domain on which you wish to create the email account.Note: if the desired domain does not appear in the menu, click Manage Subdomains or Manage Aliases to check your account’s domain configuration.
- Enter a new email address in the Email text box.Note: You cannot enter
cpanelas an account name when you create an email account. - In the Security section, perform either of the following actions:
- Select Provide alternate email and enter an email address for the system to send a password configuration linkNote: The interface displays this option only if the following conditions are true:
- The account owner possesses the User Manager feature.
- The hosting provider enables the Account Invites for Subaccount in the System tab in the Tweak Settings interface on the server.
- Select Set password now. and enter a password in the Password text box.Note:
- Use a secure password. A secure password does not contain a dictionary word, and it does contains uppercase and lowercase letters, numbers, and symbols.
- Click the reveal () icon to reveal the password.
- You can click the Generate option to have the interface generate a secure password for you.
- Click the more () icon to select complexity options for the generated password.
- Some web hosts require a minimum password strength. The system evaluates the password that you enter on a scale of 100 points.
0indicates a weak password, while100indicates a very secure password.
- Select Provide alternate email and enter an email address for the system to send a password configuration linkNote: The interface displays this option only if the following conditions are true:
- In the Storage Space section, enter a custom Mailbox Quota storage size or select Unlimited to set the amount of disk space that the account may use to store email.
- To send a message with client configuration instructions to the account, select the Send welcome email with instructions to set up a mail client checkbox.Note: If you selected Provide alternate email in the Security section, the system will send the instructions to that alternate email address. Otherwise, the user can access the welcome message via Webmail.
- Select Stay on this page after I click Create to create another email account after you create this one.
- Click Go Back to cancel this action and return to the Email Accounts interface.
- Click Create to create the account and return to the Email Accounts interface.
For Hosting ProvidersContent by label
Email accounts table
This table lists all of the email accounts on your cPanel account. Use this interface to configure each email account’s settings.
- Click the gear icon () to select the number of entries per page to display or refresh the table results.
- Use the navigation options at the top of the table to search for an email account, filter the results of the table, or navigate through the pages of results.
- Select a column heading to sort the results of the table by that heading.
| Select this checkbox to mark this email account for bulk actions, such as the bulk Delete action. | |
| Click this icon to display additional information and actions available for this email account.Delete — Permanently remove the email account. After you click Delete, a confirmation message will appear. Click Delete to remove the account.Warning: This action permanently deletes all mail for the account. You cannot revert this action.To perform a bulk deletion of accounts, select the checkboxes to the left of each account that you wish to delete and click Delete at the top of the table. | |
| Account @ Domain | Click Account to sort the list alphabetically by account name.Click Domain to sort the list alphabetically by domain name. |
| Restrictions | This column contains icons that represent the account’s ability to log in, receive mail, or send mail. |
| Storage: Usage / Quota / % | Click Usage, Quota, or the percent symbol (%) to sort the list accordingly. These represent the amount, the limit, and the percentage of disk space that the account uses of its data quota. |
| Actions | For each email account, you can perform the following actions:Check Email — A new interface will appear that displays the email account in Webmail.Manage — A new interface will appear that allows you manage resources for and configure connections to this email account.Connect Devices — This feature attempts to automatically configure your email client to access your cPanel email addresses. An email client allows you to access your email account from an application on your computer or mobile device (for example, Apple® Mail). For more information about this feature, read the Connect Devices section of this document. |
Default Email Account
The system creates this unique email account when your hosting provider creates your cPanel account. The account’s username and password are identical to your cPanel account name and password.
The system uses [email protected] as the default account, where account represents your cPanel account username and domain.com represents your main domain. You cannot rename, delete, or set a quota on the default account. We recommend that you create a separate email account for daily use.
- Your hosting provider may configure this address to be a catch-all account. A catch-all account receives all of the mail sent to addresses on the domain that do not exist. This can cause the the default email address to receive a large amount of spam. To manage the behavior of incoming mail to the default address or forward it to another location, click Manage and then click Manage Default address. This will navigate you to the Default Address interface (cPanel >> Home >> Email >> Default Address).
- To, send, view, or delete mail through webmail on this account, click Check Mail and select your desired webmail application.
- To recover disk space on this address, click Manage and then click Manage Disk Usage.
The system also uses this address as the default From and Reply-to address on outgoing email that your account’s PHP scripts send.
Note:
Because of the way the maildir mailbox format calculates disk usage, a discrepancy between reported and actual disk usage may exist for the default email account. For more information about mailbox formats, read our Mailbox Conversion documentation.
System-managed Address Book
A shared address book allows you to include a system-managed address book that serves as a user directory and allows for collaboration.
Click Manage, and a new interface will appear. Select With all email accounts to share that address book with the other email accounts on this account.
UTF-8 mailboxes
This option enables or disables UTF-8-encoded mailbox names on Horde and Roundcube webmail that the system saves on the filesystem. Set the appropriate toggle to enable or disable UTF-8-encoded mailbox names for a user’s email accounts.
- On — Enable UTF-8-encoded mailbox names on Horde and Roundcube webmail.
- Off — Disable UTF-8-encoded mailbox names on Horde and Roundcube webmail.
Users can select the UTF-8-encoded mailbox name in WHM’s Email Filters interface (cPanel >> Home >> Email >> Email Filters).
Manage an Email Account
Click Manage to open a new interface that will allow you to manage and configure the corresponding email account.
Password and authentication
Use this feature to create or change the password for an account. Enter the new password in the appropriate text box.
Enter a password in the Password text box.
Note:
- Use a secure password. A secure password does not contain a dictionary word, and it does contains uppercase and lowercase letters, numbers, and symbols.
- Click the reveal () icon to reveal the password.
- You can click the Generate option to have the interface generate a secure password for you.
- Click the more () icon to select complexity options for the generated password.
- Under the Password text box, the interface will indicate the relative strength of your password.
- Some web hosts require a minimum password strength. The system evaluates the password that you enter on a scale of 100 points.
0indicates a weak password, while100indicates a very secure password.
Storage
The quota for an email account defines the amount of mail that the account can store.
When the account exceeds this limit, the system returns any incoming mail to the sender with a message that states that the recipient’s mailbox is full. The system administrator can change this behavior in WHM’s Exim Configuration Manager interface (WHM >> Home >> Service Configuration >> Exim Configuration Manager).
Under Current Storage Use, the interface displays the amount of space that the email account currently uses.
In the Allocated Storage Space section, enter a custom Mailbox Quota storage size or select Unlimited to set the amount of disk space that the account may use to store email.
Notes:
- Make certain that you track your quota usage. A mailbox with a full quota cannot receive mail.
- The quota calculation does not include your mailbox’s trash folder.
- Due to mail server constraints, you cannot assign quotas greater than 4096 TB (4 PB). You must assign the Unlimited value for quotas that exceed this amount.
- If the Maximum option appears instead of the Unlimited option, your hosting provider does not allow unlimited email quotas.
- You cannot assign custom quotas that exceed the Maximum value.
- The system calculates mailbox quota use every four hours. For this reason, you may not receive notifications immediately if an email account reaches or exceeds its quota.
- You can select different file sizes, for example MB, GB, TB, and PB.
- Only enter whole numbers.
Restrictions
Use this feature to allow or suspend a user’s ability to log in, receive mail, or send mail. You can also hold outgoing mail.
Select Allow, Suspend, or Hold for the applicable setting.
Notes:
- When you suspend an email account, the system also suspends any aliases or forwarders that redirect email to the account.
- When you select Suspend for the Sending Outgoing Email option, the server will reject any outgoing messages for the account.
- When you select Hold for the Sending Outgoing Email option, the system will retain all outgoing messages in a queue.
- When you change the Sending Outgoing Email option from Hold to Allow, the server will deliver all queued messages.
Delete Email Account
Use this feature to permanently remove the email account. After you click Delete Email Account, a confirmation message will appear. Click Delete to remove the account.
Save or cancel your changes
At the bottom of the interface, you can perform the following actions:
- Select Stay on this page after I click Update Email Settings to remain on this interface after you update the account.
- Click Go Back to cancel this action and return to the Email Accounts interface.
- Click Update Email Settings to update the account and return to the Email Accounts interface.
Additional features and services
In the I Want To of the interface, you can configure the following features and services for this email account:
- Click Free up Email Storage to open the Email Disk Usage interface (cPanel >> Home >> Email >> Email Disk Usage). This interface allows you to view all of your mailboxes and remove old or large messages.
- Click Manage Email Filters to open the Email Filters interface (cPanel >> Home >> Email >> Email Filters). This interface allows you to create rules to filter the email that arrives in the account.
- Click Send Automated Responses to open the Autoresponders interface (cPanel >> Home >> Email >> Autoresponders). This feature allows you to configure automatic email response messages. This is useful, for example, when the recipient is unavailable.
Manage External Authentication
External authentication allows users to access cPanel with external authentication credentials. Under the Authentication section, click Manage External Authentication to open a new interface which allows you to configure these credentials. For more information, read our Password and Security documentation.
Connect Devices
This feature attempts to automatically configure your email client to access your cPanel email addresses. An email client allows you to access your email account from an application on your computer or mobile device (for example, Apple® Mail).
To access this feature, click Connect Devices under the Configure section. A new interface will appear.
Notes:
- An email client must already exist on your computer or mobile device for you to automatically configure it with cPanel.
- You must manually configure email clients that the interface does not list. For more information on how to manually configure an email client, review that client’s documentation on the client’s website.
To configure your mail client, perform the following steps:
- Select and download the appropriate configuration file from the list.Note: We strongly recommend that you use SSL/TLS.
- Run the script file to automatically configure your email client to use the selected address.
When the configuration process finishes, your email client will automatically open and log in to your email account.
Mail Client Manual Settings
You may need to manually configure your mail client. Enter mail.domain.com for the name of the server, where domain.com represents your domain.
Email Instructions
To send a mail account’s client configuration instructions to a different email address, enter the address in the Email Instructions text box and then click Send.
Configure Calendars and Contacts
Use this feature to access your calendars and contacts on your personal devices. A new interface will appear.
Note:
This option only appears if your hosting provider enables the Calendars and Contacts feature for your account.
