آموزش کار با Leech Protection در cpanel

دوستان عزیز پیشگام وبی امیدوارم که حالتون خوب باشه ، امروز با آموزش کار با Leech Protection در cpanel خدمتتون هستیم و امیدوارم توضیحاتی که در این مطلب و یا در انتها مطلب که بصورت فیلم قرارداده شده بتونه به شما کمک کنه و هر روز بیشتر پیشرفت کنید.
خوب اصلا این قسمت به چه دردی میخوره کجا بهش نیاز داریم و در کل کاربردش چی هست؟
این قسمت برای تغییر پسورد در سی پنل میباشد که با عنوان Leech Protection در قسمت Security موجود میباشد.
ابتدا وارد هاستمون داخل سایت پیشگام وب میشیم.
میتوانیم از سرویس های من ورود به سی پنل رو میزنید تا بصورت اتوماتیک وارد هاستمون بشیم.
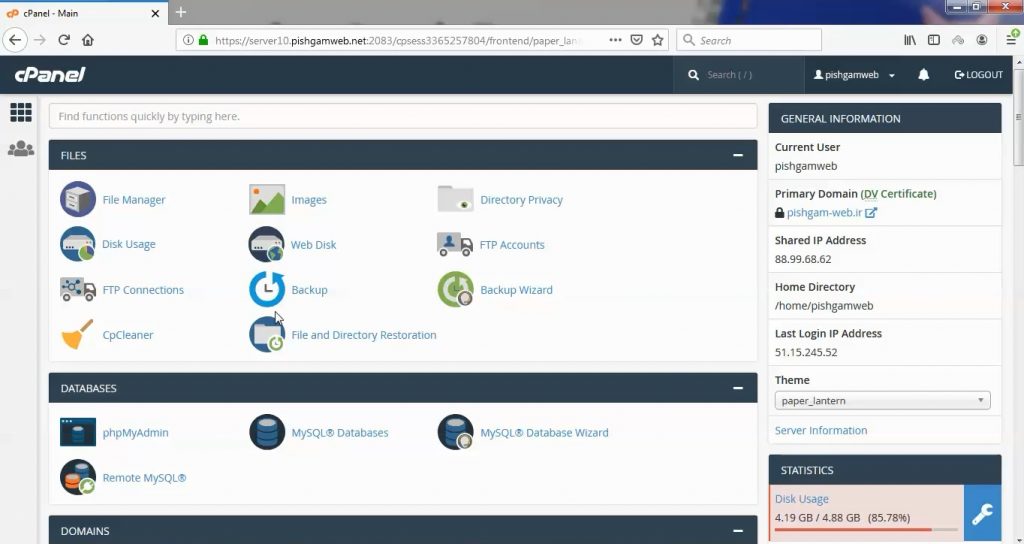
leech protection یکی دیگر از ویژگی هاییست که سی پنل برای امنیت بیشتر به کاربران هاست اشتراکی ارائه کرده است. leech protection به کاربران هاست این امکان را می دهد که فعالیت های غیر معمول و مشکوک در رابطه با رمز های دایرکتوری ها را محدود تر نمایند. leech protection به راحتی تعداد دفعات لاگین به فولدر های هاست را در عرض دو ساعت محدود میکند. برای مثال در صورتی که بیشترین تعداد لاگین در ۲ ساعت را برابر ۴ قرار دهید کاربر در بار پنجم یا به صفحه دیگری ریدایرکت خواهد شد و یا با ارور internal server error مواجه خواهد گردید.
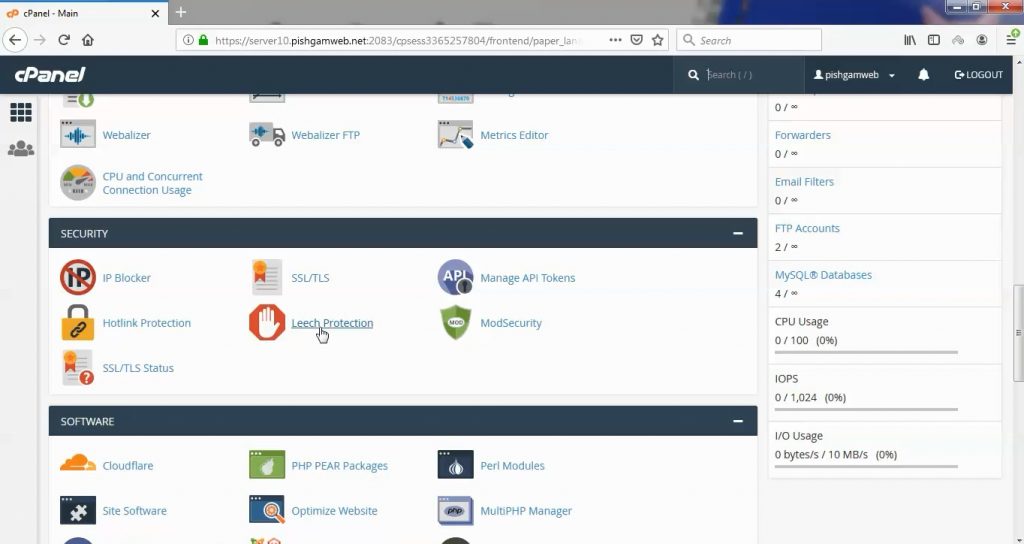
در سی پنل به قسمت Security رفته و روی گزینه Leech Protection کلیک کنید.
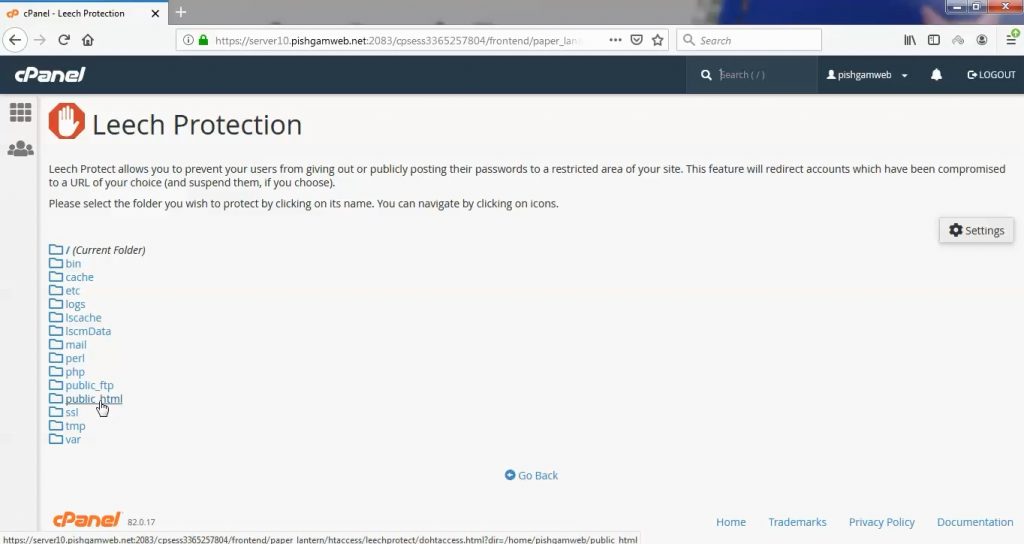
در صفحه باز شده پوشه ای که قصد ایجاد محدودیت را داریم انتخاب میکنیم.
بطور مثال ما پابلیک اچ تی ام ال را انتخاب کردیم.
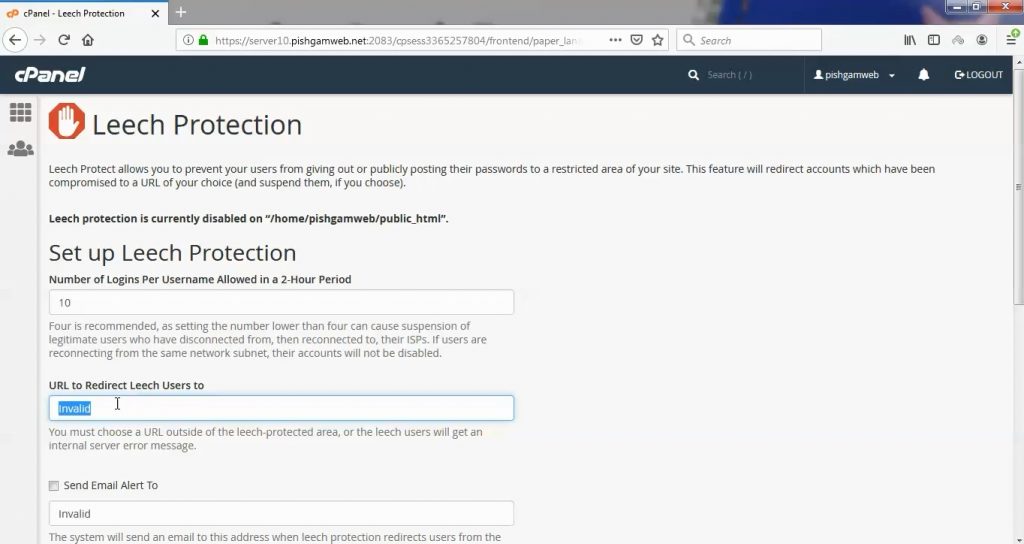
در قسمت Number of Logins Per Username Allowed in a 2-Hour Period تعداد دفعاتی که یک یوزر میتواند در ساعت پسورد اشتباه وارد کند را وارد کنید.
Four is recommended, as setting the number lower than four can cause suspension of legitimate users who have disconnected from, then reconnected to, their ISPs. If users are reconnecting from the same network subnet, their accounts will not be disabled.
در قسمت URL to Redirect Leech Users to لینکی که میخواهید پس از بلاک شدن کاربر به آن هدایت شود را مشخص کنید.
You must choose a URL outside of the leech-protected area, or the leech users will get an internal server error message.
در صورتی که میخواهید ایمیل هشدار دریافت کنید تیک گزینه Send Email Alert To را بزنید و در کادر پایین آن ایمیل خود را وارد کنید.
The system will send an email to this address when leech protection redirects users from the site. NOTE: If you do not disable leech accounts, you may receive a large number of these emails.
اگر گزینه Disable Compromised Accounts را فعال کنید ، برای امنیت بیشتر اکانت ساسپند میشود.
cPanel will disable the passwords of users who trigger leech protection, suspending them. To reactivate their accounts, reset their passwords.
در انتها هم برای فعال شدن روی گزینه enable کلیک کنید و هر زمان نیاز به غیر فعال سازی بود روی گزینه disable کلیک کنید.
مشاهده فیلم آموزشی از وب سایت آپارات
برای دانلود فیلم آموزش از قسمت تنظیمات روی گزینه دانلود کلیک کرده و کیفیت مد نظر خود را انتخاب کنید تا فیلم آموزش دانلود گردد.
نکته : هر چقدر که عدد این قسمت بیشتر باشد ، کیفیت فیلم دانلودی بالاتر خواهد بود.
آموزش های حرفه ای :
دوستان عزیز به انتهای این آموزش رسیدیم و این آموزش که خدمتتون هست از سری آموزش های حرفه ای پیشگام وب هست و یواش یواش اگر آموزش ها رو کامل فرا گرفته باشید میتوانید خودتون رو یک طراح سایت بدونید و ما از این بابت خیلی خوشحال هستیم و امیدواریم همیشه شاد و سر زنده باشید.
learn in cpanel
Overview
The Leech Protection interface allows you to detect unusual levels of activity in password-restricted directories. After you set the maximum number of logins within a two-hour period, the system redirects or suspends users who exceed it. This is useful if, for example, someone posts a user’s login credentials on a public site.
Enable leech protection
To enable leech protection for a directory, perform the following steps:
-
Click Settings, and then select one of the following locations in which to begin navigation:
-
Web Root (public_html or www) — Begin navigation in the document root for the account’s primary domain.
-
Document Root for — Select the domain that corresponds to the document root in which you wish to begin navigation.
-
To configure the interface to always open your selection from Step 1, select the Always open this directory in the future checkbox.
-
-
Click Save Changes.
-
Navigate to the directory that you wish to protect.
-
Click the appropriate folder icon (
) to navigate to a different folder.
-
Click the desired folder’s name to select it. A new interface will appear.
-
-
Enter the maximum number of logins that you wish to allow each user within a two-hour period.
-
To redirect users who exceed the maximum number of logins within a two-hour period, enter a URL to which you wish to redirect them.
-
To configure the system to send an email alert when Leech Protection activates, select the Send Email Alert To checkbox. Then, enter the email address to alert.
-
To disable an account that exceeds the maximum number of logins, select the Disable Compromised Accounts checkbox.
-
Click Enable.
Manage users
To add, edit, and delete users, perform the following steps:
-
Navigate to a directory that you wish to protect with user-level protection.
-
Click the appropriate folder icon (
) to navigate to a different folder.
-
Click the desired folder’s name to select it. A new interface will appear.
-
-
Click Manage Users to navigate to cPanel’s Directory Privacy interface for that folder (cPanel >> Home >> Security >> Directory Privacy).
/home/USERNAME/.htpasswds/public_html/passwd file, where USERNAME represents the account name.Disable leech protection
To disable leech protection, perform the following steps:
-
Navigate to the directory for which you wish to disable leech protection.
-
Click the appropriate folder icon (
) to navigate to a different folder.
-
Click the desired folder’s name to select it.
-
-
Click Disable.

 ) to navigate to a different folder.